Sinch Elastic SIP Trunking can easily integrate with Contact Pro. Follow this guide to learn how!
Before you begin setting up your Sinch Elastic SIP trunk make sure you have done the following:
- Sign up for a free account at https://www.sinch.com/ and request access for Elastic SIP Trunking. Need help? Click here for instructions.
- If you have not already done so, configure and create your Elastic SIP trunk. Instructions on how to do this can be found here.
- Ensure you note the fully qualified domain name (FQDN) that was created on your SIP Trunk. You will need this while setting up your IP-PBX or SIP Application.
First you will need your Contact Pro Tenant name. It is in the logon URLs initially provided in the tenant ready notification message.
The URL is formed in either of the two following ways:
https://login-eu-c1.cc.sinch.com/<tenantname>/...https://cc-<tenantname>.cc.sinch.com/...The tenant name starts in most cases with the letter c followed by the number 1, 2, 3 or 4 as in the examples below:
https://login-eu-c1.cc.sinch.com/c1sampl012345/...https://cc-c1sampl012345.cc.sinch.com/...
Create a new endpoint under the SIP Trunk you created while following these new setup instructions here.
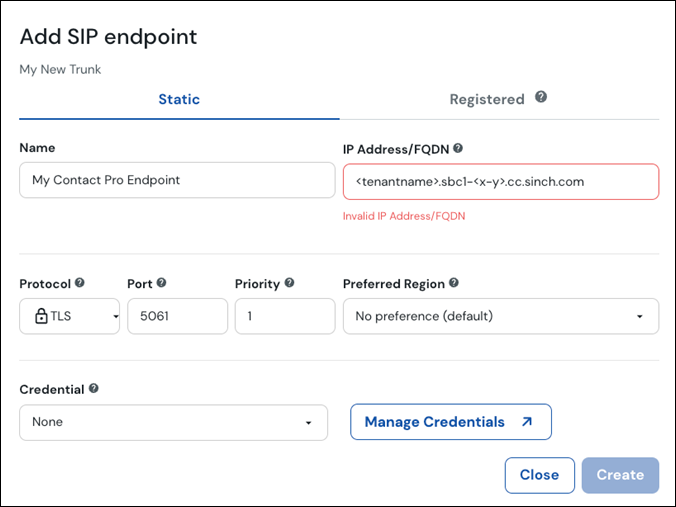
i. Replace
<tenantname>with your tenant name. This is found within your tenant ready notification message.ii. Depending on your Contact Pro Region, replace
<x-y>with:Region Value AU (Sydney) au-s2 AF (Cape Town) af-s1 EU (Frankfurt) eu-c1 NA (Oregon) na-w2 Once done, select Save.
Next, create an Access Control List on your EST trunk and white-list the IP address for your region.
Region IP Address Africa 13.245.226.208/32 Australia 54.252.162.33/32 Europe 3.121.49.38/32 North America 44.232.80.9/32 Finally request the Contact Pro team to connect to your Sinch Elastic SIP trunk.
Create a service request at https://support.sinch.com.
Include the following information in the service request:
- The tenant name
- The service you wish to connect - “Sinch Elastic SIP Trunking”
- The SIP FQDN of your SIP Trunk
They will provide you with the rest of the setup details include the IPs that you will need to whitelist on your Sinch Elastic SIP Trunk.
Now your Elastic SIP trunk should be operational and ready for traffic. Assign a number to your trunk and give it a try!

