Sinch Elastic SIP Trunking can easily integrate with VitalPBX. Follow this guide to learn how!
Before you begin setting up your Sinch Elastic SIP trunk make sure you have done the following:
- Sign up for a free account at https://www.sinch.com/ and request access for Elastic SIP Trunking. Need help? Click here for instructions.
- If you have not already done so, configure and create your Elastic SIP trunk. Instructions on how to do this can be found here.
- Ensure you note the fully qualified domain name (FQDN) that was created on your SIP Trunk. You will need this while setting up your IP-PBX or SIP Application.
Log into your VitalPBX with Admin privileges and navigate to PBX | External | Trunks. This will automatically default to the creation of a new Trunk.
Add a description of your trunk which will be used for internal reference in the PBX. Change your profile to Default PJSIP Profile.

Add "ulaw" to the Codecs section. Click the Codecs text box to open the window to add codecs. Drag "ulaw" from the left-hand box over into the right-hand box and click Accept.

Scroll down to the General Configurations section and enter the following required information:
Property name Required value Local Username The friendly name of your trunk (for example, "mycallcenter") Remote Host Enter the FQDN you created when configuring your SIP Trunk. Match Enter the FQDN you created when configuring your SIP Trunk. Require Registration Set this to No. 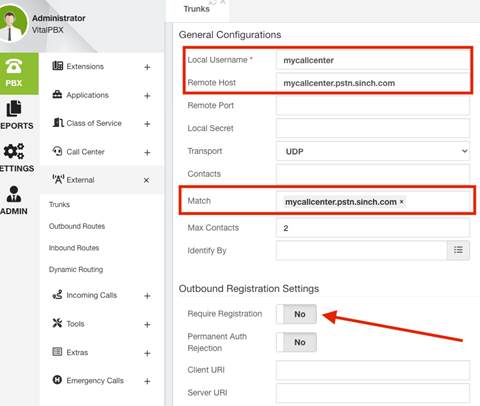
Save your configuration and now your Elastic SIP trunk should be operational and ready for traffic. Assign a number to your trunk and give it a try!

