Sinch Elastic SIP Trunking can easily integrate with Vodia PBX. Follow this guide to learn how!
Before you begin setting up your Sinch Elastic SIP trunk make sure you have done the following:
- Sign up for a free account at https://www.sinch.com/ and request access for Elastic SIP Trunking. Need help? Click here for instructions.
- If you have not already done so, configure and create your Elastic SIP trunk. Instructions on how to do this can be found here.
- Ensure you note the fully qualified domain name (FQDN) that was created on your SIP Trunk. You will need this while setting up your IP-PBX or SIP Application.
Log into your Vodia PBX with Admin privileges and navigate to Domains | List and select your domain. For this setup we will be using the default
localhostdomain.
Once the
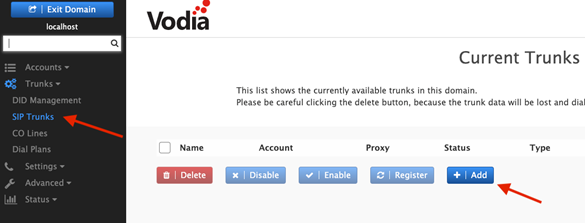
localhostdomain is selected, the main setup menu for provisioning SIP Trunks is displayed. Select Trunks | SIP Trunks from the navigation menu on the left side of the window, and then click Add.
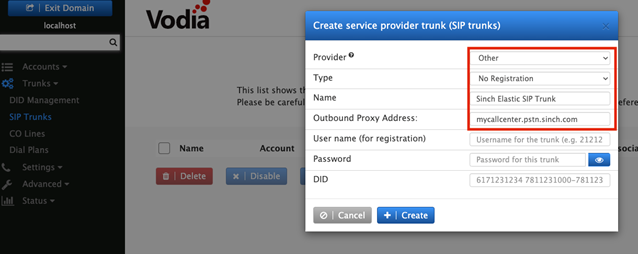
The new Trunk wizard is displayed.

Select Other from the drop-down list, and enter the values in the form as demonstrated by the following table:
Property name Required value Type Set to No Registration Name The friendly name you would like to call your SIP Trunk. Outbound Proxy Address Enter the FQDN you created when configuring your Sinch SIP Trunk. Once finished, click Create.
Navigate to the SIP Trunk you just created and scroll down to the Registrations section. While this trunk is not using Registration, there are some setup items which must completed:
Property name Property value Domain Enter the FQDN you created when configuring your Sinch SIP Trunk. Proxy Address Ensure this address is formatted to include :5060at the end of the URL.
Save your configuration and now your Elastic SIP trunk should be operational and ready for traffic. Assign a number to your trunk and give it a try!