Verify users with Swift.
The Sinch Verification iOS SDK is available for Swift.
import SinchVerification;

do {

    let input = "<user input>"

    // Get user's current region by carrier info
    let defaultRegion = DeviceRegion.currentCountryCode()

    let phoneNumber = try PhoneNumberUtil().parse(input, defaultRegion:defaultRegion)
    let phoneNumberE164 = PhoneNumberUtil().format(phoneNumber, format: PhoneNumberFormat.E164)

    let verification = SMSVerification(applicationKey:"<APP KEY>", phoneNumber: phoneNumberInE164)

    verification.initiate { (result: InitiationResult, error: NSError?) -> Void in
        // handle outcome
    }

    let code = "<user input code from SMS>"

    verification.verify(code, completion: { (success: Bool, error:NSError?) -> Void in
        // handle outcome
    })

} catch let error as PhoneNumberParseError {
    // Handle phone number parsing error, i.e. invalid user input.
}If you are using CocoaPods, add the following to your Podfile:
platform :ios, '8.0'

target '<your target>' do
    use_frameworks!
    pod 'SinchVerification-Swift'
endThe directive useframeworks! is necessary to make cocoapods add the framework to '_Embedded Binaries'.
If you integrate the Sinch SDK via CocoaPods, you must not check the option "Include bitcode" when uploading the application binary. The reason is because of a bug in CocoaPods. In the upload dialog in Xcode Organizer it should look something like this: 
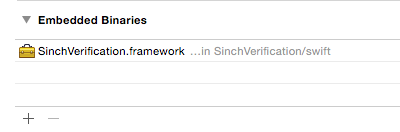
In the Sinch Verification SDK package (SinchVerification-iOS-{VERSION}.tar) there is a SinchVerification.framework bundle in the directory named
swift:
Add it to the Xcode target build settings section Embedded Binaries (under General):
In the Xcode target build settings, verify that the setting Runpath Search Paths is set to
@executable_path/Frameworks.
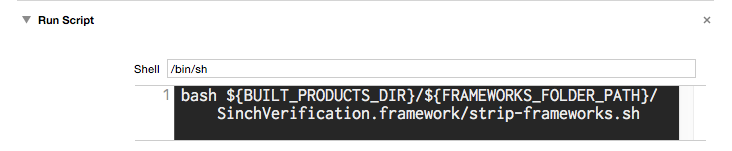
Setup to run
strip-frameworks.shas a "Run Script Phase" Create a new "Run Script Phase" in your application target's "Build Phases" and paste the following snippet:bash ${BUILT_PRODUCTS_DIR}/${FRAMEWORKS_FOLDER_PATH}/SinchVerification.framework/strip-frameworks.sh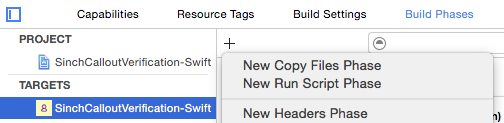
(This step is required to work around an App Store / iTunes Connect bug)
Make sure that libc++, libz and libicucore are linked (See here)

That's it! Now the SDK can be imported as follows (from any of your .swift files)
import SinchVerificationThis import method requires iOS Deployment Target iOS 8.0 or above.
"images/0f8e419-swift-run-script-contents.png",
"swift-run-script-contents.png",
732,
151,
"#cecece"
]
}

]
}
(This step is required to work around an App Store / iTunes Connect bug)
Make sure that libc++, libz and libicucore are linked (See here)
That's it!
Now the SDK can be imported as follows (from any of your .swift files).
import SinchVerificationThis import method requires iOS Deployment Target iOS 8.0 or above.

