Now that you know how to call yourself using the Voice API, learn how to handle incoming calls. Sinch has a Voice SDK for .NET that makes using the Voice API with the .NET framework quick and clean.
Before you can get started, you need the following already set up:
- Set all Voice API configuration settings.
- ASP.NET Core 7.0 or later SDK and ASP.NET Core Runtime and a familiarity with how to create an app.
- ngrok and a familiarity with how to start a network tunnel. You can use any method you want to make your server accessible over the internet, but we like ngrok and it's what we'll use in this guide.
- A mobile handset that can make phone calls.
Create a new project folder and open a command prompt to that location. Execute the following command to create a new .NET MVC application:
dotnet new mvcThis creates a new MVC application and project.
The easiest way to install the SDK is using the dotnet CLI:
- Open a command prompt or terminal to the local repository folder.
- Execute the following command:
dotnet add package Sinch
In your project folder, open the Program.cs file and replace everything in the file with the following code:
using Sinch;

var builder = WebApplication.CreateBuilder(args);

builder.Logging.ClearProviders();
builder.Logging.AddConsole();

// Add services to the container.

builder.Services.AddControllers();
builder.Services.AddEndpointsApiExplorer();

builder.Services.AddSingleton<ISinchClient>(_ => new SinchClient(
    builder.Configuration["YOUR_project_id"],
    builder.Configuration["YOUR_access_key"]!,
    builder.Configuration["YOUR_access_secret"]!,
    options =>
    {
        options.LoggerFactory = LoggerFactory.Create(config => { config.AddConsole(); });
        options.HttpClient = new HttpClient();
    }));

var app = builder.Build();

app.UseHttpsRedirection();

app.UseAuthorization();

app.MapControllers();

app.Run();
Next, create a new file in the Controllers folder called IncomingCallController.cs and paste the provided "IncomingCallController.cs" code into the file.
This code handles all of the routing for the incoming callback as well as creating the response that controls the call.
// This file is used to handle incoming calls using the Voice API and the .NET SDK.
using Microsoft.AspNetCore.Mvc;
using Sinch;
using Sinch.Voice.Calls.Actions;
using Sinch.Voice.Calls.Instructions;
using Sinch.Voice.Hooks;

namespace WebApiExamples.Controllers
{
    [ApiController]
    [Route("voice")]
    public class HandleIncomingIceEventController : ControllerBase
    {
        private readonly ISinchClient _sinchClient;

        public HandleIncomingIceEventController(ISinchClient sinchClient)
        {
            _sinchClient = sinchClient;
        }

        [HttpPost]
        [Route("ice-event")]
        public IActionResult HandleEvent([FromBody] IncomingCallEvent incomingCallEvent)
        {
            if (incomingCallEvent.Event == EventType.IncomingCallEvent) {
                var response = new CallEventResponse()
                {
                    Action = new Hangup(),
                    Instructions = new List<IInstruction>()
                    {
                        new Say()
                        {
                            Text = "Thank you for calling Sinch! This call will now end.",
                            Locale = "en-US"
                        }
                    }
                };
                return Ok(response);
            }
            else {
                return Ok();
            }
        }
    }
}You can start your webserver by running the following command:
dotnet runAt this point you need to start your ngrok tunnel so that the Sinch servers can access the webserver running on your local machine. Run the following command to start your tunnel:
ngrok http [YOUR_SERVER_PORT]Replace [YOUR_SERVER_PORT] with whatever port on which your server is listening. This starts a tunnel to your webserver.
Copy the http ngrok URL and add "/voice/webhook" to the end of it. Navigate to your app on your dashboard. Under the Settings section, you'll see a field labeled "Callback URL." Paste your ngrok URL into that field and click Save.
Now your server is listening and your callback URL is configured, so you're almost ready to test everything and make a phone call. But before we do, let's take a closer look at callbacks. If you already know about callbacks, skip right to calling your Sinch phone number.
Callbacks (also known as "webhooks") are the method that the Voice API uses to figure out what you want to do with a call. Basically, a callback is a request that the Sinch servers send to your server whenever something happens (otherwise known as an "event") in the call that requires some input from you. There are a few different types of events, but the two we are concerned about for this guide are the Incoming Call Event and the Disconnected Call Event.
An Incoming Call Event (or ICE) happens whenever someone calls one of your Sinch numbers. In essence, someone dials your number and so Sinch servers reach out to you and say "how do you want me to handle this call?"
Most callback events expect a response, depending on the event. The Incoming Call Event expects to receive back a SVAML object in response. You can read more about SVAML here, but just know that SVAML is a markup language Sinch developed to control calls.
The below diagram demonstrates exactly what's happening:
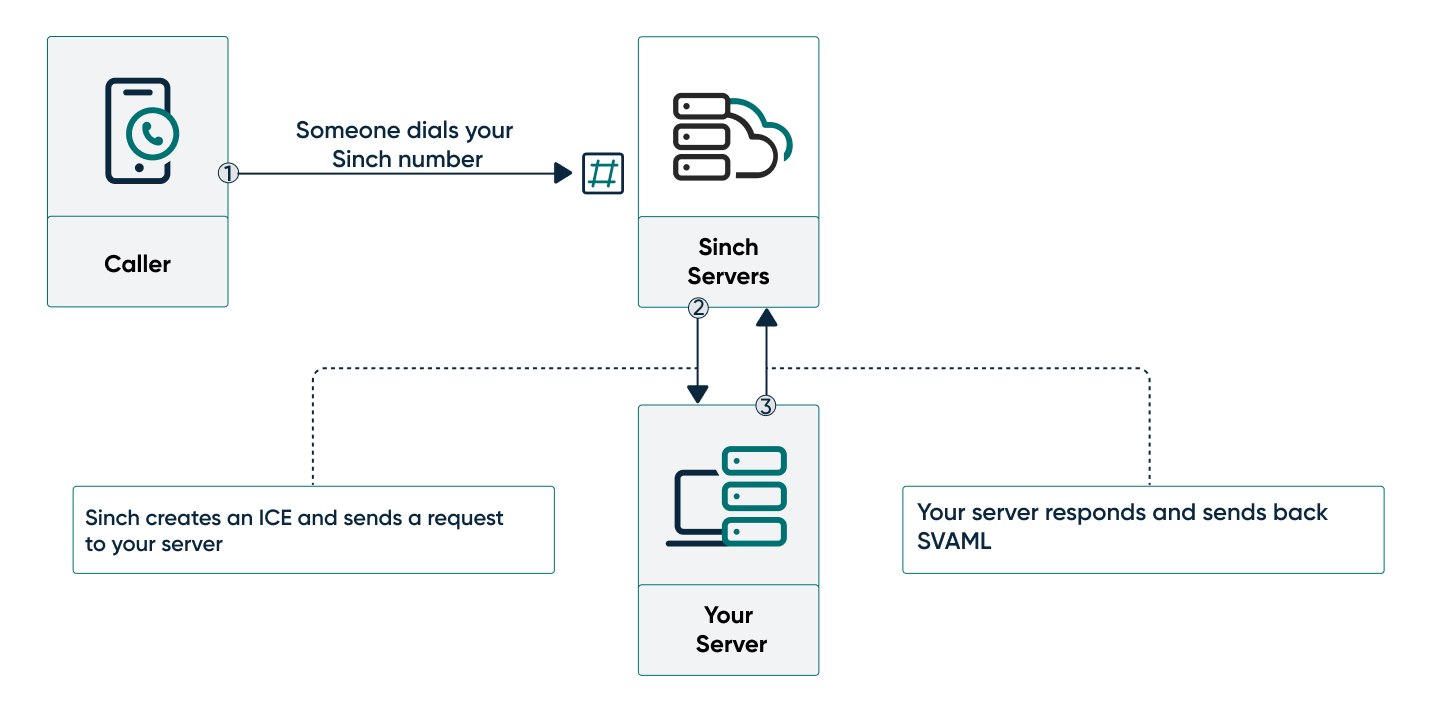
- Someone dials your Sinch number from a handset.
- The Sinch servers create an ICE and send a POST request to your server.
- Your server listens for the request and sends back a SVAML response to tell the Sinch server how to handle the call.
In this sample application, this is the SVAML object that you will use to respond to the callback (we've also provided the underlying JSON SVAML object for comparison):
var response = new CallEventResponse()
    {
        Action = new Hangup(),
        Instructions = new List<IInstruction>()
        {
            new Say()
            {
                Text = "Thank you for calling Sinch! This call will now end.",
                Locale = "en-US"
            }
        }
    };
This code creates a response that plays a Say instruction to read out a string of text and then hangs up the call to end it.
And that's it! Now we can test.
Look up the free Sinch number assigned to your app and call it using your phone. The call should be picked up by the Sinch servers and you should hear the text from the instruction. Now you know how to handle an incoming call.

