Migrating to FCM v1 endpoint
Sinch currently requests FCM push notifications using the FCM legacy endpoint, which is deprecated and will reach End of Life in June 2024 (see Firebase FAQ). To continue using FCM, your Sinch application must be migrated to use the FCM v1 API instead, which is the current supported method from Firebase/Google.
If you want Sinch to keep sending FCM push notifications to your Android devices after June 2024, you must follow this migration guide. If you don't, Sinch won't be able to request FCM push messages on your behalf.
Overview
The new FCM endpoint requires a different type of credentials ("short-lived access tokens", more details in next section), and Sinch has to adjust its authentication flow and interact with your backend to fetch such credentials. From your perspective, performing the migration is essentially a 2 steps process:
- you have to implement 2 new public endpoints ("Authorization server", "Resource server"), that Sinch will contact to fetch the FCM credentials;
- you have to share with Sinch the URL of these endpoints, together with credentials to access them, and trigger the migration; this step is performed via Sinch Dashboard .
Note
You can find a sample implementation of an authorization server, together with a tutorial on how to configure it for Sinch usage, as a public repo in Sinch's GitHub.
OAuth2.0 authentication in FCM v1
The main difference between the FCM legacy endpoint and FCM v1 is the authentication method, as FCM v1 only supports short-lived access tokens, according to the OAuth2 security mode. This means you'll have to provide Sinch with those access tokens, which will then in turn be used by Sinch to authenticate with FCM v1 API.
Compared with the current authentication method (that requires you to share a private key with Sinch), this is a more secure approach because:
- your FCM private key is stored privately in your backend, and it's never shared with anyone
- in case an access token is leaked, it can only be used by malicious actors until it expires
Sinch will request you short-lived access tokens for FCM using OAuth 2.0 Client Credentials flow (see overview of Client Credential flow).
Providing FCM tokens to Sinch
In broad terms, the key steps you have to follow to provide FCM tokens are:
- Implement an OAuth2.0 Authorization Server endpoint (your organization might already have one in place that you can leverage).
- Implement another endpoint, protected by a standard OAuth2.0 Client Credentials flow, that provides FCM tokens ("FCM token endpoint") valid for FCM v1 API
-
Provide Sinch with:
-
OAuth2.0 Client Credentials
(
client_id,client_secret,scope) that are valid within your own OAuth domain - URL of your Auth Server
- URL of the FCM tokens endpoint
-
OAuth2.0 Client Credentials
(
Overview
The desired flow after the migration is complete is the following:
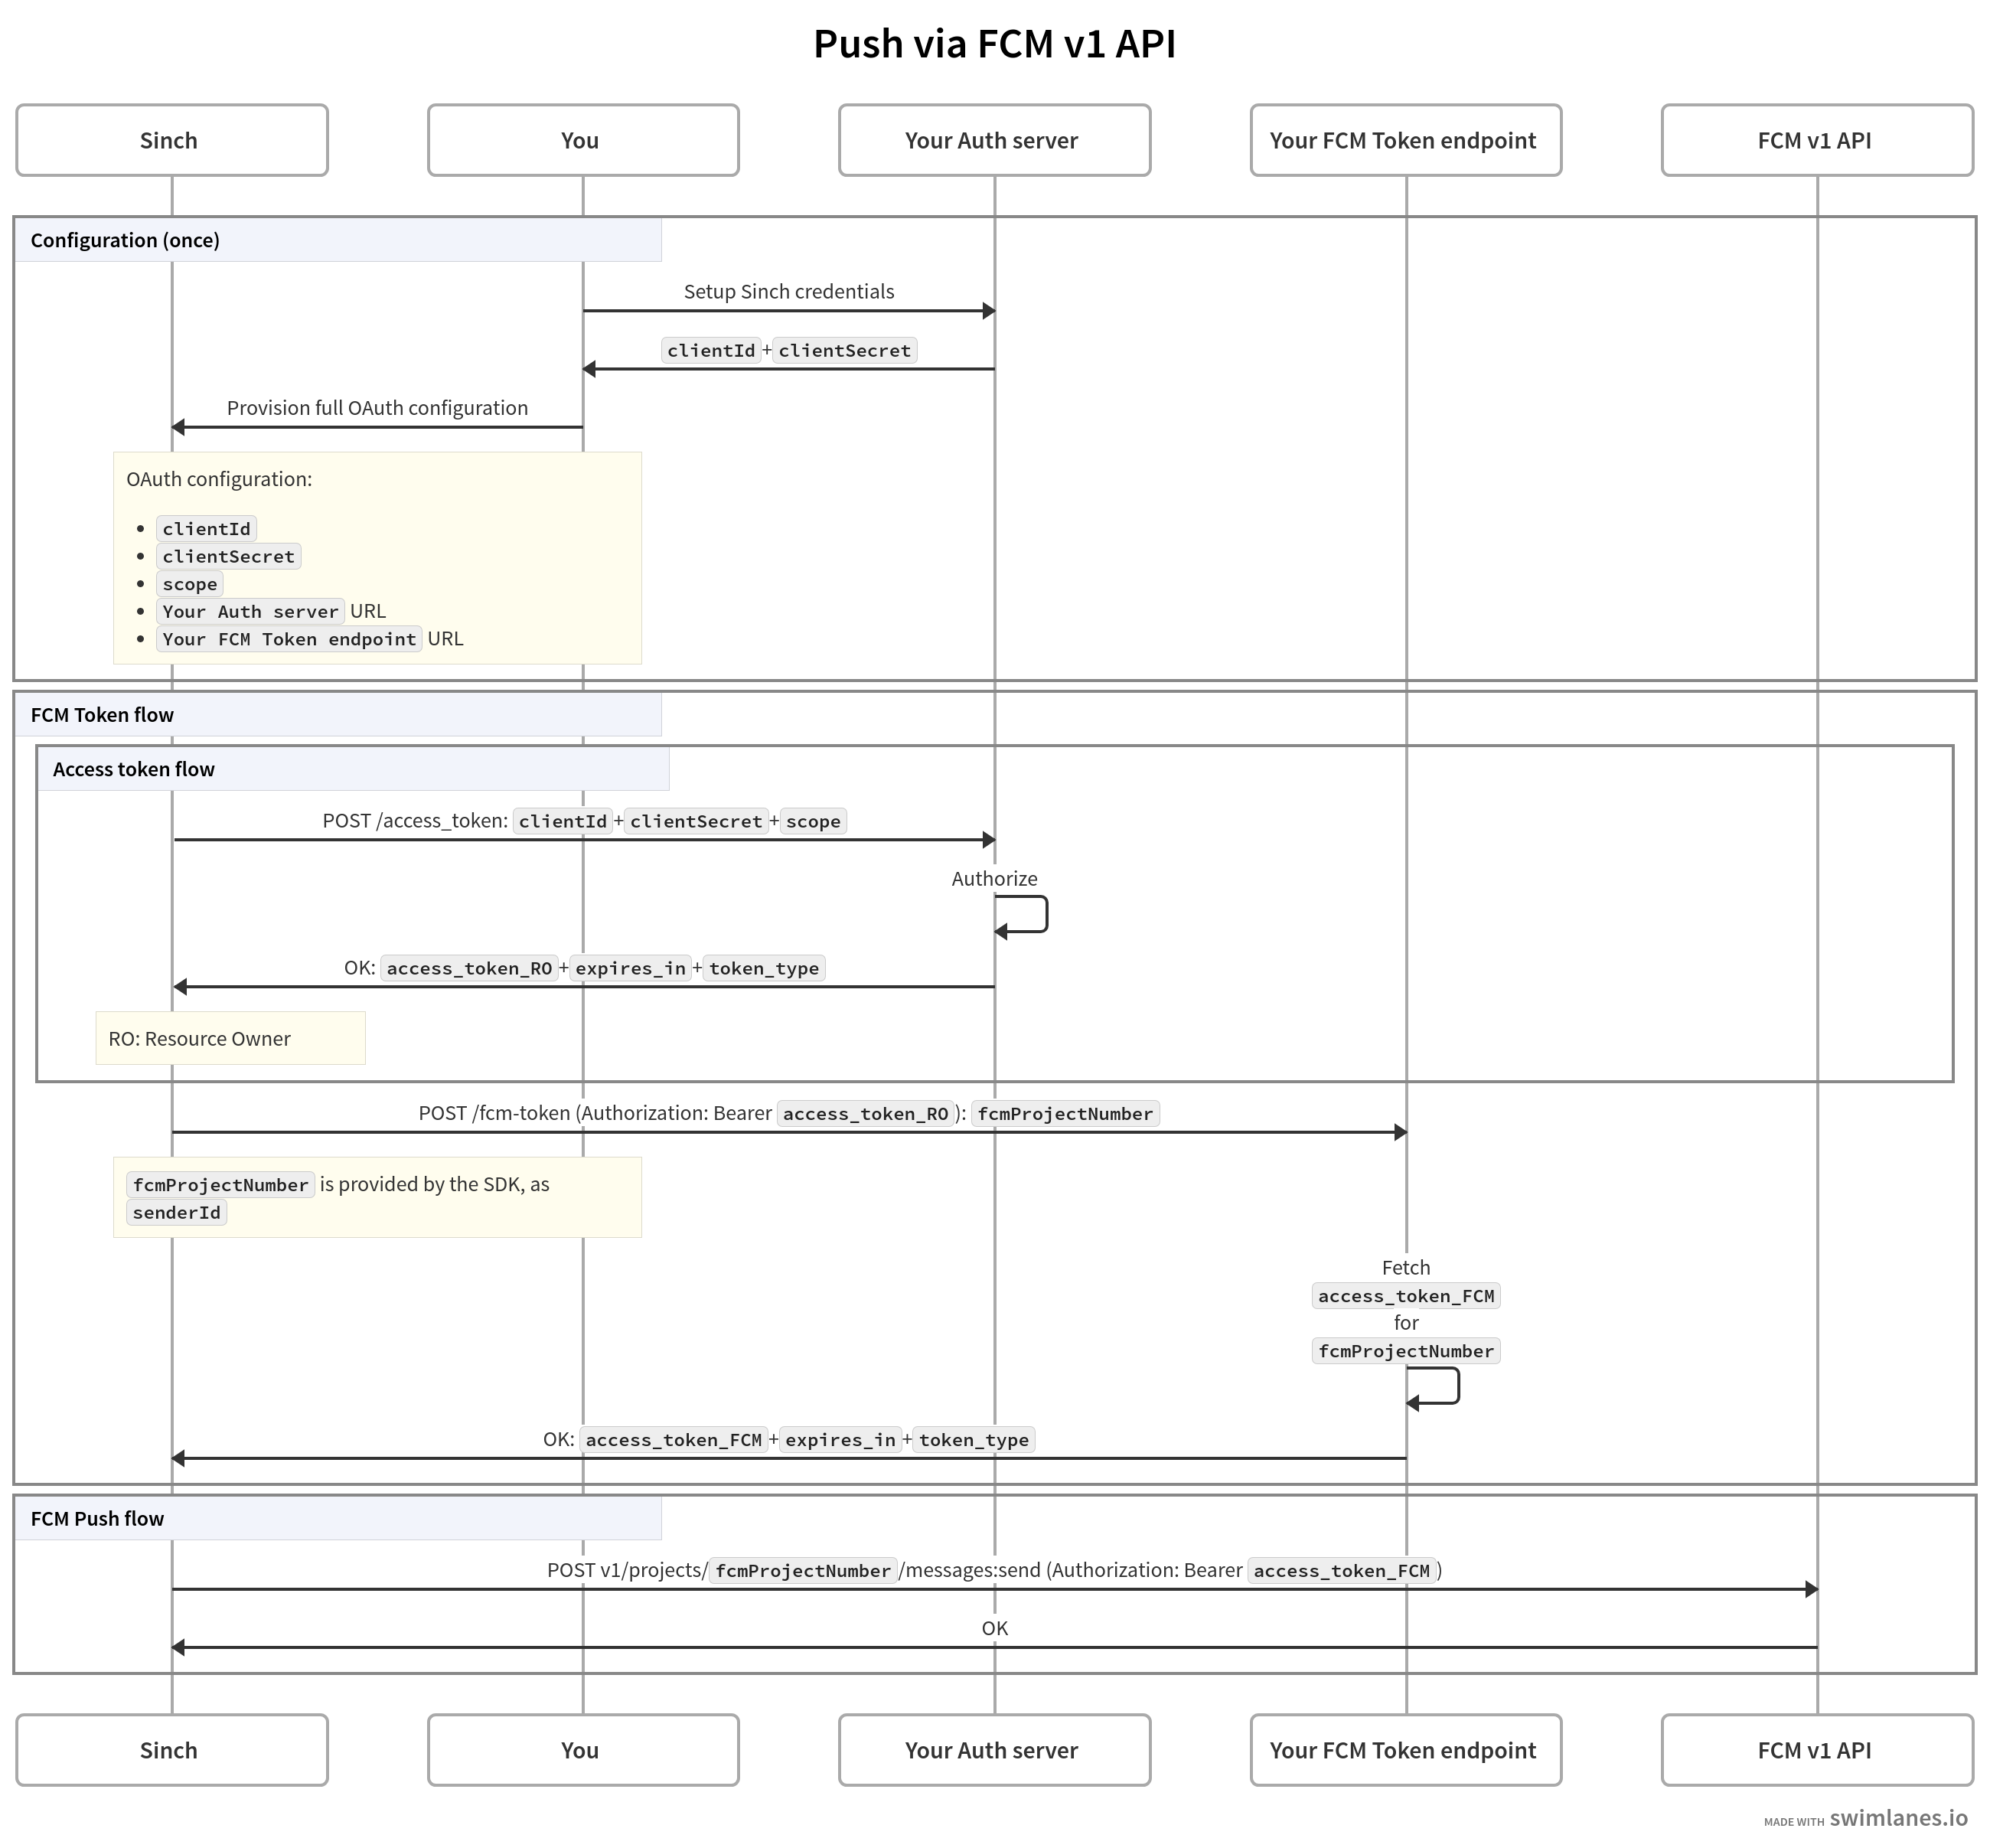
Key takeaways from the diagram above
-
When Sinch needs a new
access_token_FCM(required to request a push message via FCM v1 API), it will first make a request to your Authorization Server to obtain aaccess_token_ROvalid for your security domain ( RO as in Resource Owner ). -
Having obtained an
access_token_RO, Sinch will make a subsequent request to your FCM access token endpoint, providingaccess_token_ROas a Bearer token. -
Your
Resource Server
should pass the
access_token_FCM(as received from Firebase) in the response back to Sinch. -
Sinch will only make requests to "Your Auth Server" endpoint and "Your FCM Token endpoint" as needed, not for every push message sent. Sinch will cache the FCM access token in accordance to the value of
expires_in. -
See
Implementing the FCM Token Endpoint
section for details on how to mint
access_token_FCM.
Contextualizing the diagram in the OAuth2.0 standard
- The component labeled "Your FCM Token endpoint" is your OAuth2.0 Resource Server , with the resource being the FCM tokens.
-
The
scopementioned in the diagram is OAuth2.0 Scope , and its default value ishttps://www.googleapis.com/auth/firebase.messaging. - The tokens provided by "Your Auth server" and "Your FCM token endpoint" are OAuth2.0 Access Tokens .
-
The requests to "Your Auth server" and "Your FCM Token endpoint" will have
Content-Type: application/x-www-form-urlencoded, according to OAuth2 standard .
Providing OAuth configuration to Sinch
Select your app in the Sinch Dashboard, and the In-app Voice & Video SDKs tab. The configuration for FCM consists of the following fields in the "Google FCM Identification" section:
| Field name | Field value |
|---|---|
| Access token URL | URL of your Auth Server endpoint |
| FCM token URL | URL of your FCM token endpoint |
| Client ID | Your client_id |
| Client Secret | Your client_secret |
| Scope | An OAuth scope (optional, will default to https://www.googleapis.com/auth/firebase.messaging) |
Implementing the Authorization server Endpoint
As described in the overview, Sinch will make a request to your Authorization server, to request an access token valid for the "FCM token endpoint". The request will be populated with the fields from the OAuth configuration you provided (see Providing OAuth configuration to Sinch section), and it will be of the following form:
    POST /<your Authorization server endpoint>
    Content-Type: application/x-www-form-urlencoded

    grant_type=client_credentials
    client_id=<client-id from OAuth configuration>
    client_secret=<client-secret from OAuth configuration>
    scope=<scope from OAuth configuration>
Example response to Sinch:
    HTTP/1.1 200 OK
    Content-Type: application/json;charset=utf-8
    {
      "access_token": "<access token valid for the FCM token endpoint>",
      "expires_in": 3600,
      "token_type": "Bearer"
    }
The access_token included in the response will then be used by Sinch as Bearer token in the subsequent call to the "FCM token endpoint".
Implementing the FCM Token Endpoint
As described in the overview, Sinch will make a request to your Resource Server FCM token endpoint, requesting an FCM access token. The request will be of the following form:
    POST /<your FCM token endpoint>
    Authorization: Bearer <Access token obtained from your Authorization Server>
    Content-Type: application/x-www-form-urlencoded

    grant_type=client_credentials
    fcm_project_number=<Your FCM Project number>
Example response to Sinch:
    HTTP/1.1 200 OK
    Content-Type: application/json;charset=utf-8
    {
      "access_token": "<access token acquired from Firebase>",
      "expires_in": 3600,
      "token_type": "Bearer"
    }
Notes:
-
Sinch will be able to use this
access_tokento send push messages to your end-user devices until the token expires, upon which Sinch will issue a new token request to your Authorization Server and Resource Server ; the recommendation is that you obtain a new FCM access token every time Sinch requests it. -
Sinch will cache the
access_tokenaccording to itsexpires_invalue; the default value forexpires_inin Google Auth Library is 1 hour (3600 seconds) and maximum value is 86400 (24h) -
Your implementation of this resource endpoint should obtain an FCM
access_tokenusing one of the methods recommended by the Firebase documentation - see also Google API Client Libraries for a list of implementations of the Google Auth Library. -
You might have to provide a list of permissions when creating an FCM private key; in such case, only
cloudmessaging.messages.create(see GCP's Permissions reference ) is required. -
FcmProjectNumberis an unique identifier of your Firebase project; note that every Firebase project has 2 unique identifiers : "project ID" and "project number", and both are supported in the context of FCM v1. However, Sinch will usefcmProjectNumberbecause it's already available in Sinch backend: whenever a Sinch client is created, this value is provided assenderId. See:- Sinch Android SDK reference docs , and keep in mind that "sender ID" has the same value of "FCM project number";
- Sinch Android public docs about acquiring FCM push configuration .
Resources
- FCM documentation
- OAuth2.0 official website
- OAuth2.0 RFC
- Client Credentials flow
- Google client libraries , to support FCM token generation

