Push notifications enable reliable delivery of incoming calls to your Android app, even when the app is in the background, closed, or the device is locked. Sinch uses Google Firebase Cloud Messaging (FCM) v1 for Android devices and also supports Huawei Mobile Services (HMS) Push for Huawei devices. To receive calls via push:
- Configure FCM v1 / HMS OAuth endpoints in your backend and provide them in the Sinch Dashboard.
- Acquire the device’s push token (FCM or HMS) and register it with Sinch using
SinchClientpush configuration APIs. - Implement a lightweight listener service that forwards Sinch push payloads to the running
SinchClient.
This page covers both the FCM v1 and HMS requirements and flow.
To receive incoming calls via Push Notifications, the application instance must start SinchClient with a valid push configuration so the device token is registered on the Sinch backend.
Push Notifications allow reception of an incoming call even if the phone is locked, or the application is in the background or closed.
Sinch SDK supports both currently available major Push Notification platforms on Android - Google's Firebase Cloud Messages (later FCM) and Huawei Mobile Services Push Notifications (Huawei Push or HMS Push).
application instance must register itself on the Sinch backend to receive Push Notifications using either FCM or HMS.
Registering towards the Sinch backend to receive incoming call push notifications via FCM or HMS Push is quite similar and consists of several topics, which are covered below.
| Step | FCM Specific | Notes |
|---|---|---|
| 1. Enable support of the push notifications in Sinch Client | Happends automatically when FcmPushConfiguration is provided | |
| 2. Update Sinch dashboard with required provider identification | Add FCM identification in the Sinch dashboard | |
| 3. Provision your application with FCM support code | Use gooogle-services.json | Acquire files online in FCM Consoles |
| 4. Acquire a unique push configuration from FCM | Automatic | |
| 5. Register the push configuration on the Sinch backend | Use FcmPushConfigurationBuilder | |
| 6. Implement listening service |
| Minor differences in the RemoteMessage API |
| Step | HMS Specific | Notes |
|---|---|---|
| 1. Enable support of the push notifications in Sinch Client | Happens automatically when HMSPushConfiguration is provided | |
| 2. Update Sinch dashboard with required provider identification | Specify HMS authentication mode in the Sinch dashboard | |
| 3. Provision your application with HMS support code | Use agconnect-services.json | Acquire files online in HMS Console |
| 4. Acquire a unique push configuration from HMS | ||
| 5. Register the push configuration on the Sinch backend | Use HmsPushConfigurationBuilder | |
| 6. Implement listening service |
| Minor differences in RemoteMessage API |
The following sections take you through the process of registering Google FCM push notifications:
To use FCM Push notifications you must also implement the FCM v1 OAuth2.0 Flow.
This step is almost the same for both FCM and HMS. Enabling managed push notifications happens automatically once PushConfiguration is specified during Sinch Client creation.
val sinchClient = SinchClient.builder().context(context)
                              .pushConfiguration(fcmPushConfiguration)
                              ...
                              .build()
...
sinchClient.start()Configure the FCM v1 OAuth settings in the Sinch Dashboard as described in FCM v1 OAuth2.0 Flow.
Provisioning your application with the support code to receive FCM push notifications is straightforward. You'll need to acquire a configuration file google-services.json from the FCM console and add it to your project.
You can add Firebase to your app either semi-automatically using Android Studio, or manually by following the official setup guide. For manual setup, register your application in the Firebase console. If your project already uses FCM, the console will prompt you to import it as a new Firebase Cloud Messaging project. Register your application using the console and download google-services.json into your project's main folder.
Sample SDK projects sinch-rtc-sample-push and sinch-rtc-sample-video-push require your own google-services.json to build. Without this file, Gradle will show an explanatory error and stop the build. The google-services.json file automates Firebase setup for your app. Android Studio's plugin com.google.gms.google-services parses it and adds relevant resources and permissions to your application's manifest automatically.
When using FCM your app must include com.google.firebase:firebase-messaging as a dependency. Snippets below use APIs provided by that library.
For using FCM push configuration to work you have to obtain 2 string properties:
- Sender ID
- Registration token
Getting the sender ID is easy. Once the Firebase app is created it doesn't change and is bundled into the google-services.json file. You can check it in your Firebase console project settings or get it synchronously at runtime:
val APP_FCM_SENDER_ID: String = FirebaseApp.getInstance().options.gcmSenderId.orEmpty()The registration token must be obtained asynchronously and it can change during the application's lifetime.
Use below code to acquire the registration token:
        FirebaseMessaging.getInstance().token.addOnCompleteListener { task: Task<String?> ->
            if (task.isSuccessful) {
                val registrationToken = task.result
            }
        }
Track token changes in onNewToken and recreate your SinchClient instance in such cases (see sinch-rtc-sample-push for a complete use case).
Create an instance of FcmPushConfiguration using the FcmPushConfigurationBuilder and provide it to SinchClient during build. Start the client to register the device token with Sinch.
val pushConfiguration = PushConfiguration.fcmPushConfigurationBuilder()
  .senderID(APP_FCM_SENDER_ID)
  .registrationToken(registrationToken)
  .build()

val sinchClient = SinchClient.builder()
  .context(getApplicationContext())
  .applicationKey("<application key>")
  .userId("<user id>")
  .environmentHost("ocra.api.sinch.com")
  .pushConfiguration(pushConfiguration)
  .build()
sinchClient.addSinchClientListener(<listener>)
sinchClient.start()Implement your FcmListerningService by extending the FirebaseMessagingService:
...
class FcmListenerService : FirebaseMessagingService() {

override fun onMessageReceived(remoteMessage: RemoteMessage){
    if (SinchPush.isSinchPushPayload(remoteMessage.data)) {
        val result = SinchPush.queryPushNotificationPayload(context,
                                  remoteMessage.data)
        sinchClient.relayRemotePushNotification(result)
        ...
    } else {
        // it's NOT Sinch message - process yourself
    }
}}The following sections explain how to register Huawei HMS push notifications:
To use Huawei Push notifications you must also implement the Huawei OAuth 2.0 Flow.
This step is almost the same for both FCM and HMS. Managed push notifications are enabled automatically once PushConfiguration is specified during SinchClient creation.
val sinchClient = SinchClient.builder().context(context)
                              .pushConfiguration(hmsPushConfiguration)
                              ...
                              .build()
...
sinchClient.start()Using HMS Push requires that Huawei Mobile Services (HMS) is installed on the device. A prompt to install HMS will appear automatically the first time an HMS device token is being acquired.
Follow the Huawei Push Kit Development Process to acquire agconnect-services.json. Refer to How to Integrate HMS Core SDK for the necessary changes in your Gradle build files.
Sinch SDK expects the application to acquire the HMS device token before creating SinchClient. An example of asynchronous HMS device token acquisition is provided in the RegisterToHmsTask class of the sinch-rtc-sample-hms-push sample application.
The task extends AsyncTask and returns both the known hmsApplicationId and the unique hmsDeviceToken, which Huawei recommends re-acquiring on each application start. To read the HMS Application ID and acquire the HMS device token, use:
val hmsApplicationId = AGConnectServicesConfig.fromContext(context).getString("client/app_id")
val hmsDeviceToken = HmsInstanceId.getInstance(context).getToken(appId, "HCM")For this operation to succeed, your application must be signed and its signature fingerprint registered in the Huawei AGConnect console. See AGConnect signing requirements.
- Application is registered on Huawei AGConnect Console (IMPORTANT: package name should match).
- The AGConnect Console's application project has PushKit enabled.
- The application is signed.
- Fingerprint of the signature is registered in the AGConnect Console .
- HMS is installed on the device (User will get UI Prompt automatically).
- Device is connected to the internet.
Create an instance of HmsPushConfiguration using the HmsPushConfigurationBuilder and provide it to SinchClient during build. Start the client to register the device token with Sinch.
val pushConfiguration = PushConfiguration.hmsPushConfigurationBuilder()
  .applicationId(hmsApplicationId)
  .deviceToken(hmsDeviceToken)
  .build()

val sinchClient = SinchClient.builder()
  .context(applicationContext)
  .applicationKey("<application key>")
  .userId("<user id>")
  .environmentHost("ocra.api.sinch.com")
  .pushConfiguration(pushConfiguration)
  .build()
sinchClient.addSinchClientListener(<listener>)
sinchClient.start()Implement your HmsListerningService by extending the HmsMessageService:
class HmsListenerService : HmsMessageService() {

  override fun onMessageReceived(message: RemoteMessage) {
    if (SinchPush.isSinchPushPayload(message.dataOfMap)) {
        val result = SinchPush.queryPushNotificationPayload(context,
                                  message.dataOfMap)
        sinchClient.relayRemotePushNotification(result)
        ...
    } else {
        // it's NOT Sinch message - process yourself
    }
}}As a developer, you will be responsible for implementing the code that receives the push message.
- For FCM example, please see the sample apps
sinch-rtc-sample-pushandsinch-rtc-sample-video-push. - For HMS example, please see the sample app
sinch-rtc-sample-hms-push.
The following sections cover how to support receiving calls and messages via push notifications.
Once you have received the RemoteMessage in your listening service you should forward it to the Sinch client. In order to do so:
- Verify it is a Sinch payload by calling SinchPush.isSinchPushPayload.
- If it is transform it into the CallNotificationResult by calling SinchPush.queryPushNotificationPayload.
- At this point CallNotificationResult can be inspected and provide information about participants, whether the call timed out and whether the call offers video.
- Forward provided CallNotificationResult to the Sinch Client by calling SinchClient.relayRemotePushNotificationPayload.
The Sinch SDK supports adding custom headers in push notification messages when initiating a call, so developers don't need to implement their own push mechanism if they only need to deliver small pieces of information along the Sinch managed push between their app instances. The Sinch SDK allows up to 1024 bytes of custom headers.
Setting custom headers on the sender side when initiating a call:
val headers = hashMapOf(
  "First key" to "123",
  "Second key" to "second value"
)
val call = callController.callUser(userId, new MediaConstraints(false), headers)
If custom headers were supplied by call initiator, they can be retrieved from notification result using callResult.callHeaders API:
if (SinchPush.isSinchPushPayload(remoteMessage.data)) {
  val result = SinchPush.queryPushNotificationPayload(context, remoteMessage.data)
  // For HMS use remoteMessage.dataOfMap API instead.
  val customHeaders = callResult.callHeaders
}It's possible to retrieve custom headers without starting the client (doing it allows you to create some early reject logic without the need to initiate a more resource demanding process of creating and starting the Sinch client).
If the user logs out or this device should no longer receive incoming call push notifications, call SinchClient.unregisterPushToken() to prevent further notifications.
If your application assumes frequent change of users (logging in and out), it's imperative to unregister the device by using SinchClient.unregisterPushToken() on each log out to guarantee that a new user won't receive incoming calls intended to the previous one.
You don't need to manually add any permission to the application manifest - all required changes will be added automatically by the gradle depending on the configuration file you provide (google-service.json or agconnect-services.json).
Sinch requests FCM push notifications using the FCM v1 API, which requires OAuth2 short‑lived access tokens. Your backend must expose two endpoints that Sinch will call to obtain these tokens:
- An OAuth2 Authorization Server endpoint that issues an access token for your security domain (Client Credentials flow).
- A protected Resource Server endpoint that mints an FCM v1 access token using your Firebase service account.
Overview of the flow:
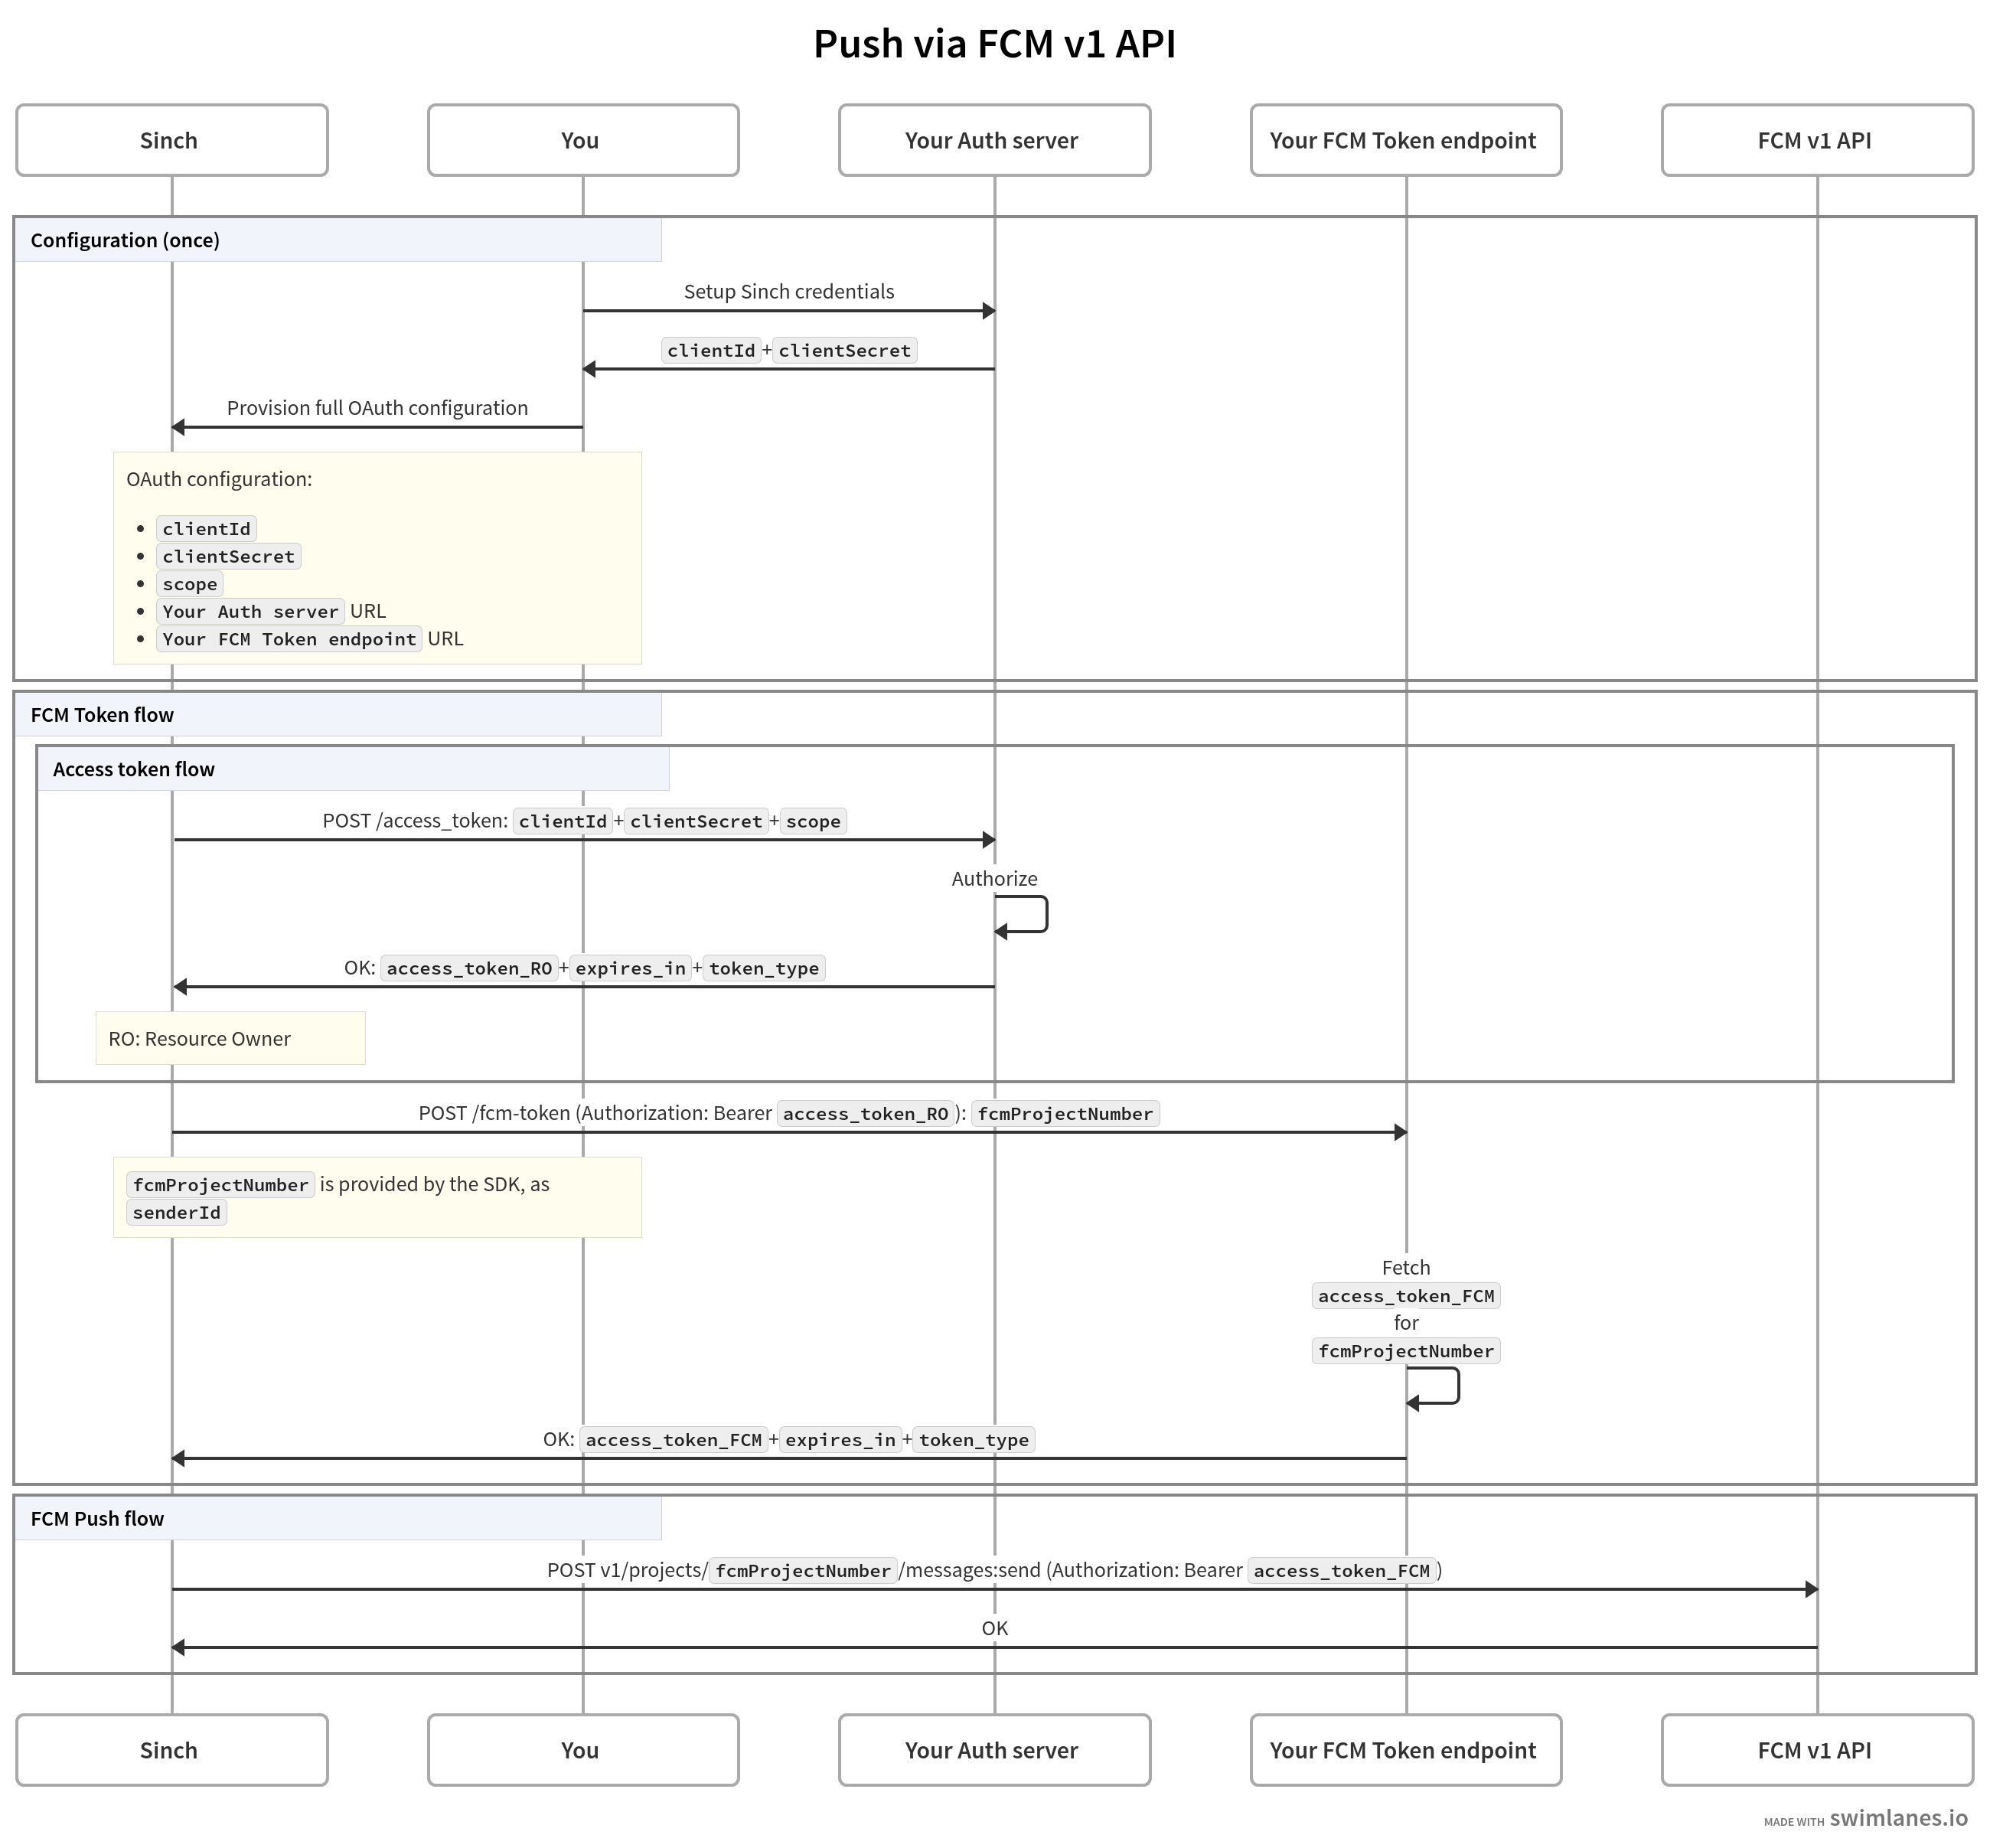
- When Sinch needs a new
access_token_FCM(required to request a push message via FCM v1 API), it will first make a request to your Authorization Server to obtain aaccess_token_ROvalid for your security domain (RO as in Resource Owner). - Having obtained an
access_token_RO, Sinch will make a subsequent request to your FCM access token endpoint, providingaccess_token_ROas a Bearer token. - Your Resource Server should pass the
access_token_FCM(as received from Firebase) in the response back to Sinch. - Sinch will only make requests to "Your Auth Server" endpoint and "Your FCM Token endpoint" as needed, not for every push message sent. Sinch will cache the FCM access token in accordance to the value of
expires_in. - See Implementing the FCM Token Endpoint section for details on how to mint
access_token_FCM.
- The component labeled "Your FCM Token endpoint" is your OAuth2.0 Resource Server, with the resource being the FCM tokens.
- The
scopementioned in the diagram is OAuth2.0 Scope, and its default value ishttps://www.googleapis.com/auth/firebase.messaging. - The tokens provided by "Your Auth server" and "Your FCM token endpoint" are OAuth2.0 Access Tokens.
- The requests to "Your Auth server" and "Your FCM Token endpoint" will have
Content-Type: application/x-www-form-urlencoded, according to OAuth2 standard.
Select your app in the Sinch Dashboard, and the In-app Voice & Video SDKs tab. The configuration for FCM consists of the following fields in the "Google FCM Identification" section:
| Field name | Field value |
|---|---|
| Access token URL | URL of your Auth Server endpoint |
| FCM token URL | URL of your FCM token endpoint |
| Client ID | Your client_id |
| Client Secret | Your client_secret |
| Scope | An OAuth scope (optional, will default to https://www.googleapis.com/auth/firebase.messaging) |
As described in the overview, Sinch will make a request to your Authorization server, to request an access token valid for the "FCM token endpoint". The request will be populated with the fields from the OAuth configuration you provided (see Providing OAuth configuration to Sinch section), and it will be of the following form:
    POST /<your Authorization server endpoint>
    Content-Type: application/x-www-form-urlencoded

    grant_type=client_credentials
    client_id=<client-id from OAuth configuration>
    client_secret=<client-secret from OAuth configuration>
    scope=<scope from OAuth configuration>
Example response to Sinch:
    HTTP/1.1 200 OK
    Content-Type: application/json;charset=utf-8
    {
      "access_token": "<access token valid for the FCM token endpoint>",
      "expires_in": 3600,
      "token_type": "Bearer"
    }
The access_token included in the response will then be used by Sinch as Bearer token in the subsequent call to the "FCM token endpoint".
As described in the overview, Sinch will make a request to your Resource Server FCM token endpoint, requesting an FCM access token. The request will be of the following form:
    POST /<your FCM token endpoint>
    Authorization: Bearer <Access token obtained from your Authorization Server>
    Content-Type: application/x-www-form-urlencoded

    grant_type=client_credentials
    fcm_project_number=<Your FCM Project number>
Example response to Sinch:
    HTTP/1.1 200 OK
    Content-Type: application/json;charset=utf-8
    {
      "access_token": "<access token acquired from Firebase>",
      "expires_in": 3600,
      "token_type": "Bearer"
    }
Notes:
- Sinch will be able to use this
access_tokento send push messages to your end-user devices until the token expires, upon which Sinch will issue a new token request to your Authorization Server and Resource Server; the recommendation is that you obtain a new FCM access token every time Sinch requests it. - Sinch will cache the
access_tokenaccording to itsexpires_invalue; the default value forexpires_inin Google Auth Library is 1 hour (3600 seconds) and maximum value is 86400 (24h) - Your implementation of this resource endpoint should obtain an FCM
access_tokenusing one of the methods recommended by the Firebase documentation - see also Google API Client Libraries for a list of implementations of the Google Auth Library. - You might have to provide a list of permissions when creating an FCM private key; in such case, only
cloudmessaging.messages.create(see GCP's Permissions reference) is required. FcmProjectNumberis an unique identifier of your Firebase project; note that every Firebase project has 2 unique identifiers: "project ID" and "project number", and both are supported in the context of FCM v1. However, Sinch will usefcmProjectNumberbecause it's already available in Sinch backend: whenever a Sinch client is created, this value is provided assenderId. See:- Sinch Android SDK reference docs, and keep in mind that "sender ID" has the same value of "FCM project number";
- Sinch Android public docs about acquiring FCM push configuration.
Sinch supports Huawei push messages via Huawei Push Kit (HPK) which is part of Huawei Mobile Services (HMS). The Sinch SDKs and platform can take care of sending push notification messages via Huawei Push Kit on your behalf as part our Sinch Managed Push Notifications functionality. To enable Huawei push messages for Android devices you will need to do two things:
- Make use of the Huawei (HMS) APIs in the Sinch Android SDK as described above.
- Implement an OAuth 2.0 Authorization Server endpoint that can provide Sinch with OAuth 2.0 access_tokens required to send messages via HPK on your behalf.
Sinch will send push notification messages via the Huawei Push Kit API. Huawei Push Kit supports (and requires) an OAuth 2.0 Client Credentials flow to authenticate against the Huawei Push Kit server endpoint(s). Your Huawei app in Huawei AppGallery Connect will have an App ID and an App secret. These are to be used as OAuth client credentials: client_id and client_secret respectively.
Sinch supports Huawei OAuth flow by delegation. You will keep your client_secret on your backend, and Sinch will request an HMS OAuth access_token via an server-side HTTP API endpoint that you implement. Sinch supports two different alternatives for how to provide Sinch with an HMS access token:
- A) A HMS token endpoint protected by a standard OAuth 2.0 Client Credentials flow. This is a good fit if you have an existing OAuth 2.0 Authorization Server that's used to protect and grant access access to your server-side endpoints.
- B) A HMS token endpoint protected using your existing Sinch credentials (Sinch Application Key and Application Secret). This is a good fit if you don't have an OAuth 2.0 Authorization Server to grant access to your server-side endpoints.
This flow assumes you have an OAuth 2.0 conforming Authorization Server that supports the Client Credentials grant type.
The flow is implemented in terms of two key steps:
- You create a set of OAuth 2.0 Client Credentials that are valid within your OAuth domain, and configure those for your Sinch Application.
- You implement a HMS token endpoint that provides a HMS access token (labeled
$push_token_endpointin diagram below).
In the Sinch Dashboard you should configuring the following:
- OAuth 2.0 access token endpoint (URL)
- Client Credentials (
client_idandclient_secret) - An OAuth scope (optional to specify, will default to
https://push-api.cloud.huawei.com) - HMS token endpoint (URL)
The overall flow is depicted below:
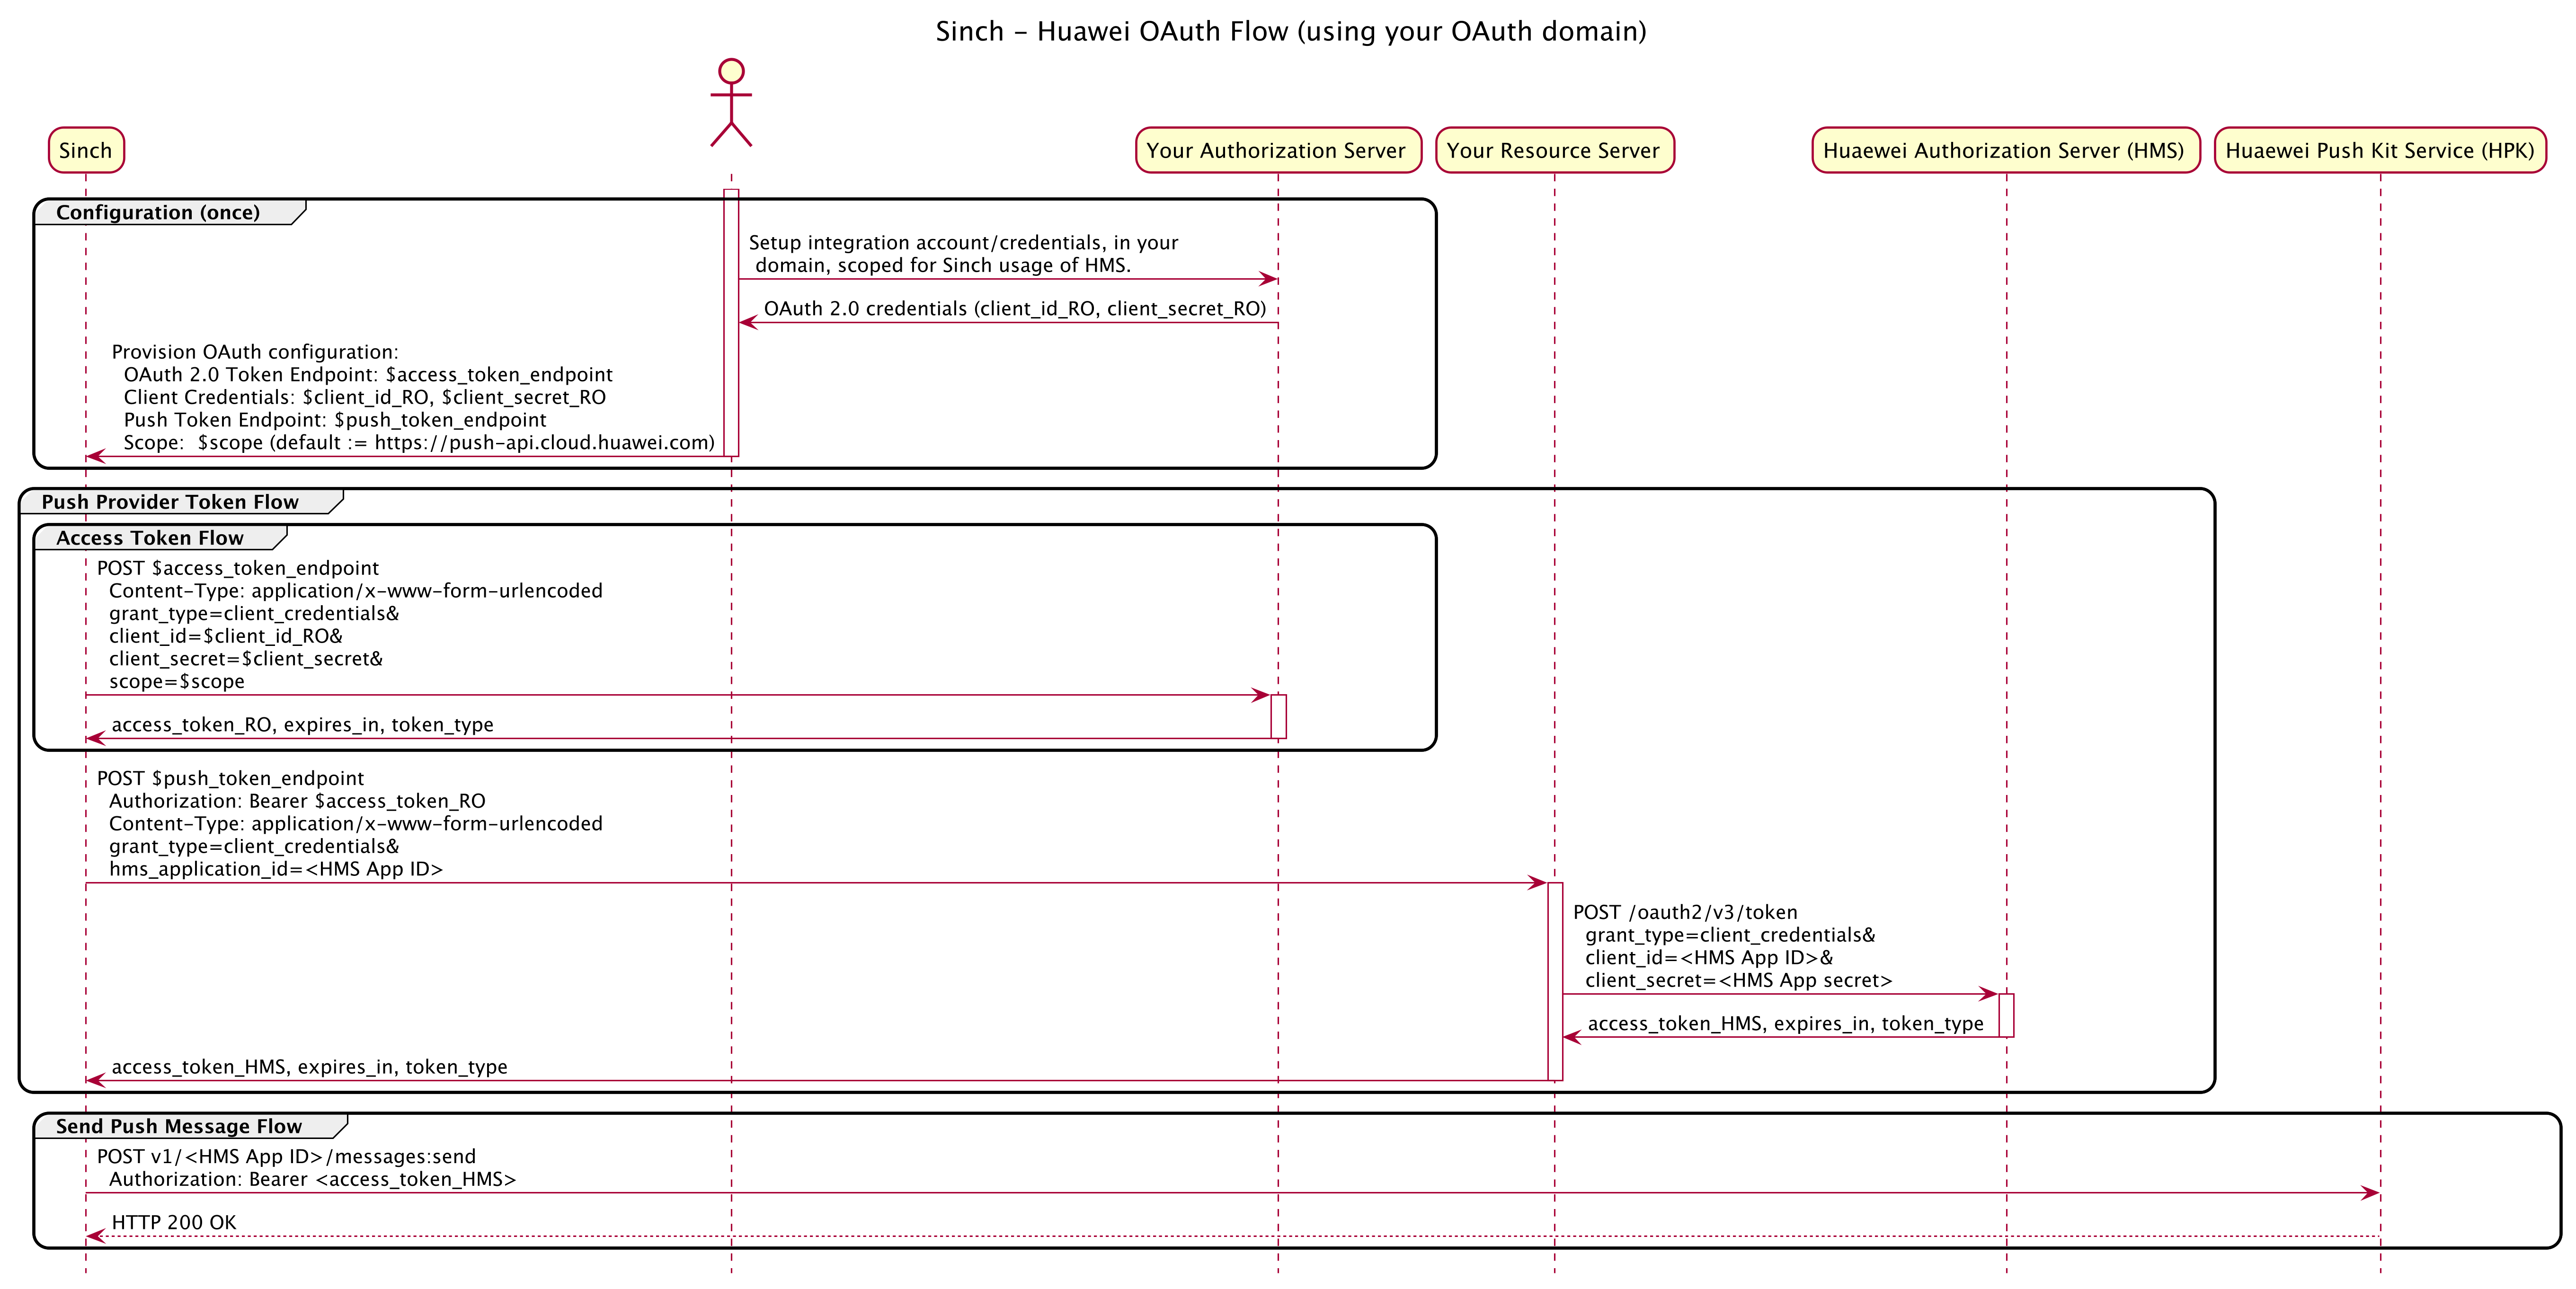
Key takeaways:
- The component labeled Your Resource Server in the diagram is your Resource Server in the terminology of OAuth and the resource here being an HMS access token.
- When Sinch needs a (new) HMS
access_tokenrequired to send a push message to Huawei Push Kit server, it will first make a request to your Authorization Server to obtain anaccess_tokenvalid for your security domain (labeled asaccess_token_ROin the diagram, RO as in Resource Owner). - Having obtained
access_token_RO, Sinch will make a subsequent request to your HMS access token endpoint (labeled$push_token_endpointin the diagram), providingaccess_token_ROas a Bearer token. - Your Resource Server should obtain a HMS
access_tokenusing the Huawei HMS OAuth Authorization Server endpoint and your Huawei App ID and App secret asclient_idandclient_secret. - Your Resource Server should pass the HMS
access_token(as received from HMS) in the response back to Sinch.
Sinch will only make requests to your Authorization Server access token endpoint and your HMS token endpoint as needed, not for every push message sent. Sinch will cache the HMS access token in accordance to the value of expires_in.
You can think of the step where you configure OAuth Client Credentials for your Sinch Application as a way of enabling Sinch and your Sinch Application in particular to make requests to your HMS token endpoint (Resource Server).
As described in the overview, Sinch will make a request to your Resource Server HMS token endpoint, requesting a HMS access_token. The request will be on the following form:
    POST /<your HMS token endpoint>
    Authorization: Bearer <Access token obtained from your Authorization Server>
    Content-Type: application/x-www-form-urlencoded

    grant_type=client_credentials&
    hms_application_id=<Your HMS App Id>
Your implementation of this resource endpoint should obtain an HMS access_token using the Huawei HMS OAuth endpoint, using your Huawei App ID and App secret as client_id and client_secret. The access token received from Huawei should then be included in the response back to Sinch. See Huawei documentation for how to implement requesting an OAuth access token using Huawei HMS.
Example response to Sinch:
    HTTP/1.1 200 OK
    Content-Type: application/json;charset=utf-8
    {
      "access_token": "<access token acquired from Huawei>",
      "expires_in": 3600,
      "token_type": "Bearer"
    }
Sinch will then be able to use this access_token to send push messages to your end-user devices until the token expires, upon which Sinch will issue a new token request to your Authorization Server and Resource Server.
You will receive your HMS App ID as a request parameter (hms_application_id) and you can use that for a given request to map it to your corresponding HMS App.
The overall flow is depicted below:
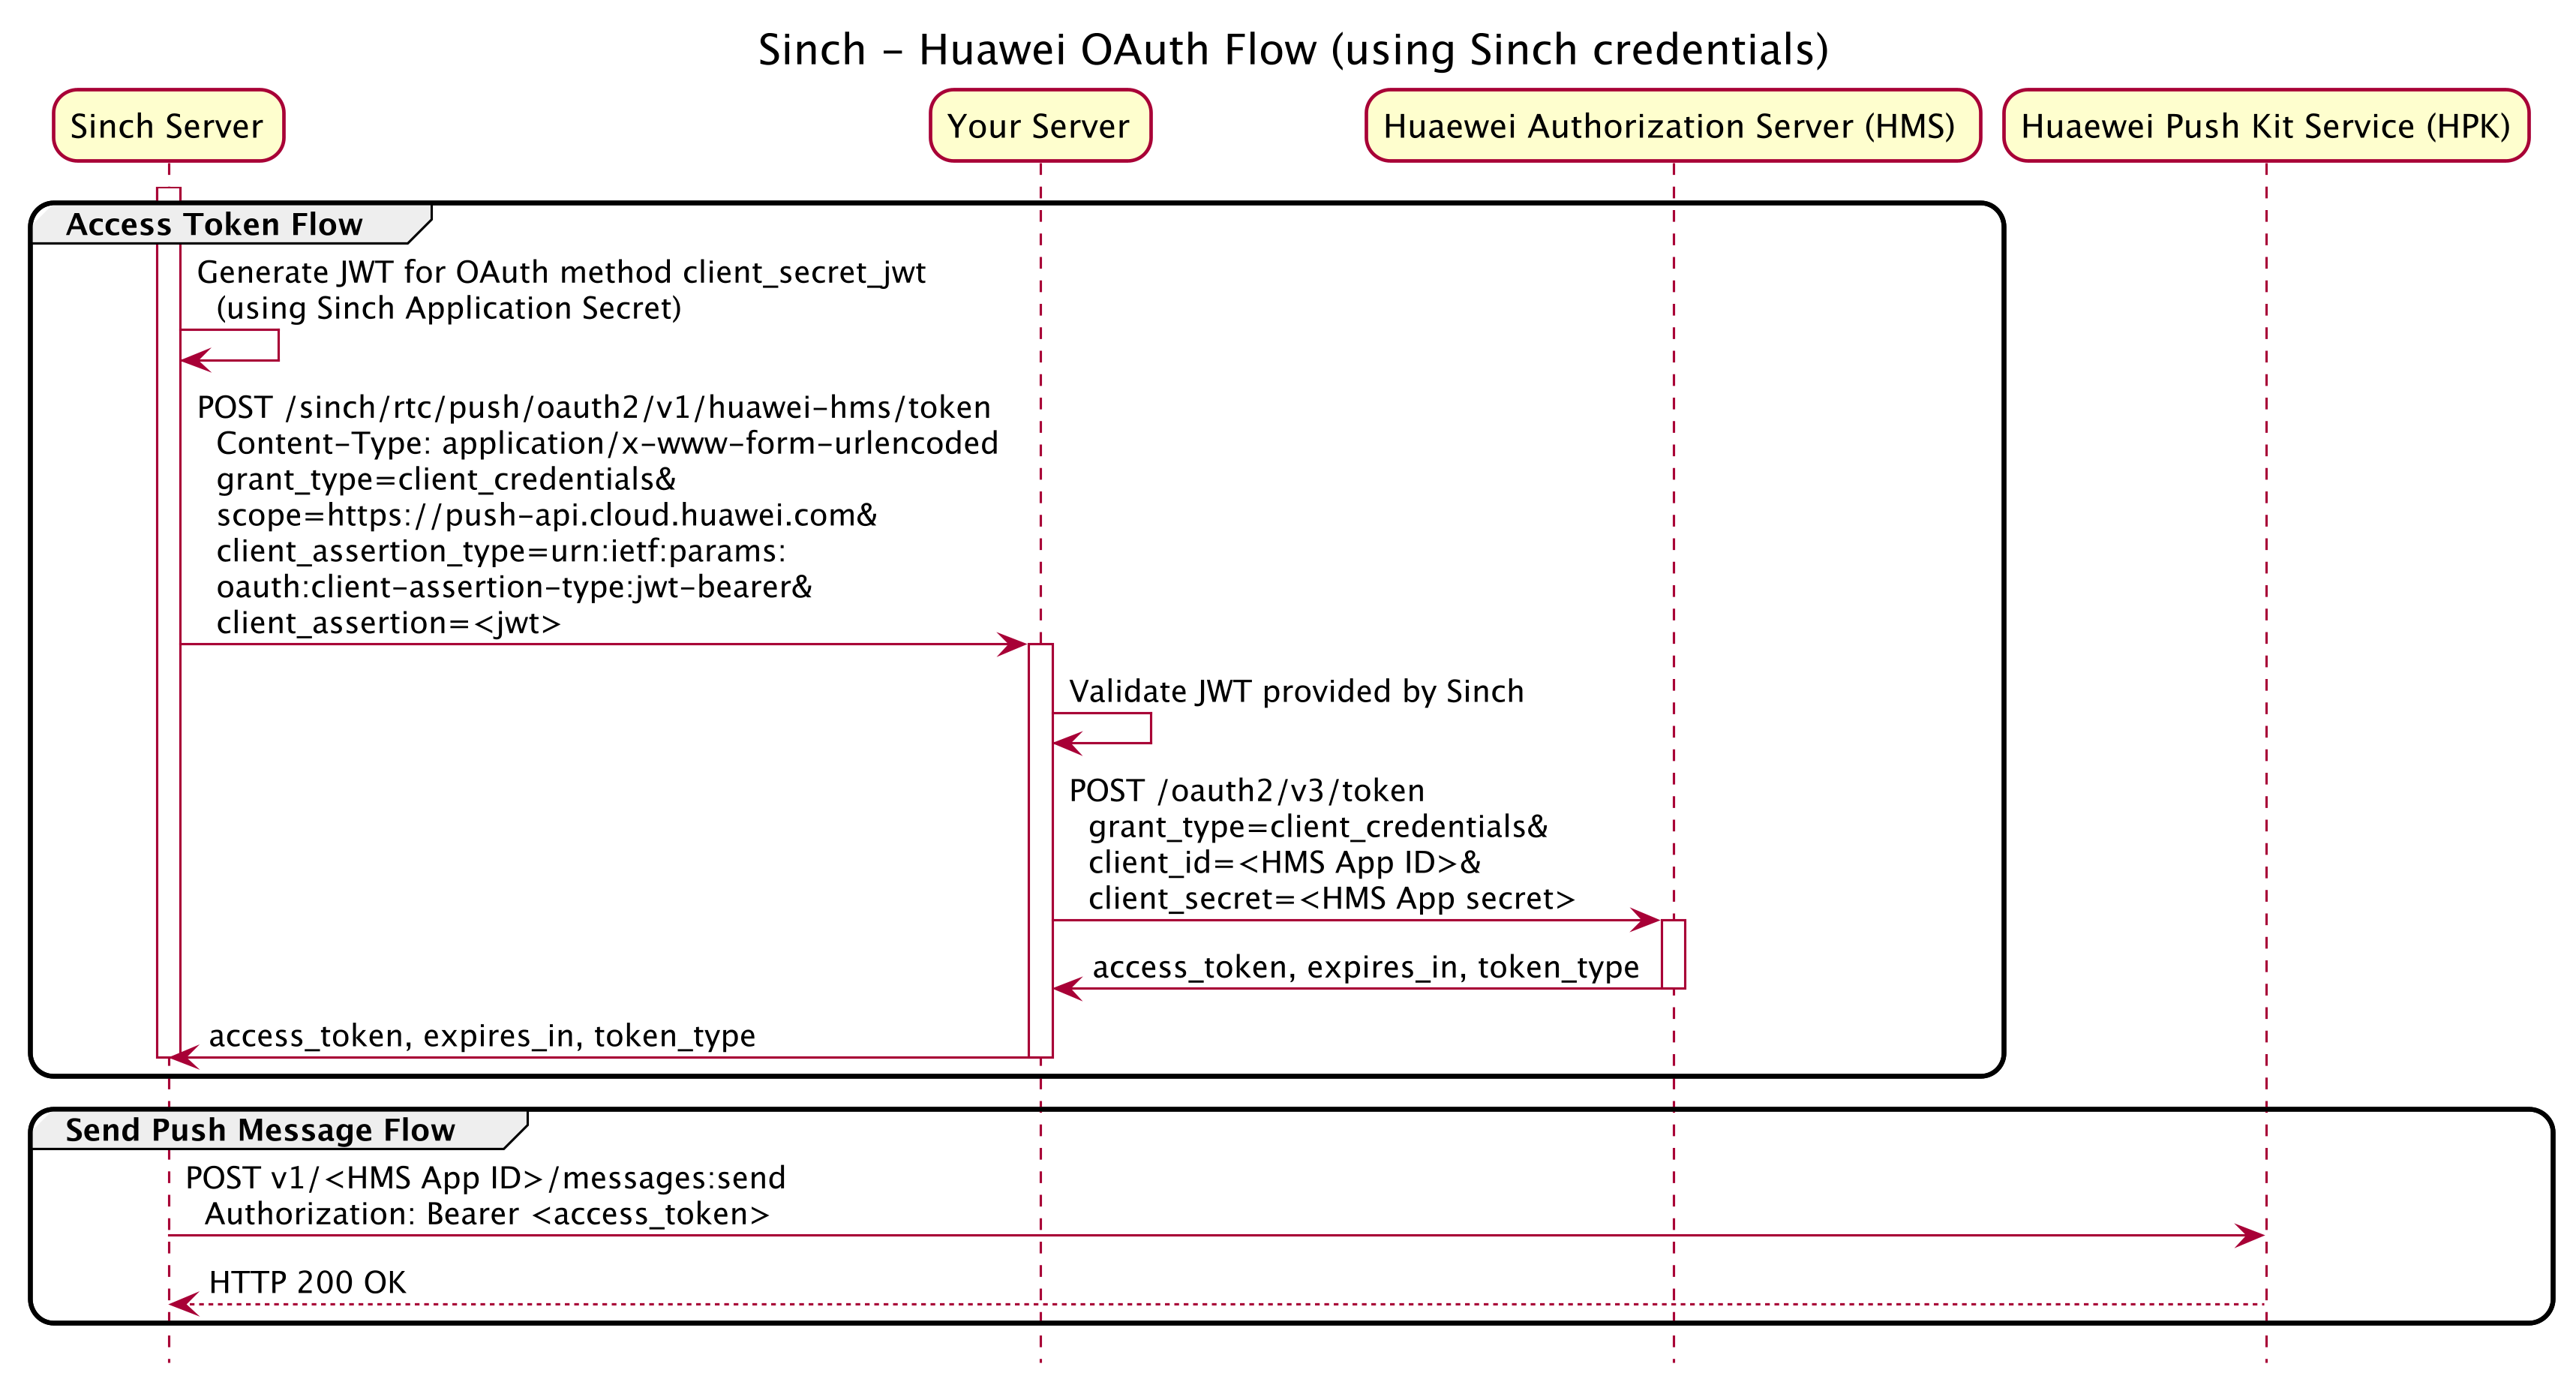
Key takeaways:
- When Sinch needs an
access_tokenrequired to send a push message to Huawei Push Kit server, it will make an OAuth request using a Client Credentials grant type to your Authorization Server. This request will be specifying anclient_assertion_type=urn:ietf:params:oauth:client-assertion-type:jwt-beareras the value forclient_assertionprovides a JWT that's symmetrically signed with your Sinch Application Secret. - Your Authorization Server should validate the JWT provided as
client_assertionby Sinch and that the signed JWT is signed with your Sinch Application Secret. - Your Authorization Server should obtain a HMS
access_tokenusing the Huawei HMS OAuth Authorization Server endpoint and your Huawei App ID and App secret asclient_idandclient_secret. - Your Authorization Server should pass the HMS
access_token(as received from HMS) in the response back to Sinch.
Sinch will only make requests to your Authorization Server access token endpoint and your HMS token endpoint as needed and not for every push message sent. Sinch will cache the HMS access token in accordance to the value of expires_in.
Details on how to validate the JWT provided by Sinch as client_assertion are available in the following sections.
(The use of client_assertion and client_assertion_type=urn:ietf:params:oauth:client-assertion-type:jwt-bearer is based on RFC 7523 and RFC 7521 and part of the OpenID Connect Core 1.0 standard.)
As described in the overview, Sinch will make a request to your OAuth Authorization Server endpoint, requesting a HMS access_token. The request will be on the following form:
    POST /sinch/rtc/push/oauth2/v1/huawei-hms/token HTTP 1.1
    Host: as.your-domain.com
    Content-Type: application/x-www-form-urlencoded

    grant_type=client_credentials&
    scope=https%3A%2F%2Fpush-api.cloud.huawei.com&
    client_assertion_type=urn%3Aietf%3Aparams%3Aoauth%3Aclient-assertion-type%3Ajwt-bearer
client_assertion=<JWT>The value of scope and client_assertion_type in the example above are URL-encoded
The JWT will be making use of the standard JWT header parameters alg and kid, and the standard claims iss, sub, iat, exp, nonce and aud. Before we jump to the details of how to validate this token, here is an example:
    // JWT Header (example)
    {
      "alg": "HS256",
      "kid": "hkdfv1-20200901",
      "sinch:rtc:application_key": "a32e5a8d-f7d8-411c-9645-9038e8dd051d"
    }

    // JWT Payload (example)
    {
      "iss": "//rtc.sinch.com/applications/a32e5a8d-f7d8-411c-9645-9038e8dd051d",
      "sub": "123456789",
      "aud": "https://as.your-domain.com/sinch/rtc/push/oauth2/v1/huawei-hms/token",
      "scope": "https://push-api.cloud.huawei.com",
      "sinch:rtc:application_key": "a32e5a8d-f7d8-411c-9645-9038e8dd051d",
      "iat": 1600780504,
      "exp": 1600784104,
      "nonce": "6b438bda-2d5c-4e8c-92b0-39f20a94b34e"
}- Claim
issis on the form//rtc.sinch.com/applications/<your Sinch Application Key>(canonical form) - Claim
subis your HMS App ID (as specified viaHmsPushBuilder.applicationId(String)on the Android client). - Claim
audwill be set to the Authorization Server token endpoint you have configured with Sinch. examplehttps://as.your-domain.com/sinch/rtc/push/oauth2/v1/huawei-hms/token - Claim
scopewill behttps://push-api.cloud.huawei.com(representing the Huawei Push Kit server domain) - Claim
sinch:rtc:application_keywill contain your Sinch Application Key`. - Claims
iat,exp,nonceare standard JWT claims (see JWT RFC 7519)
Your Sinch Application Key is present both in the JWT header and the JWT payload (as header parameter and claim sinch:rtc:application_key). The reason, is that it allows you to implement validating the JWT signature without accessing the payload, and once you have validated the JWT signature, you can strip away the header and all the data you need for further processing is self contained in the payload.
The kid parameter in the JWT header is on the form hkdfv1-{DATE} where {DATE} is date of signing in UTC on format YYYYMMDD.
When validating the JWT, use a signing key that's derived from your Sinch Application Secret as follows. Given:
- A function
HMAC256(key, message). - A date-formatting function
FormatDate(date, format). - The date of signing as variable
signedAt. This is to be extracted from the JWT header parameterkid. - Sinch Application Secret as variable
applicationSecret, holding the secret as a base64 encoded string.
Derive the signing key as follows:
signingKey = HMAC256(BASE64-DECODE(applicationSecret), UTF8-ENCODE(FormatDate(signedAt, "YYYYMMDD")))This is the same key derivation scheme as used for Token-based User registration
Your Authorization Server should validate the JWT in accordance with section RFC 7523 - Section 3. JWT Format and Processing Requirements. Here is a rough outline of the steps necessary:
- Use JWT header parameter
sinch:rtc:application_keyto lookup your corresponding Application Key and Application Secret (at this point the token is still unvalidated) - Derive the signing key (as detailed in the previous section)
- Validate that the JWT has a valid signature given the signing that you have derived.
- Validate the JWT payload in terms of
iat,exp,nonceetc. - Validate that the claim
scopeishttps://push-api.cloud.huawei.com
Visit https://github.com/sinch/sinch-rtc-api-auth-examples for example implementations of JWT generation.
After validating the JWT client assertion, your Authorization Server should in turn request an access_token from the Huawei HMS OAuth endpoint, using your Huawei App ID and App secret as client_id and client_secret. The access token received from Huawei should then be included in the response back to Sinch. See Huawei documentation for how to implement requesting an OAuth access token using Huawei HMS.
Example response to Sinch:
    HTTP/1.1 200 OK
    Content-Type: application/json;charset=utf-8
    {
      "access_token": "<access token acquired from Huawei>",
      "expires_in": 3600,
      "token_type": "Bearer"
    }
Sinch will then be able to use this access_token to send push messages to your end-user devices until the token expires, upon which Sinch will issue a new token request to your Authorization Server.
You will receive your HMS App ID in JWT claim sub and you can use that to for a given request map it to your corresponding HMS App. You will also be able to access your Sinch Application Key as the JWT claim sinch:rtc:application_key if you need that as input at this stage.
If your Authorization Server rejects the access token request from Sinch, it should respond with a HTTP response that's compliant with the OAuth 2.0 standard. Example:
    HTTP/1.1 400 Bad Request
    Content-Type: application/json;charset=utf-8
    {
      "error": "unauthorized_client",
      "error_description": "Your helpful error description"
    }
Please see https://www.oauth.com/oauth2-servers/access-tokens/access-token-response/ for details on how to formulate conformant OAuth error responses.
For use cases requiring only outgoing App-to-Phone, App-to-SIP, or Conference calls, providing PushConfiguration is not required. You can place these calls directly once the Sinch client is started.
- Examples how to validate a client assertion JWT at https://github.com/sinch/sinch-rtc-api-auth-examples.
- FCM documentation
- OAuth2.0 official website
- OAuth2.0 RFC
- Client Credentials flow
- Google client libraries, to support FCM token generation
- Huawei HMS OAuth Client Credentials Flow
- OAuth 2.0 Client Credentials
- OAuth
client_secret_jwt - RFC 7523 - JSON Web Token (JWT) Profile for OAuth 2.0 Client Authentication and Authorization Grants
- RFC 7521 - Assertion Framework for OAuth 2.0 Client Authentication and Authorization Grants

