This article includes third-party images for reference purposes. Third-party images are subject to change at any time.
The Salesforce Marketing Cloud Journey Builder allows you to create communication paths, called journeys, that guide customers through their interaction with your brand. The Omnichannel Connector app, which is available on the Salesforce AppExchange, adds features to your Journey Builder that allow you to automatically send Conversation API template messages (either omni-channel or channel-specific) and incorporate Conversation API callback information into your journey.
There are many aspects of a Marketing Cloud journey, and we encourage you to review the Journey Builder documentation. When using the Omnichannel Connector app, the most relevant components of a Marketing Cloud journey are:
- The entry source of the journey
- The flow control and messaging activities included in the journey.
The entry source establishes the customer information and circumstances that trigger the journey. Messaging activities can automatically send messages to those customers, and flow controls direct the customer along the paths of your communication plan based on the information provided throughout the journey.
The Omnichannel Connector app provides you with an entry source type (and corresponding Data Extension), messaging activity, and flow control activity that allow you to make use of the Conversation APIs functionality in your journey:
- The Omni Entry entry source collects inbound messages from Conversation API callbacks. Including this entry source in your journey allows you to dynamically respond to Mobile Originated (MO) messages. Use this entry source with the Omni Flow flow control.
- The Omni Flow flow control collects Conversation API-specific data from the data sources that precede it on the journey, including the Omni Entry entry source.
- The Omni Channel messaging activity allows you to send both omni-channel and channel-specific template messages on your journey. In addition to selecting which message template to use under which circumstances, you can also configure this activity to populate template parameters dynamically using any data collected throughout the journey.
The Omni Entry entry source, flow control activity, and message activity are designed to be used together. With careful administration, they may also be used with other components that are included in the Marketing Cloud Journey Builder.
This article details the steps required to:
- Prepare the tools you need to connect your accounts
- Install the Omnichannel Connector app
- Connect your Salesforce account and Conversation API project to the Omnichannel Connector app
- Use the Omni Channel message activity
- Use the Omni Entry entry source
- Use the Omni Flow flow control
- Troubleshoot your solution
Although information regarding the Omni Channel message activity is presented first in this article, note that entry sources always, and flow controls often, precede message activities in a Marketing Cloud journey.
In order to successfully integrate your Conversation API project and apps with your Salesforce account, you must ensure that the following prerequisites are met.
Each Conversation API project (and corresponding project ID) can be associated with, at most, one Omnichannel connector solution/installation link and one Salesforce Marketing Cloud ID. If you plan to set up solutions for sub-organizations or (in the case of resellers) customers, they cannot use your parent project ID or Salesforce Marketing Cloud ID. They must provide their own.
In order to successfully connect a Conversation API project to a Salesforce account, and use the Omnichannel connector with Marketing Cloud, you must have:
A license for the Salesforce Marketing Cloud service.
A corporate or enterprise edition of Marketing Cloud.
A Marketing Cloud Org set up.
An account with Marketing Cloud administrator privileges readily available.
Note that, at this time, the Omnichannel Connector app only supports Multi-Step journeys.
In order to successfully connect a Conversation API project to a Salesforce account, and use the Omnichannel connector with Marketing Cloud, you must have:
At least one Conversation API app with at least one configured channel. For information on how to create a Conversation API app and configure a channel on that app, see this Getting started guide.
At least one omni-channel template or channel-specific template. Templates can be created using the API or the Message Composer functionality of the Sinch Build Dashboard. Additionally, you may create new omni-channel templates during the configuration of the Omni Channel message activity.
Note:Omnichannel Connector support for the explicit channel message functionality of the Conversation API is currently under development.
A Conversation API webhook that is configured to deliver information to the Omnichannel Connector app. This requires that you set the appropriate values for Target URL and Triggers.
Set the Target URL to
https://sfmc-omni-connector.prod.sinch.com/omnientry/webhook/{{MID}}, where{{MID}}is your current Organization ID. YourMIDis displayed in your accound drop-down menu at the top of your Salesforce Marketing Cloud page.Note:If your organization has sub-organizations, and your Omnichannel Connector solution(s) is/are associated with those sub-organizations, you must set the
{{MID}}value to the MID of the sub-organization (NOT the MID of the parent organization).Select the
MESSAGE_DELIVERY,MESSAGE_INBOUND, andCONTACT_CREATEwebhook triggers from the Triggers drop-down list.Note:You can create up to five webhooks per Conversation API app.
In order for your Omnichannel Connector app/solution to be available for production use, you must provide Sinch's provisioning service with the following pieces of information:
The name of your organization.
The Marketing Organization ID of your organization's Marketing Cloud solution. Note that this value may be the same as the Enterprise ID.
The Enterprise ID of your organizations's Marketing Cloud solution. Note that this value may be the same as the Marketing Organization ID.
A contact name and email for the account associated with your Marketing Cloud solution.
Your Sinch Account ID.
The Omnichannel Connector app makes use of several of Sinch's endpoints. These include:
| Endpoint | Description | Location |
|---|---|---|
https://sfmc-omni-connector.prod.sinch.com | Primary URL of the Omnichannel Connector | EU |
https://eu.conversation.api.sinch.com | Conversation API (EU Production) | EU |
https://us.conversation.api.sinch.com | Conversation API (US Production) | US |
https://br.conversation.api.sinch.com | Conversation API (BR Production) | BR |
https://eu.template.api.sinch.com | Template Management API (EU Production) | EU |
https://us.template.api.sinch.com | Template Management API (US Production) | US |
https://br.template.api.sinch.com | Template Management API (BR Production) | BR |
https://provisioning.api.sinch.com | Provisioning API | EU |
https://auth.sinch.com/oauth2/token | OAuth 2.0 access token provision | US |
In order to install the Omnichannel Connector app:
Navigate to the Salesforce AppExchange.
Search for
Sinch Omnichannel Connectorand double-click the appropriate listing.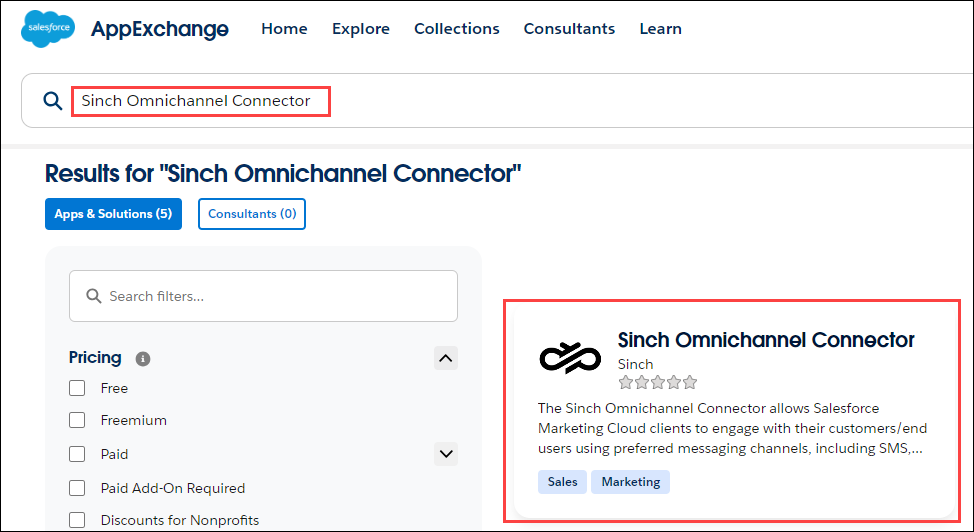
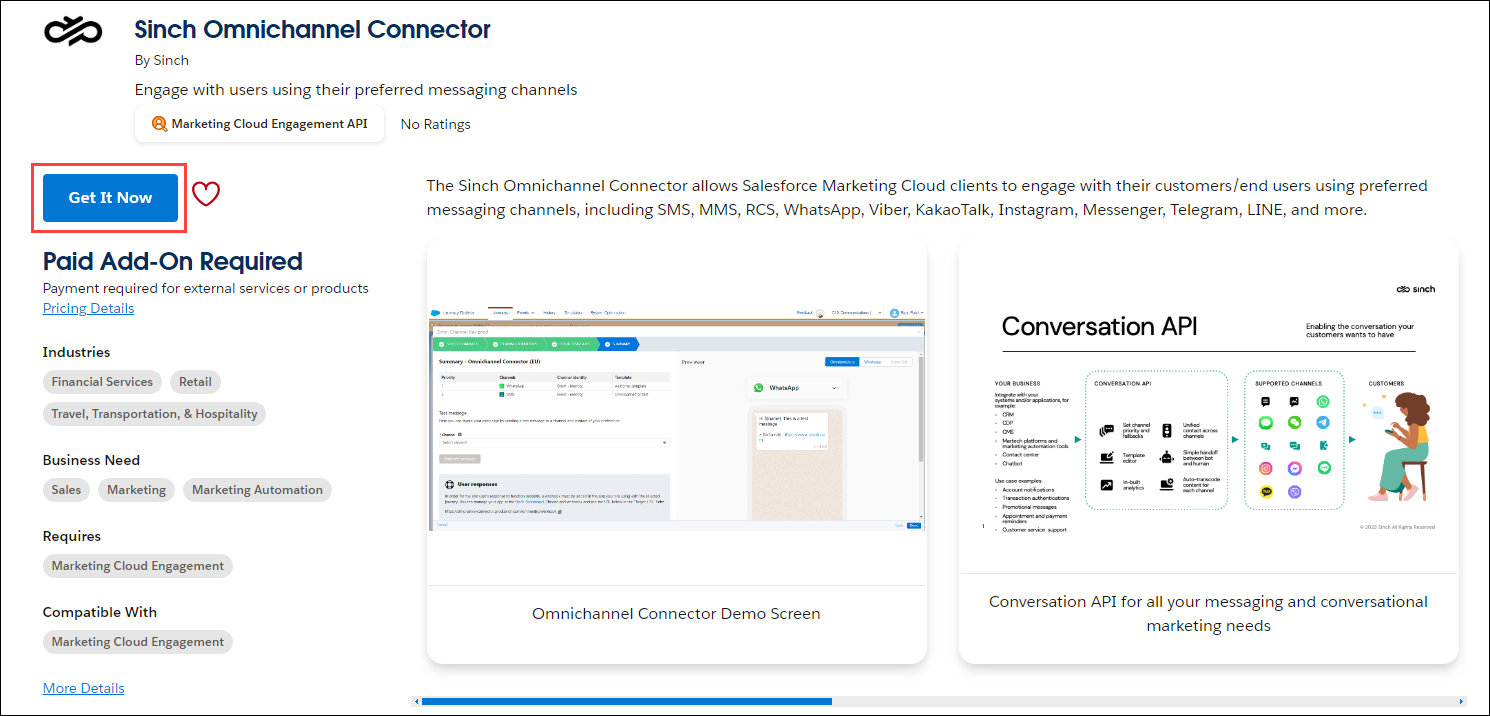
Click Get It Now.
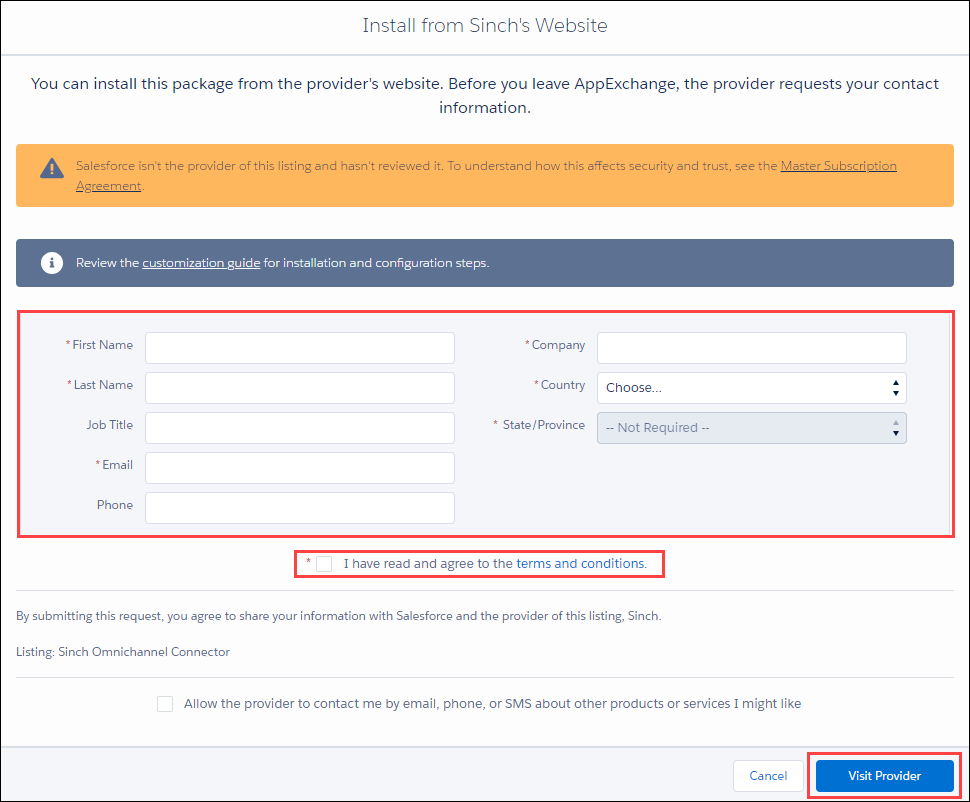
Populate the form and click Visit Provider. An inquiry that includes the data you provided is sent to Sinch.
A Sinch account manager will contact you and contract you for the Sinch Omnichannel Connector. Once contracted, Sinch will provide you with an installation URL. A Salesforce Marketing Cloud administrator must log in and click the URL. The Omnichannel Connector will be added to your Salesforce Marketing Cloud solution via the app exchange.
The time between form completion and contact with a Sinch account manager may vary.
If you encounter issues during the account connection process, you may need to enable third-party cookies.
After you have met the above prerequisites, you are ready to connect your Conversation API account and project to your Salesforce account. This is accomplished by connecting both your Salesforce account and your Conversation API project to the Omnichannel Connector app.
To accomplish both tasks, click the AppExchange tab in the Salesforce Marketing Cloud UI and select Omnichannel Connector. Then, complete the steps described in the subsections below.
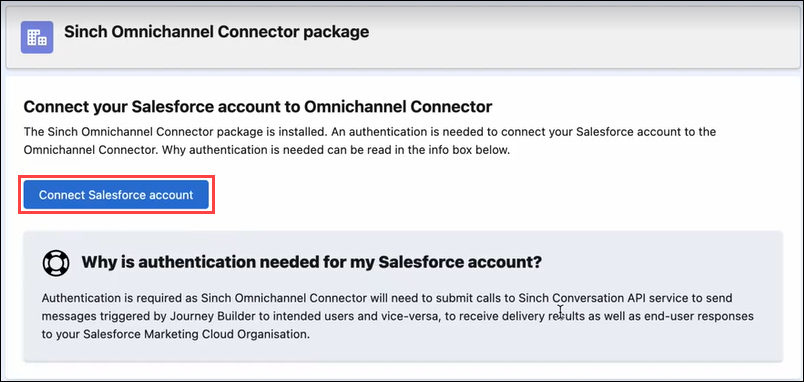
On the Sinch Omnichannel Connector package page, the Connect your Salesforce account to Omnichannel Connector section is displayed. Review the corresponding text and click Connect Salesforce account. This will connect your Salesforce account to the Omnichannel Connector.
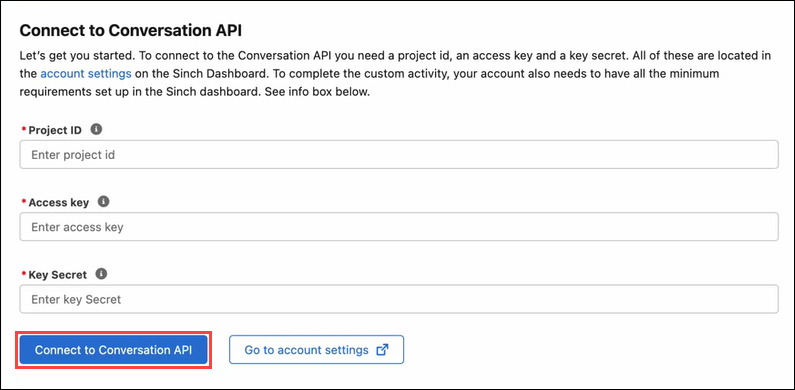
After connecting your Salesforce account, The Connect to Conversation API section is displayed. You must connect your Conversation API project to the Omnichannel Connector. In order to connect your Conversation API project to the Omnichannel connector, you'll need to have the following pieces of information (found on the Sinch Build Dashboard) readily available:
- Your access key ID
- Your access key secret
- Your project ID
To connect your account, simply enter this information into the corresponding fields. Then, click Connect to Conversation API. You may also disconnect your Conversation API project from the Omnichannel Connector app at any time.
In most cases, will only need to complete the process of connecting your Conversation API project to the Omnichannel Connector once. However, if you wish to connect to another project, or if your connection credentials change, you must disconnect your previous connection and reconnect using your new credentials.
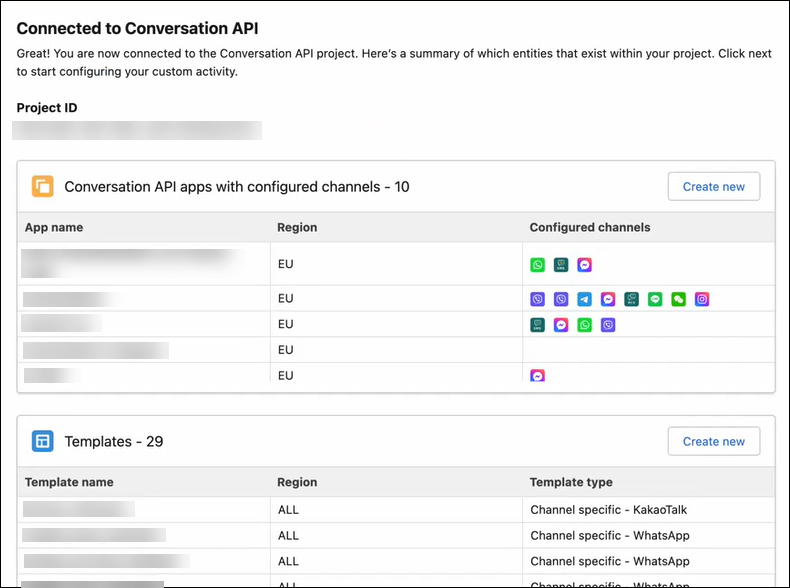
A summary of your configured Conversation API apps, channels, and templates is displayed.
After connecting your accounts, you may navigate back to the screen on which you configured the connections to update global settings that apply to all Omnichannel Connectory activities across your organization.
Currently, the only available global setting is the option to store all delivery report events as separate entries in a corresponding Data Extension.
To update these global settings:
Click the AppExchange tab in the Salesforce Marketing Cloud UI and select Omnichannel Connector.
Navigate to the Global settings panel.
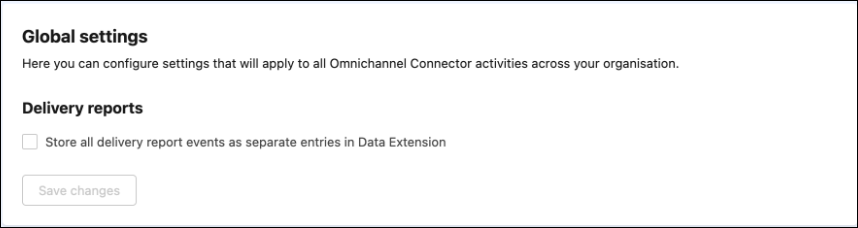
Configure the settings appropriately for your solution. Note that these settings will apply to all omnichannel Connector activities across your organization.
Click Save changes.
In order to send messages using the Omni Channel message activity in your journey, you must:
- Add the Omni Channel message activity to the journey itself
- Configure the Omni Channel message activity
To add the Omni Channel message activity to your Salesforce Journey:
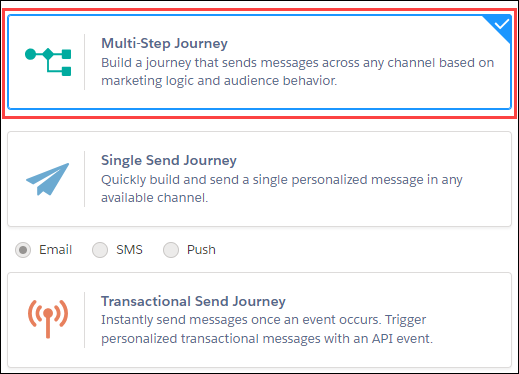
Navigate to or create the journey to which you'd like to add the Omni Channel message activity. If you are creating a journey, ensure you select a Multi-Step journey.
Locate the Omni Channel message activity under the Messages category of the ACTIVITIES section on the left side of the screen.

Click and drag the Omni Channel message activity to an appropriate space on your journey.
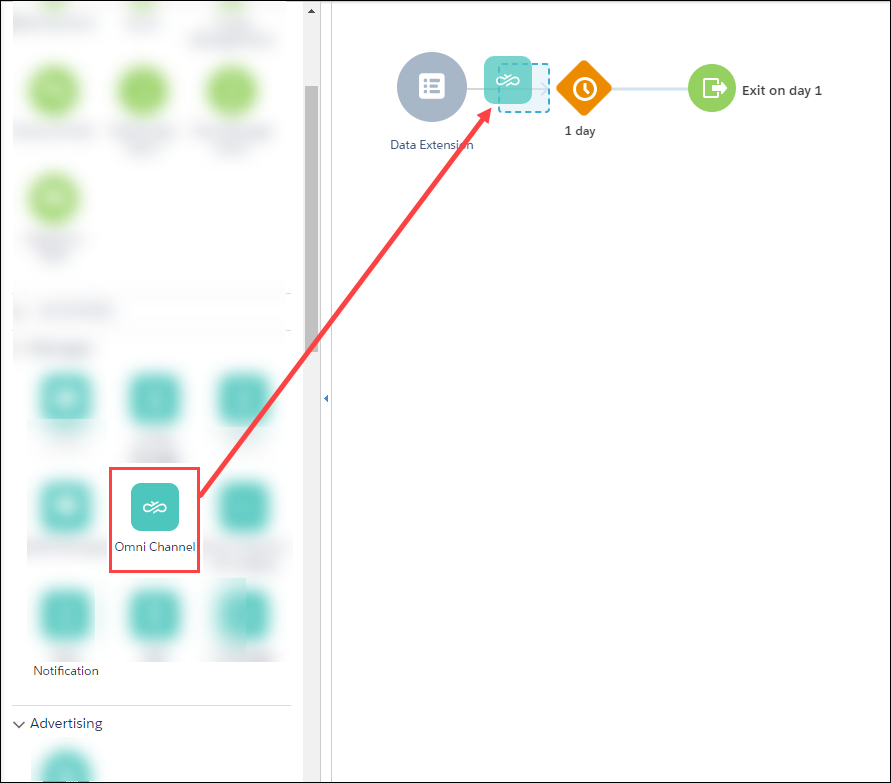
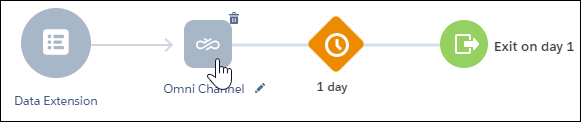
After it has been added to your journey, you must configure the Omni Channel message activity.
To configure an Omni Channel message activity that has been included in your journey:
Double-click the Omni Channel message activity that is included in your journey. The first page of the Omni Channel message activity configuration wizard is displayed.
Select the Conversation API app to use with your Journey from the Conversation API App drop-down list.

Depending on your configuration (i.e., if you have an existing solution that is already set to the
CONVERSATIONprocessing mode), you may also set the processing mode. If this is a new solution, or if your existing solution uses an app that is already set toDISPATCHmode, you will be unable to update the processing mode. Note that, by default, all new Conversation API apps are set toDISPATCHmode.Finally, you may set the queue to high priority.
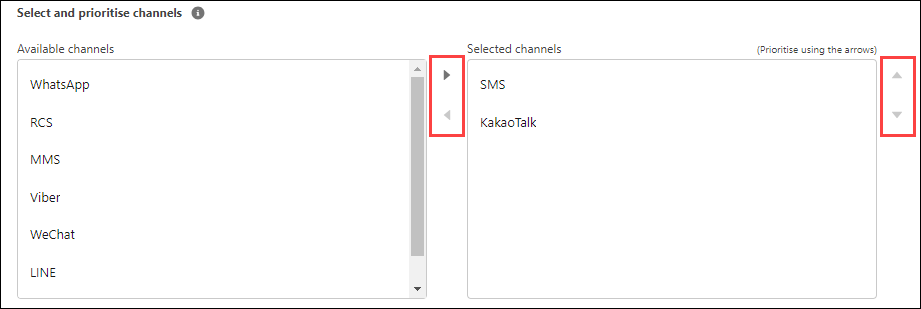
A new section, Select and prioritise channels, is displayed. Use the left and right arrow buttons to transfer channels from the Available channels list to the Selected channels list. The Selected channels are the channels the Omnichannel Connector app will use to send messages in this campaign. Use the up and down arrow buttons on the right side of the Selected channels list to determine channel priority.
When you have completed selecting and prioritising your channels, click Next in the bottom right corner of the screen. The Channel identities page is displayed.
The channel identities drop-down lists that are displayed depend on the channels you selected on the previous page. The channel identities represent the recipients of your message(s). For each displayed channel, select the source of the channel identity/recipient (for example, a phone number when using the SMS, WhatsApp, MMS, and/or RCS channels) from the drop-down list.
Note:The options available in these drop-down lists depend on the entry source that precedes the Omni Channel message activity in your journey.
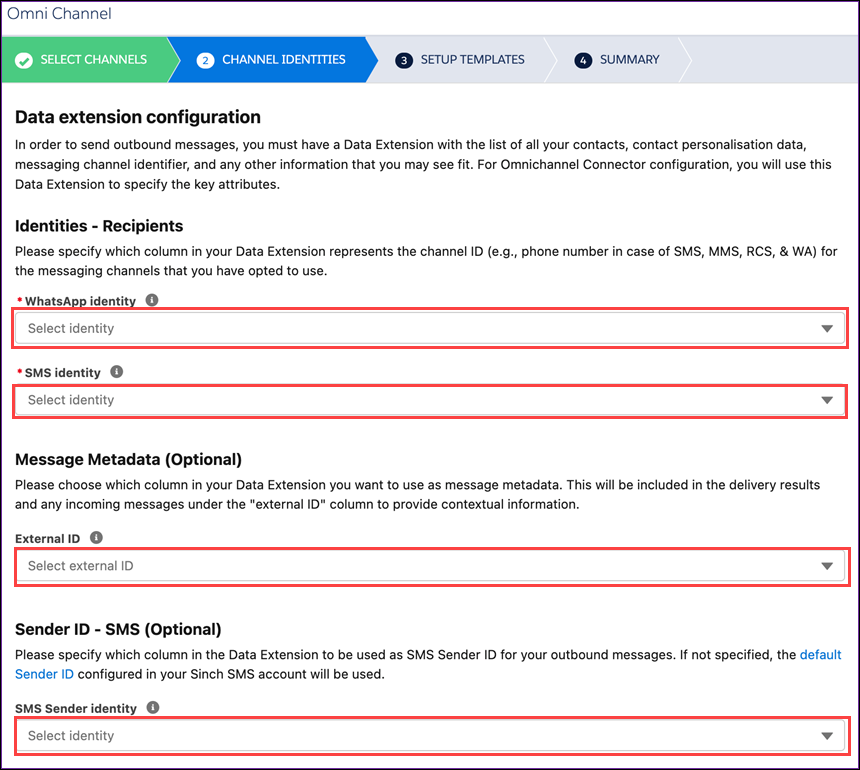
You may also specify what metadata to be included with sent messages. Additionally, you can specify an SMS Sender ID for outbound messages (the default Sender ID configured for your Sinch SMS account will be used if this value is not specified).
After you have completed selecting channel identities, click Next in the bottom right corner of the screen. The Setup templates page is displayed.
Select either Starting a conversation (if this journey is to be used to initiate conversations with recipients) or Follow up conversation (if this journey is to be used to continue a conversation). Note that some channels require an approved template to start a conversation, whereas follow up conversations allow for the use of a wider variety of templates.
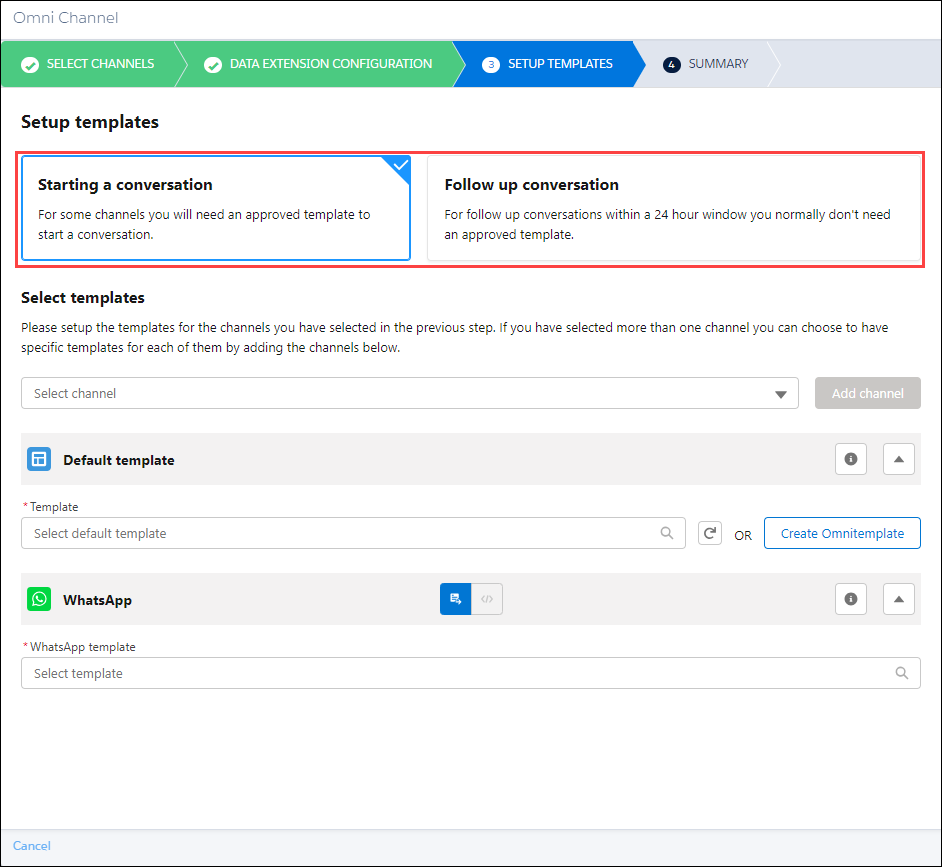
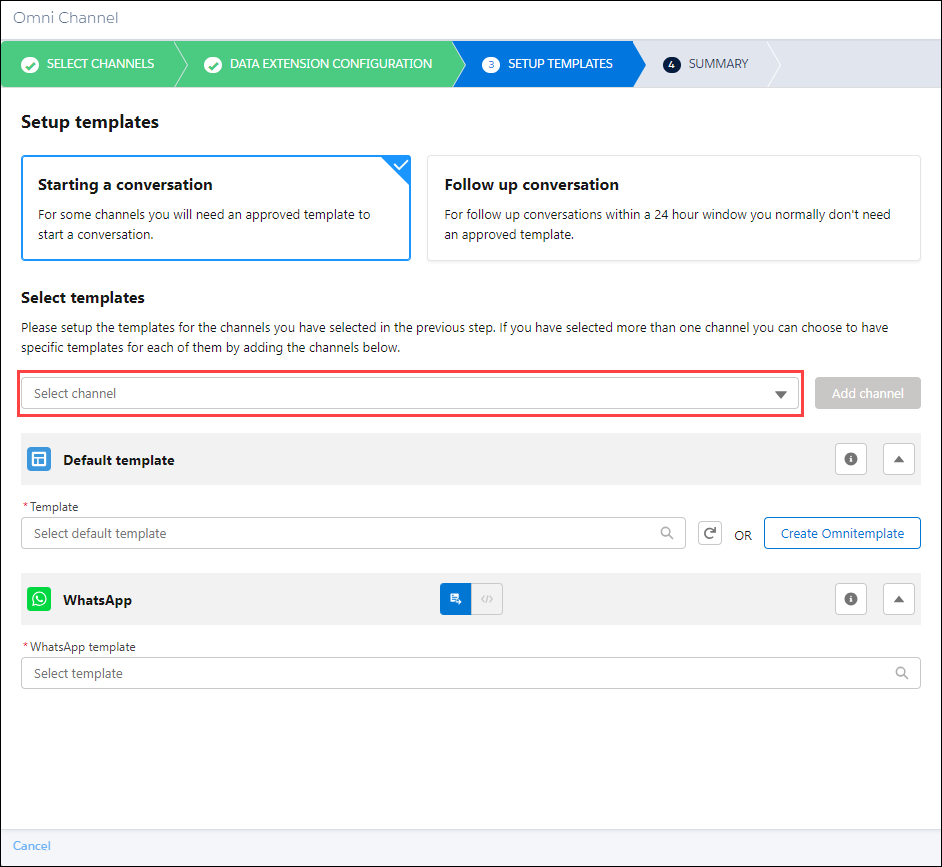
If you would like specific templates to be used with specific channels (instead of a single template for all channels), select those channels from the Select channel drop-down list and click Add channel. A section representing that channel is added to the bottom of the screen.
Note the following:
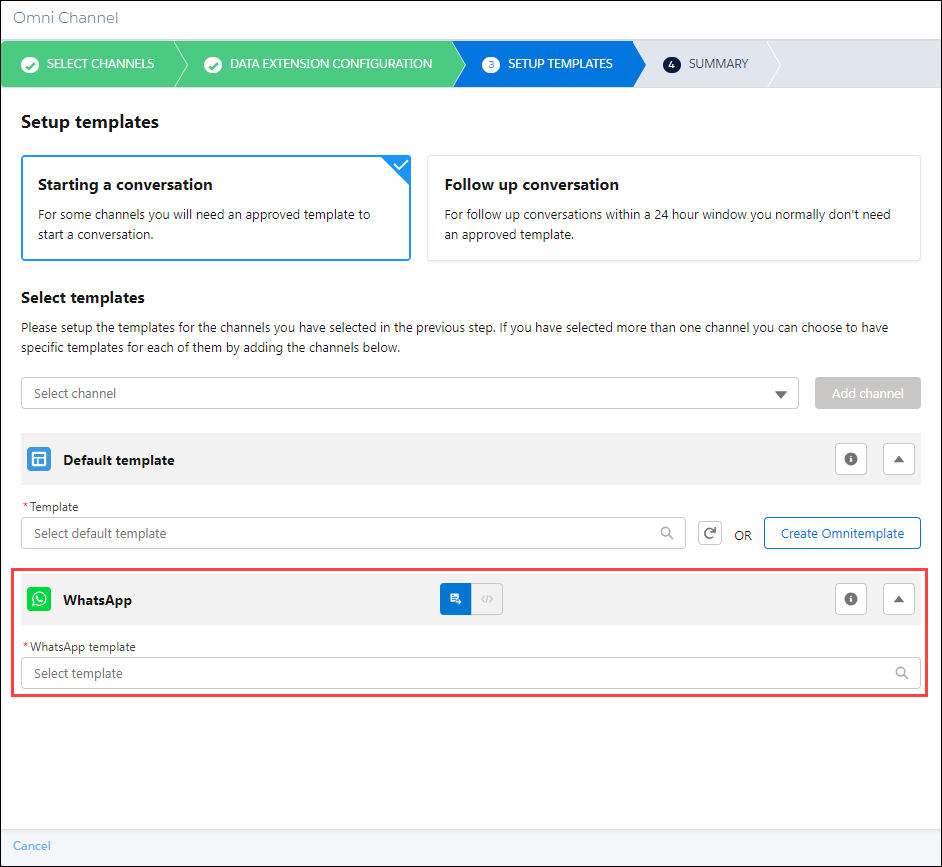
- In addition to omni-channel templates that can be used by any channel of the Conversation API, you are able to configure use channel-specific templates for certain Conversation API channels. These are templates that meet specific requirements defined by the channel itself. In many cases, these templates are used to initiate conversations. If these templates are configured in your Conversation API solution, they will appear in the drop-down list for the corresponding channel.
- In some cases, channel-specific templates may be required. If so, the corresponding channel will appear at the bottom of the screen, regardless of the channel selections you made from the Select channel drop-downlist.
Select the default omni-channel template to use when sending your message from the Select default template drop-down list, or click Create Omnitemplate to create a new template.
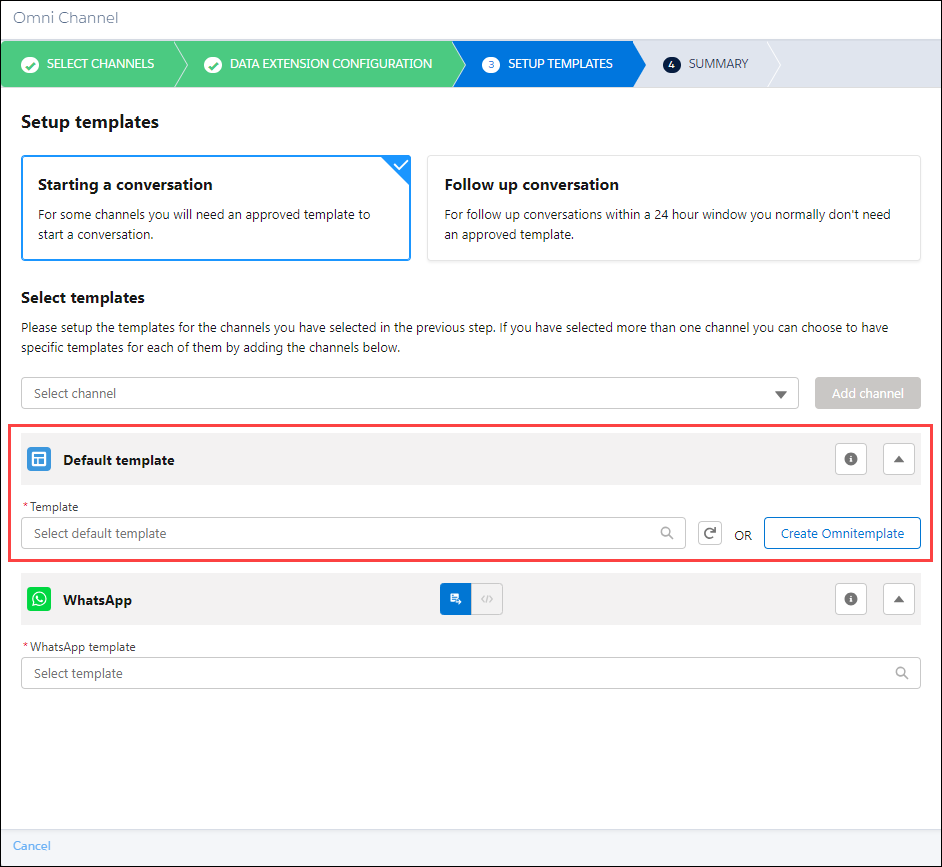
Alternatively, depending on the channels you selected earlier in the process, you may also have channel-specific templates you can choose from. These are displayed in their own sections, and may have additional options.
Note:If you selected Starting a conversation and a channel that requires an approved template in order to initiate a conversation, you must select a channel-specific template for that corresponding channel.
In some cases, you also define an explicit payload for the channel-specific template by clicking the coding icon and clicking Open editor.


After selecting the template, a preview of how the message will appear on the handset is displayed on the right side of the page.
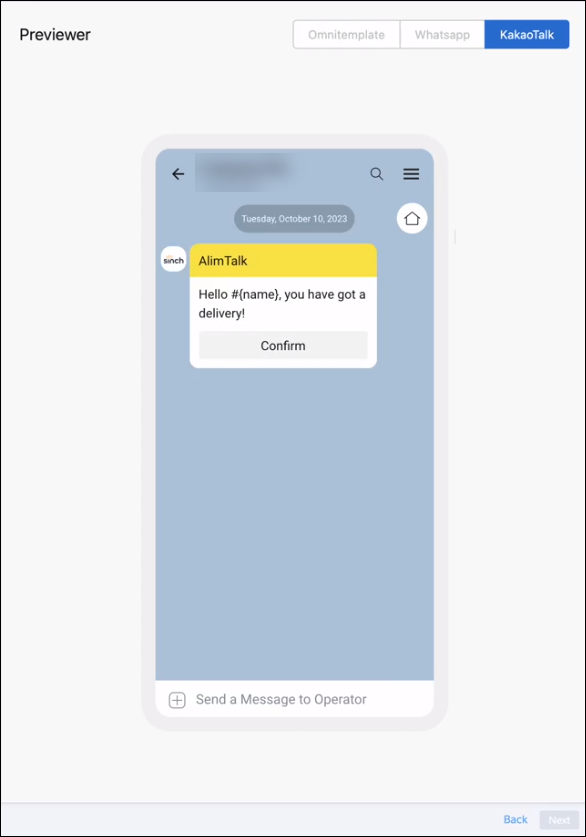
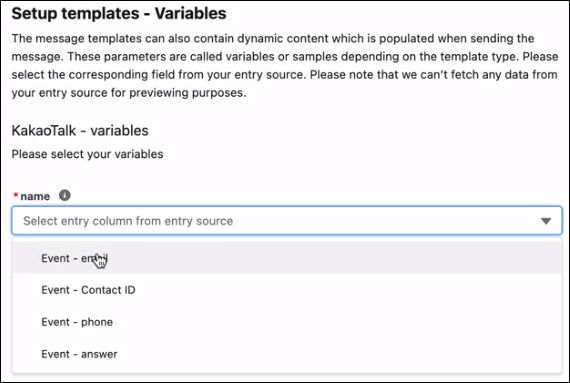
Depending on the template you choose, there may be more selections to make. Complete any remaining selections and click Continue setup. This may include configuring variables. Any variables are listed with a corresponding drop-down. For each variable drop-down, select the field from the preceding entry source that will be used to populate the variable.
 Note:
Note:If you are using an SMS channel-specific template, and you provide a value for SMS maximum parts (which corresponds to the
SMS_MAX_NUMBER_MESSAGE_PARTSproperty), you will be given an estimate of how many messages will be required when sending your content. This value is an estimate (based on the SMS maximum parts value, you encoding settings, and the lengths of the overall message content). Ensure that you monitor your outbound traffic in a production environment.After you have completed making your selections, click Next in the bottom right corner of the screen. The Summary page is displayed. First, select how you want your delivery reports and inbound messages to be stored.
- Select Save in a global bucket to store all content in a single, pre-named data extension (Omnichannel Connector Delivery Reports for delivery reports and Omnichannel Connector Inbound Messages for inbound messages from exisiting contacts).
- Select Save in a journey scoped data extension to store the content in a custom-named data extension associated with this journey. If you select this option, populate the field under the radio button with the name to use for the data extension.
- Note that inbound messages from unknown contacts will be saved in the Omnichannel Connector User-Initiated Messages Data Extension regardless of your selection.
- After making your selections, click Confirm Data Extensions.
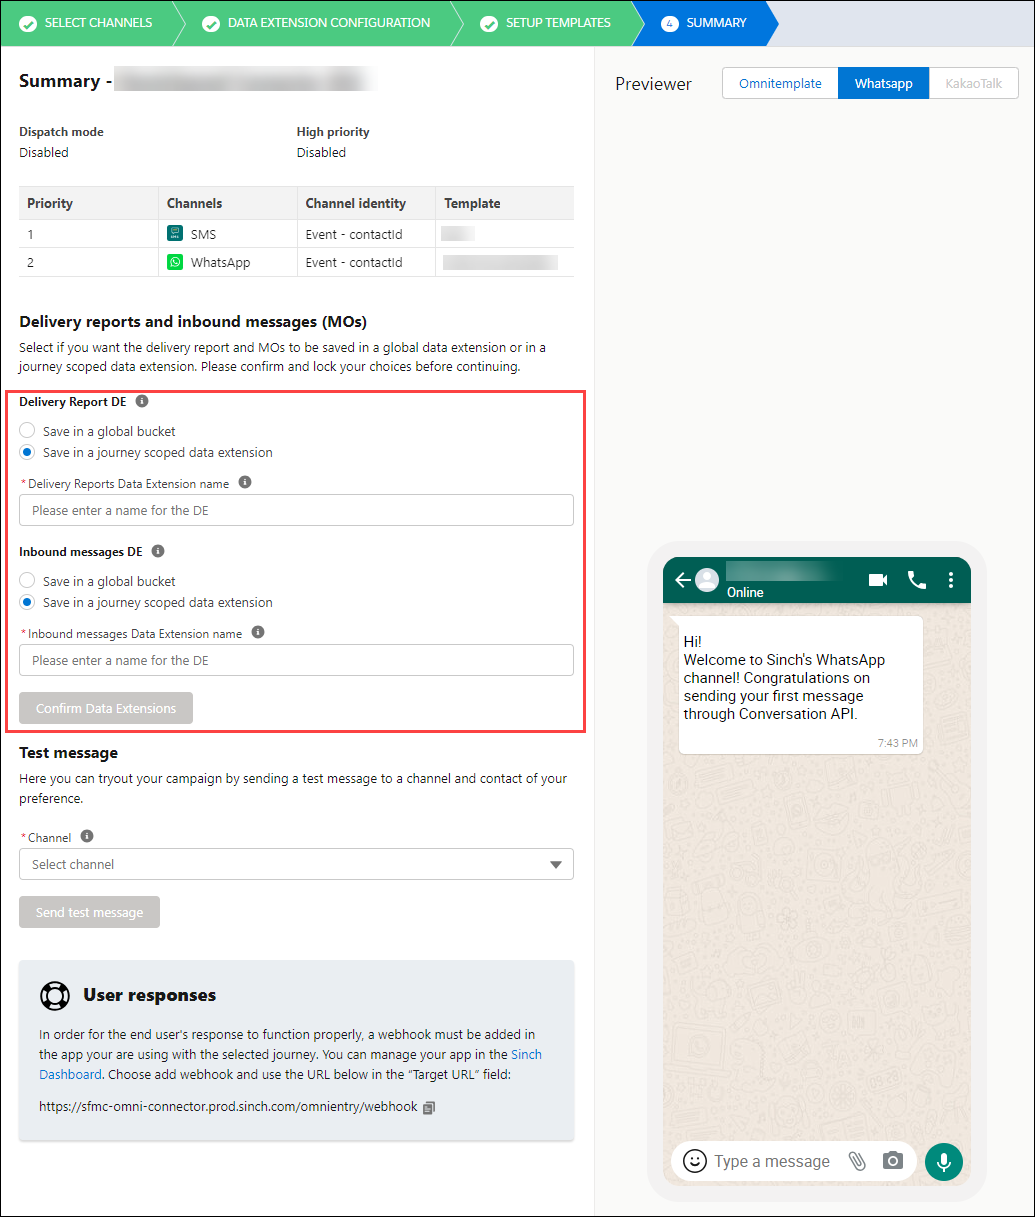
Then, review the rest of your your configuration options. You may optionally send a Test message by selecting the appropriate channel, populating required fields, and clicking Send. This will emulate the Omni Channel message activity's functionality, though the information you provide will be populated by the entry preceding the Omni Channel message activity in your journey in production.

Once you have reviewed your configuration (and, optionally, sent a test message and validated that the test message was received), click Done in the bottom right of the screen. If there are any issues with your test message, or if you need to update your configuration, use the Back button to navigate through the configuration process and update your selections.
After messages are sent on the Conversation API, delivery reports are generated. Data from these delivery reports is transferred to your connected Omnichannel Connector app and stored in a Data Extension called Omni Connector Delivery Reports. This Data Extension includes the following fields (any corresponding Conversation API delivery report fields are noted in the table):
| Data Extension field | Conversation API field | Description |
|---|---|---|
eventId | N/A | The ID of the journey event associated with this Data Extension |
eventTime | N/A | The time at which the journey event occurred. |
messageId | message_id | The ID of the sent message. |
contactId | contact_id | The ID of the contact to whom the message was sent. Will be empty if the processing_mode of the corresponding Conversation API app is set to DISPATCH. |
identity | channel_identity | The identity of the contact in the underlying channel (for example, a phone number for the SMS channel or WhatsApp channel). See the identity field of the Channel Identity object for details. |
channel | channel | The channel on which the message was sent. See the channel field of the Channel Identity object for details. |
status | status | The delivery status of the message. See Delivery Status for details. |
errorCode (if present) | The code field of the reason object | High level classification of the error. See Error Codes for details. |
errorMessage (if present) | The description field of the reason object | A description of the error. See Reason for more information. |
journeyId | N/A | The ID of the corresponding journey. |
journeyName | N/A | The name of the corresponding journey. |
journeyVersion | N/A | The version of the corresponding journey. |
activityId | N/A | The ID of the activity that supplied the data to this Data Extension. |
activityName | N/A | The name of the activity that supplied the data to this Data Extension. |
templateChannelType | N/A | Either Omnichannel or a channel-specific template. |
templateId | N/A | The ID of the template used to send the message. |
templateName | N/A | The name of the template used to send the message. |
omnichannelMessageId | N/A | An internal identification value that is used by backend processes. |
externalId | N/A | An external identifier |
You may export this data to process it externally. You may also use the Omni Flow flow control to configure your journey to respond to the status of the delivery report.
The Omnichannel Connector app provides you access to the Omni Entry entry souce, which is a type of Event entry source, that you can use in your journey.
This entry source listens for mobile originated (MO) messages delivered with webhooks associated with your Conversation API solution. This information is stored in an automatically created Data Extensions that are associated with the Omni Entry source. You are then able to use that information to trigger your Journey and propagate information throughout it.
There are two types of Omni Entry listeners you may create:
| Omni Entry type | Description | Data Extensions |
|---|---|---|
| Business-initiated | This event will listen for inbound messages sent during a conversation initiated by you (the business). These MO messages will come from contacts that already existing within your Conversation API solution. | Either Omnichannel Connector Inbound Messages or a custom-named Data Extension, depending on the configuration of the corresponding journey. |
| User-initiated | This event will listen for inbound messages sent by a contact that does not yet exist within your Conversation API solution. Note that, after receiving such a message, a contact will immediately be created for the sender within your Conversation API solution. Therefore, this type of Omni Entry event will only ever collect the first MO message sent by a (then) unknown user. It is considered best practice to only have one User-initated event active in your solution at a time. | Omnichannel Connector Inbound Messages |
Note the following:
In order for the Omnichannel Connector app to successfully collect information from Conversation API callbacks, you must ensure that you have configured a webhook that connects with the Omnichannel Connector app. See the Conversation API prerequisites section for more information.
When configuring a Business-intiated Omni Entry within an Event entry source, you will select a journey for it to listen to. The Omni Entry entry source will collect MO messages sent in response to the messages sent during the that journey.
The Data Extensions that are automtically created by the Omni Entry Event are accessible outside of the journey. You can export the data (that is, the MO messages) contained in this Data Extension for external processing.
The tables below details how the fields in these automatically created Data Extensions are mapped to the corresponding Conversation API fields:
| Business-initiated Data Extension field | Conversation API MO field | Description |
|---|---|---|
id | N/A | An automatically created unique ID. Used for backed processing |
contactId | contact_id | The ID of the contact from which the MO originated. This is a unique value assigned to the contact by the Conversation API. |
userResponse | message | The content of the MO message. |
identity | The identity field of the channel_identity object | A channel recipient identity, which is an identifier for the contact for a specific channel. For example, a phone number in the case of the SMS and WhatsApp channels. |
channel | The channel field of the channel_identity object | The channel on which the MO message was sent and with which the identity is associated. |
status | N/A | The status of the message. This field is not normally included in inbound message callbacks, but may instead be populated when another callback is triggered. |
| User-initiated Data Extension field | Conversation API MO field | Description |
|---|---|---|
id | N/A | An automatically created unique ID. Used for backed processing |
userMessage | message | The content of the MO message. |
identity | The identity field of the channel_identity object | A channel recipient identity, which is an identifier for the contact for a specific channel. For example, a phone number in the case of the SMS and WhatsApp channels. |
channel | The channel field of the channel_identity object | The channel on which the MO message was sent and with which the identity is associated. |
createdAt | N/A | The time that the data extension entry was created. |
The Data Extensions that are automatically created by the Omni Entry Event should not be modified. If you wish to capture other data or fields, work with your Sinch account manager to create a separate Data Extension.
To successfully include the Omni Entry entry source in your journey, you must:
Additionally, it is considered a best practice to the include an Omni Flow flow control immediately after the Omni Entry entry source. This allows you to direct the path of the journey based on keywords extracted from an MO sent by your end-users. See Using the Omni Flow flow control section for more information.
To add the Omni Entry entry source to your Salesforce Journey:
Navigate to or create the journey to which you'd like to add the Omni Entry entry source. If you are creating a journey, ensure you select a Multi-Step journey.
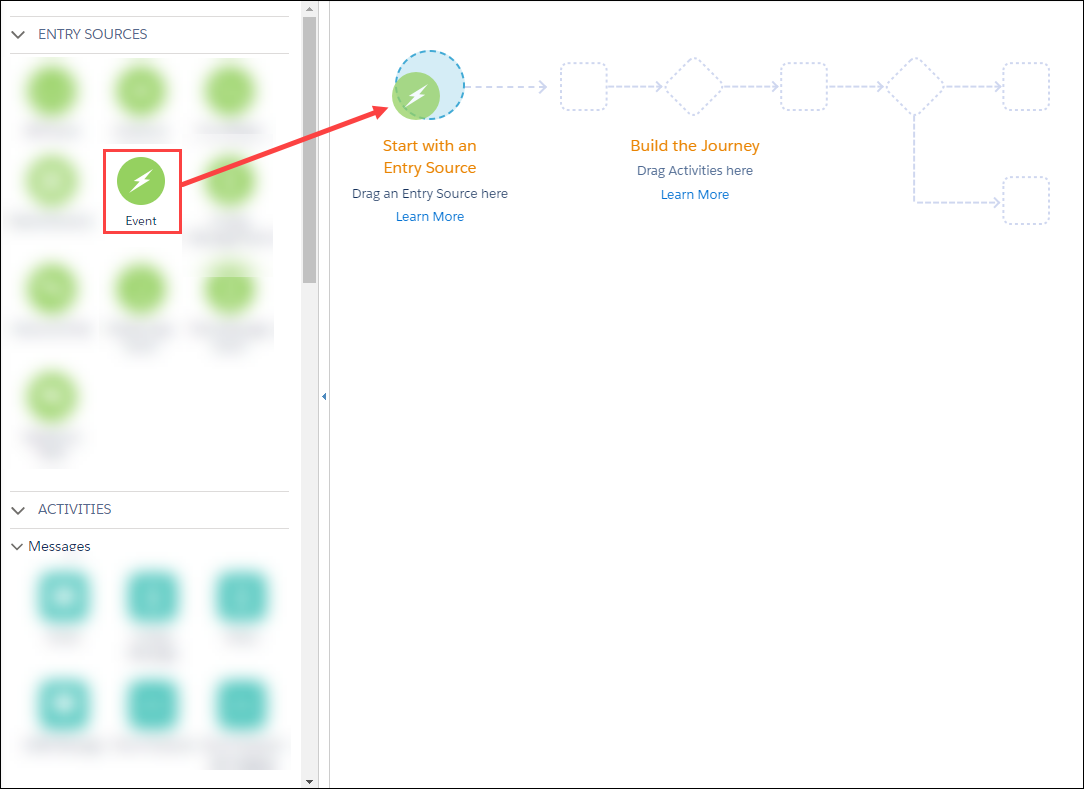
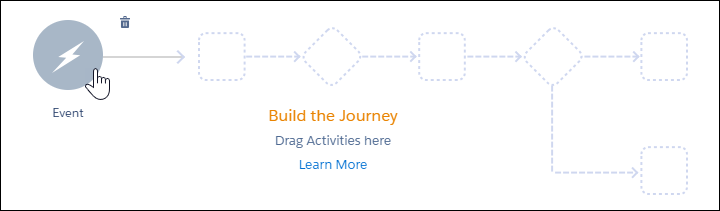
Locate the Event entry source under the ENTRY SOURCES category on the left side of the screen.

Click and drag the Event entry source to the entry source space on your journey.
After it has been added to your journey, you must configure the Omni Entry entry source.
To configure the Omni Entry entry source:
Double-click the Event entry source that is included in your journey.
Select the Omni Entry Event type to continue the configuration.
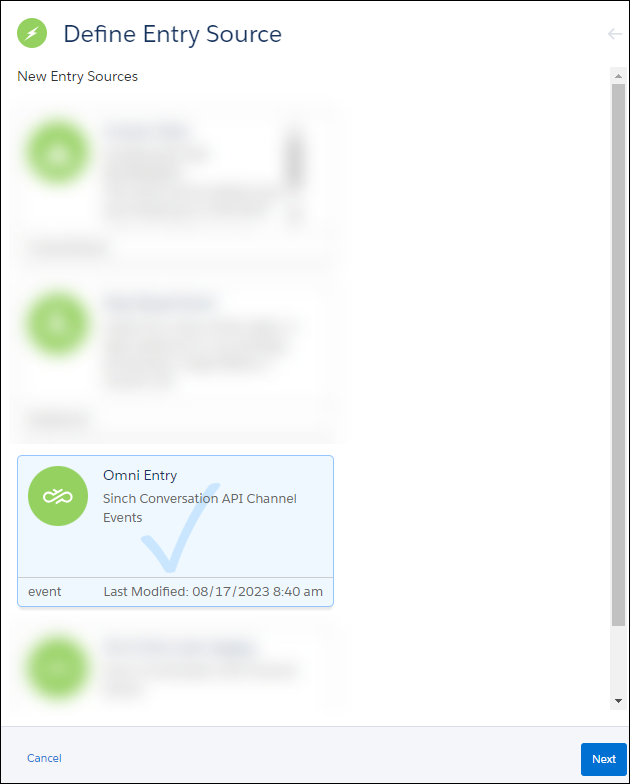
Click Next.
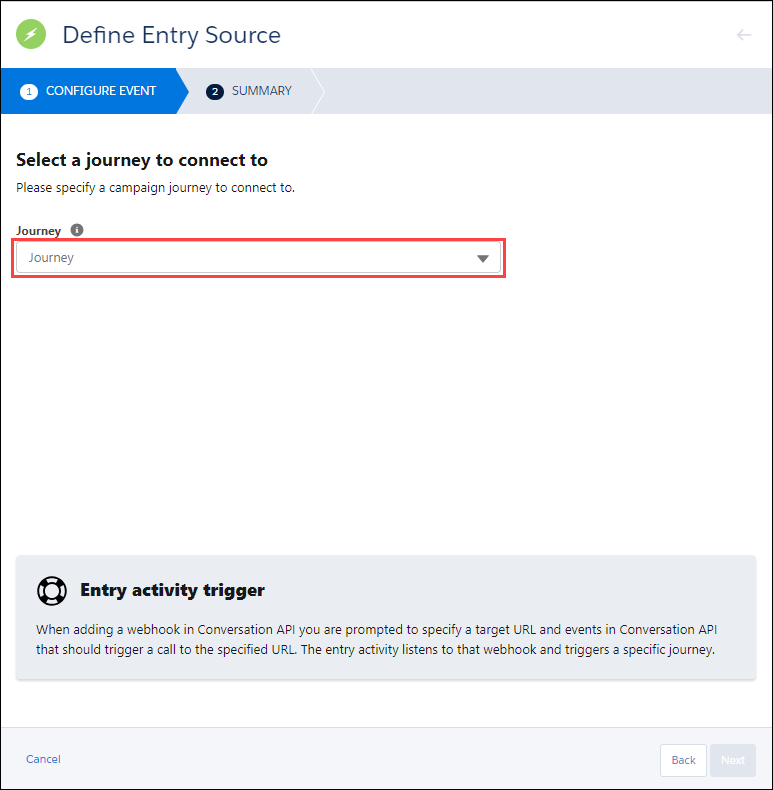
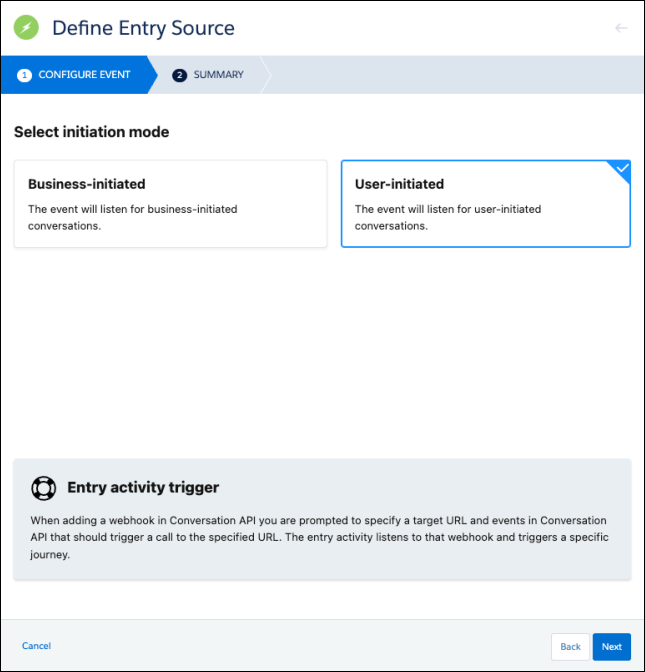
The CONFIGURE EVENT page is displayed. Select your initiation mode.
- Business-initiated can be selected if you plan to begin conversations by sending messages to known recipients. Select the journey to which this entry source wil listen from the Journey drop-down list. The MO messages sent in respones to the selected journey will be used to populate an automatically created Data Extension.
User-initiated can be selected if you anticipate conversations being started by unknown contacts (that is, contacts that don't yet exist in your Conversation API contact list). These message events will be stored in an automatically created data extension called Omnichannel Connecter User-Initiated Messages. Note the following:
Upon receiving a message from an unknown contact, a new contact is created for them in the Conversation API system. So, while that first message is stored in the Omnichannel Connector User-Initiated Messages data extension, further messages from this user will be stored in the Omnichannel Connector Inbound Messages data extension.
To avoid discrepancies, you should have, at most, one active User-initiated Omni Entry entry source.
Click Next.
The SUMMARY page is displayed. Confirm that you have made the correct journey selection and click Done. Alternatively, if you'd like to select a different journey, click the Back button and make a new selection.
The Salesforce Marketing Cloud Journey Builder provides you with a number of default entry sources that you can use in your Journey. When configuring Journeys that make use of the Sinch Omnichannel Connector, you will likely most often use the Data Extension entry source. This is a flexible data structure that allows you to create, modify, and update rows of information that can then be used throughout the journey.
In addition to Data Extensions, you may also use Events, API Events, and Salesforce Data as an entry source. API Events allow you to extract data from API calls that can be used to initiate, and propagate information throughout, your journey. While the information provided by the API Call entry source is ultimately stored in a Data Extension structure, it differs from the Data Extension entry source in that the journey only processes the information included in the API call itself, not all of the entries in the Data Source in which the information is recorded.
Entry sources other than Data Extensions, Events, API Events, and Salesforce Data are not supported at this time.
The Omni Flow flow control allows you to extract information from prior sources on the journey (including information extracted from the Omni Channel message activity and MO messages retrieved by the Omni Entry entry source) and use it to split your journey and populate fields in subsequent activities. To successfully include the Omni Flow flow control in your journey, you must:
To add the Omni Flow flow control to your Salesforce Journey:
Navigate to or create the journey to which you'd like to add the Omni Flow flow control.If you are creating a journey, ensure you select a Multi-Step journey.
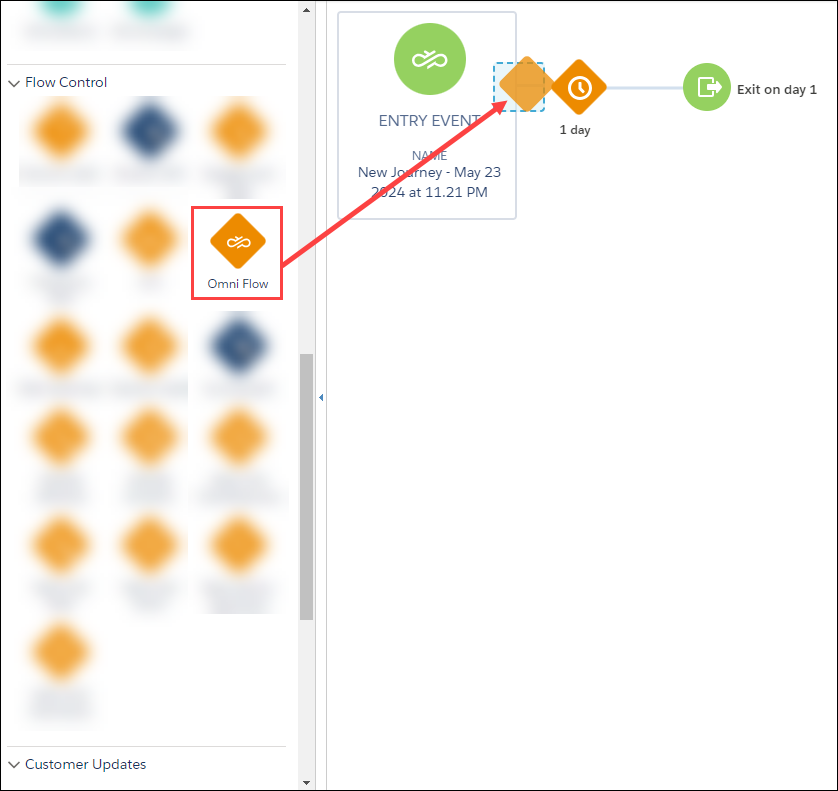
Locate the Omni Flow flow control under the Flow Control category of the ACTIVITIES section on the left side of the screen.

Click and drag the Omnichannel flow control to the appropriate space on your journey. It must be placed directly after an Omni Entry entry source (if it is to process information extracted from MO messages delivered in response to messages sent on another journey) or a combination of an Omni Channel messaging activity and a Wait Until Event control (if it is to extract responses/information from the Omni Channel activity).
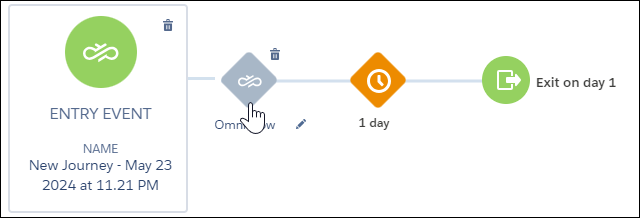
After it has been added to your journey, you must configure the Omni Flow flow control.
To configure the Omni Flow flow control in your Salesforce Journey:
Double-click the Omni Flow flow control that is included in your journey. The first page of the Omni Flow flow control configuration wizard is displayed.
Select whether you want to split the flow of your journey By keyword or By delivery status.
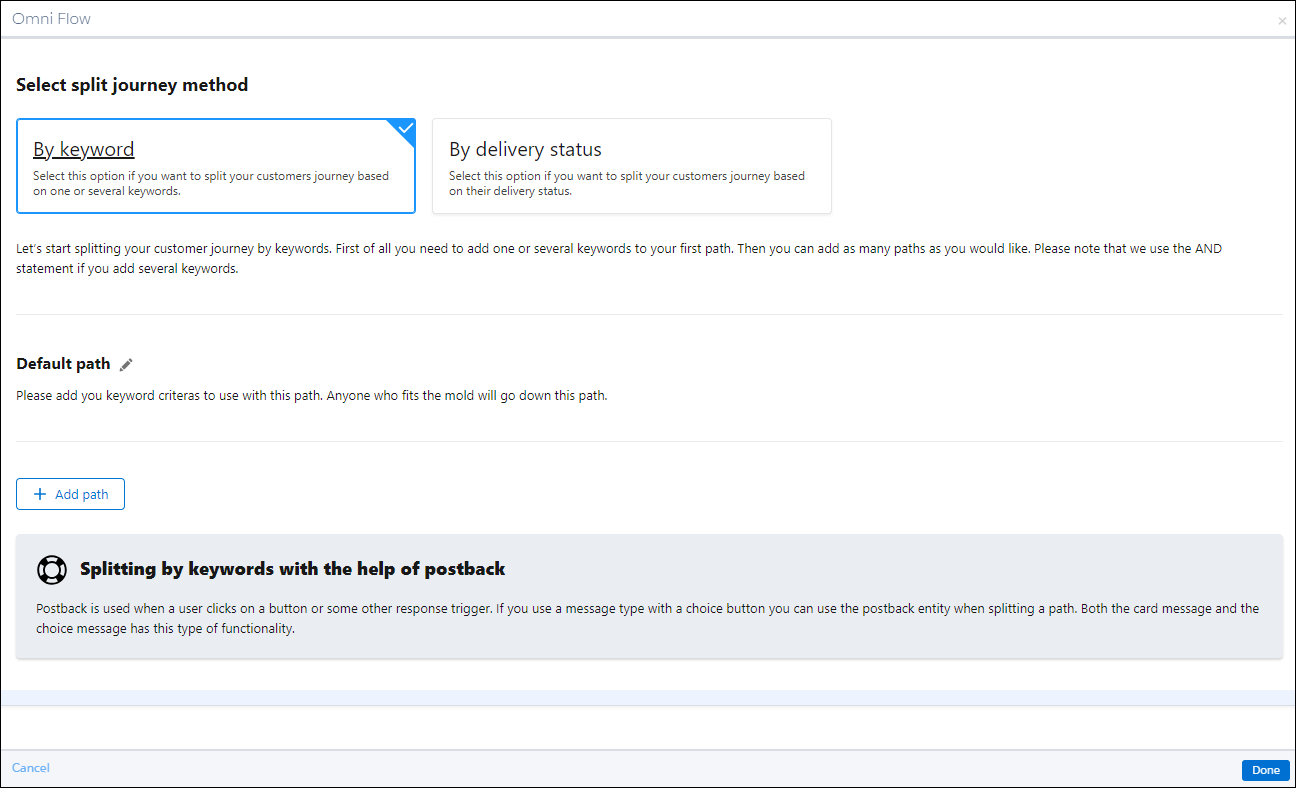
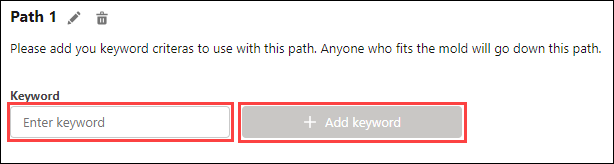
Add your first path, which should be different than the Default path. Click Add path.

Define either a keyword (or keywords) or a delivery status (or statuses) to associate with this path, depending on the selection you made in the previous step. First, populate the field, then click Add keyword or Add delivery status.
Add as many additional paths (with unique keywords or delivery statuses) as your solution requires by using the same method in the previous step.
Note:To rename a path, click the pencil icon and enter the new name into the editable field.

When you are done adding paths, click Done.
As discussed in previous sections, you may include an Omni Flow flow control directly after a combination of a Omni Channel activity and a Wait Until Event control.
In order for this configuration to function properly, you must configure the Wait Until Event control to listen for the API event that is automatically created by the Omni Channel activity. This will provide the subsequent Omni Flow control with the appropriate pieces of data that will allow it to direct the path based on status or keywords.
If you encounter unexpected behavior or results while using the Omnichannel Connector app, you can follow the troubleshooting steps described below or review analytic information for your Conversation API solution.
If you encounter issues while using the Omnichannel Connector app, there are you may troubleshoot your solution by completing the following steps in order:
Retry the action (for example, sending a message). Your solution may have encountered a temporary error that may resolve itself as circumstances change. For example, if an automatic contact management operation interferes with a send message request, the same request may succeed on a subsequent attempt.
Review the steps described in this article on troubleshooting the Conversation API. Your Omnichannel Connector app is directly connected to a Conversation API app, and resolving issues with your Conversation API solution overall will likely resolve any issues you encounter with your corresponding Omnichannel Connector app.
You can view analytic information about your Conversation API solution, including message delivery data, Monthly Active Users (MAU), conversation data, channel statistics, and more on the Sinch Build Dashboard.
For the initial release, the Omnichannel Connector data will be hosted in the Sinch AWS EU region. In the future, we will expand the hosting to other regions.
The support process is the same as the process for the Conversation API. You may submit a ticket to the Sinch 24x7 team, and they will triage the case. If they cannot resolve it, then the case will be escalated to Sinch tier-2 support and eventually to Sinch Dev team members.
Yes.
Yes.
Yes, ASP clients can use the Omnichannel Connector app in their solution(s).
The maximum speed of the Salesforce Marketing Cloud's Journey Builder is 50 TPS (when using the custom activities). The Sinch Omnichannel Connector supports this throughput level.
Yes, in order to successfully connect your accounts, you must enable third-party cookies. This is true regardless of the browser you use when connecting the accounts. Note that, in some cases, third-party cookies may be blocked by default on certain browsers. If these cookies are not un-blocked, you may be unable to complete your integration.