As an ASP, you can enable WhatsApp functionality for your customers through the WhatsApp channel of the Sinch Conversation API.
Your customers can complete onboarding either directly through the Sinch Build Dashboard or through a custom onboarding experience that you build using Meta’s Embedded Signup flow and Sinch APIs.
During onboarding, information provided by your customers (either in the Sinch Dashboard or your custom interface) is used by Sinch’s backend services to:
- Create and manage WhatsApp Business Accounts (WABAs)
- Onboard a phone number to Meta and register it as WhatsApp Sender
- Link senders to Conversation API apps that allow sending and receiving WhatsApp messages
This guide explains the steps required to onboard as a WhatsApp ASP, whether you plan to integrate the process into your own system or rely entirely on Sinch’s built-in flow.
If you just want a quick introduction to how the Conversation API works (including WhatsApp), check out our Conversation API Getting Started guides.
You can onboard your customers in one of two ways: by exclusively using the Sinch Build Dashboard or by using the Sinch Build Dashboard in conjunction with your own onboarding experience. The two methods each begin with identical steps, with extra steps being required for creating your own onboarding experience:
- Using the Sinch Build Dashboard – This method is recommended for most ASPs. Complete the instructions found under Setting up your account, Becoming a Tech Provider, and Creating a Solution with Sinch at Meta.
- Building your own onboarding experience – Follow all steps described above and also complete the instructions found under Providing your own customer onboarding experience.
Throughout this guide, we assume you are a new Sinch customer. If you are an existing customer that already has access to the Conversation API, you may begin with Creating a customer project.
To set up your Sinch account as an ASP, you must:
To onboard as an ASP, first create a Sinch account:
- Visit the Sinch Build Dashboard signup page.
- Fill in your information and desired account credentials.
- Verify your email and phone number using the confirmation links and codes provided.
- Complete any remaining steps in the signup wizard.
After signing up, contact your Sinch account manager to upgrade your account to a postpaid account.
Also, you must have an account type that matches your organization's goals. Because you are planning to offer customers (and yourself) access to Sinch's WhatsApp service, you must have a Reseller account. Throughout this guide, we assume you have a Reseller account.
For more information, see How to sign up for your free Sinch account.
Your account must have access to the Conversation API to provide WhatsApp functionality:
- Visit the Sinch Build Dashboard.
- Select Conversation API from the left menu.
- Click GET ACCESS on the Overview page.
- Review and accept the Terms of Service.
If you already contracted WhatsApp through Sinch Sales, you may already have access and do not need to repeat this step.
For details, see: How can I request access for Conversation API?
Afterward, coordinate with your Sinch account manager to confirm WhatsApp access in Sinch systems.
Sinch provides WhatsApp services to ASPs via Meta Partner Solutions. These solutions let both parties share WhatsApp assets and permissions. You must become a Tech Provider, add Sinch as a Solution Partner, and complete the configuration steps in the Sinch Build Dashboard.
Follow this guide: How does Sinch provide WhatsApp assets and functionality to ASPs?
Meta partner solutions allow the parties of the solution to share WhatsApp assets and services. These partnerships are between Tech Providers (or Tech Partners, which are upgraded Tech Providers) and Solution Partners. As an ASP, you must create at least one Solution with Sinch to jointly manage your customers’ WABAs.
To create or select a partner solution to use with your customer:
Visit the Sinch Build Dashboard.
Select your parent project.
Click the Overview tab under WhatsApp.
You must either select or create a partner solution to use with your customers.
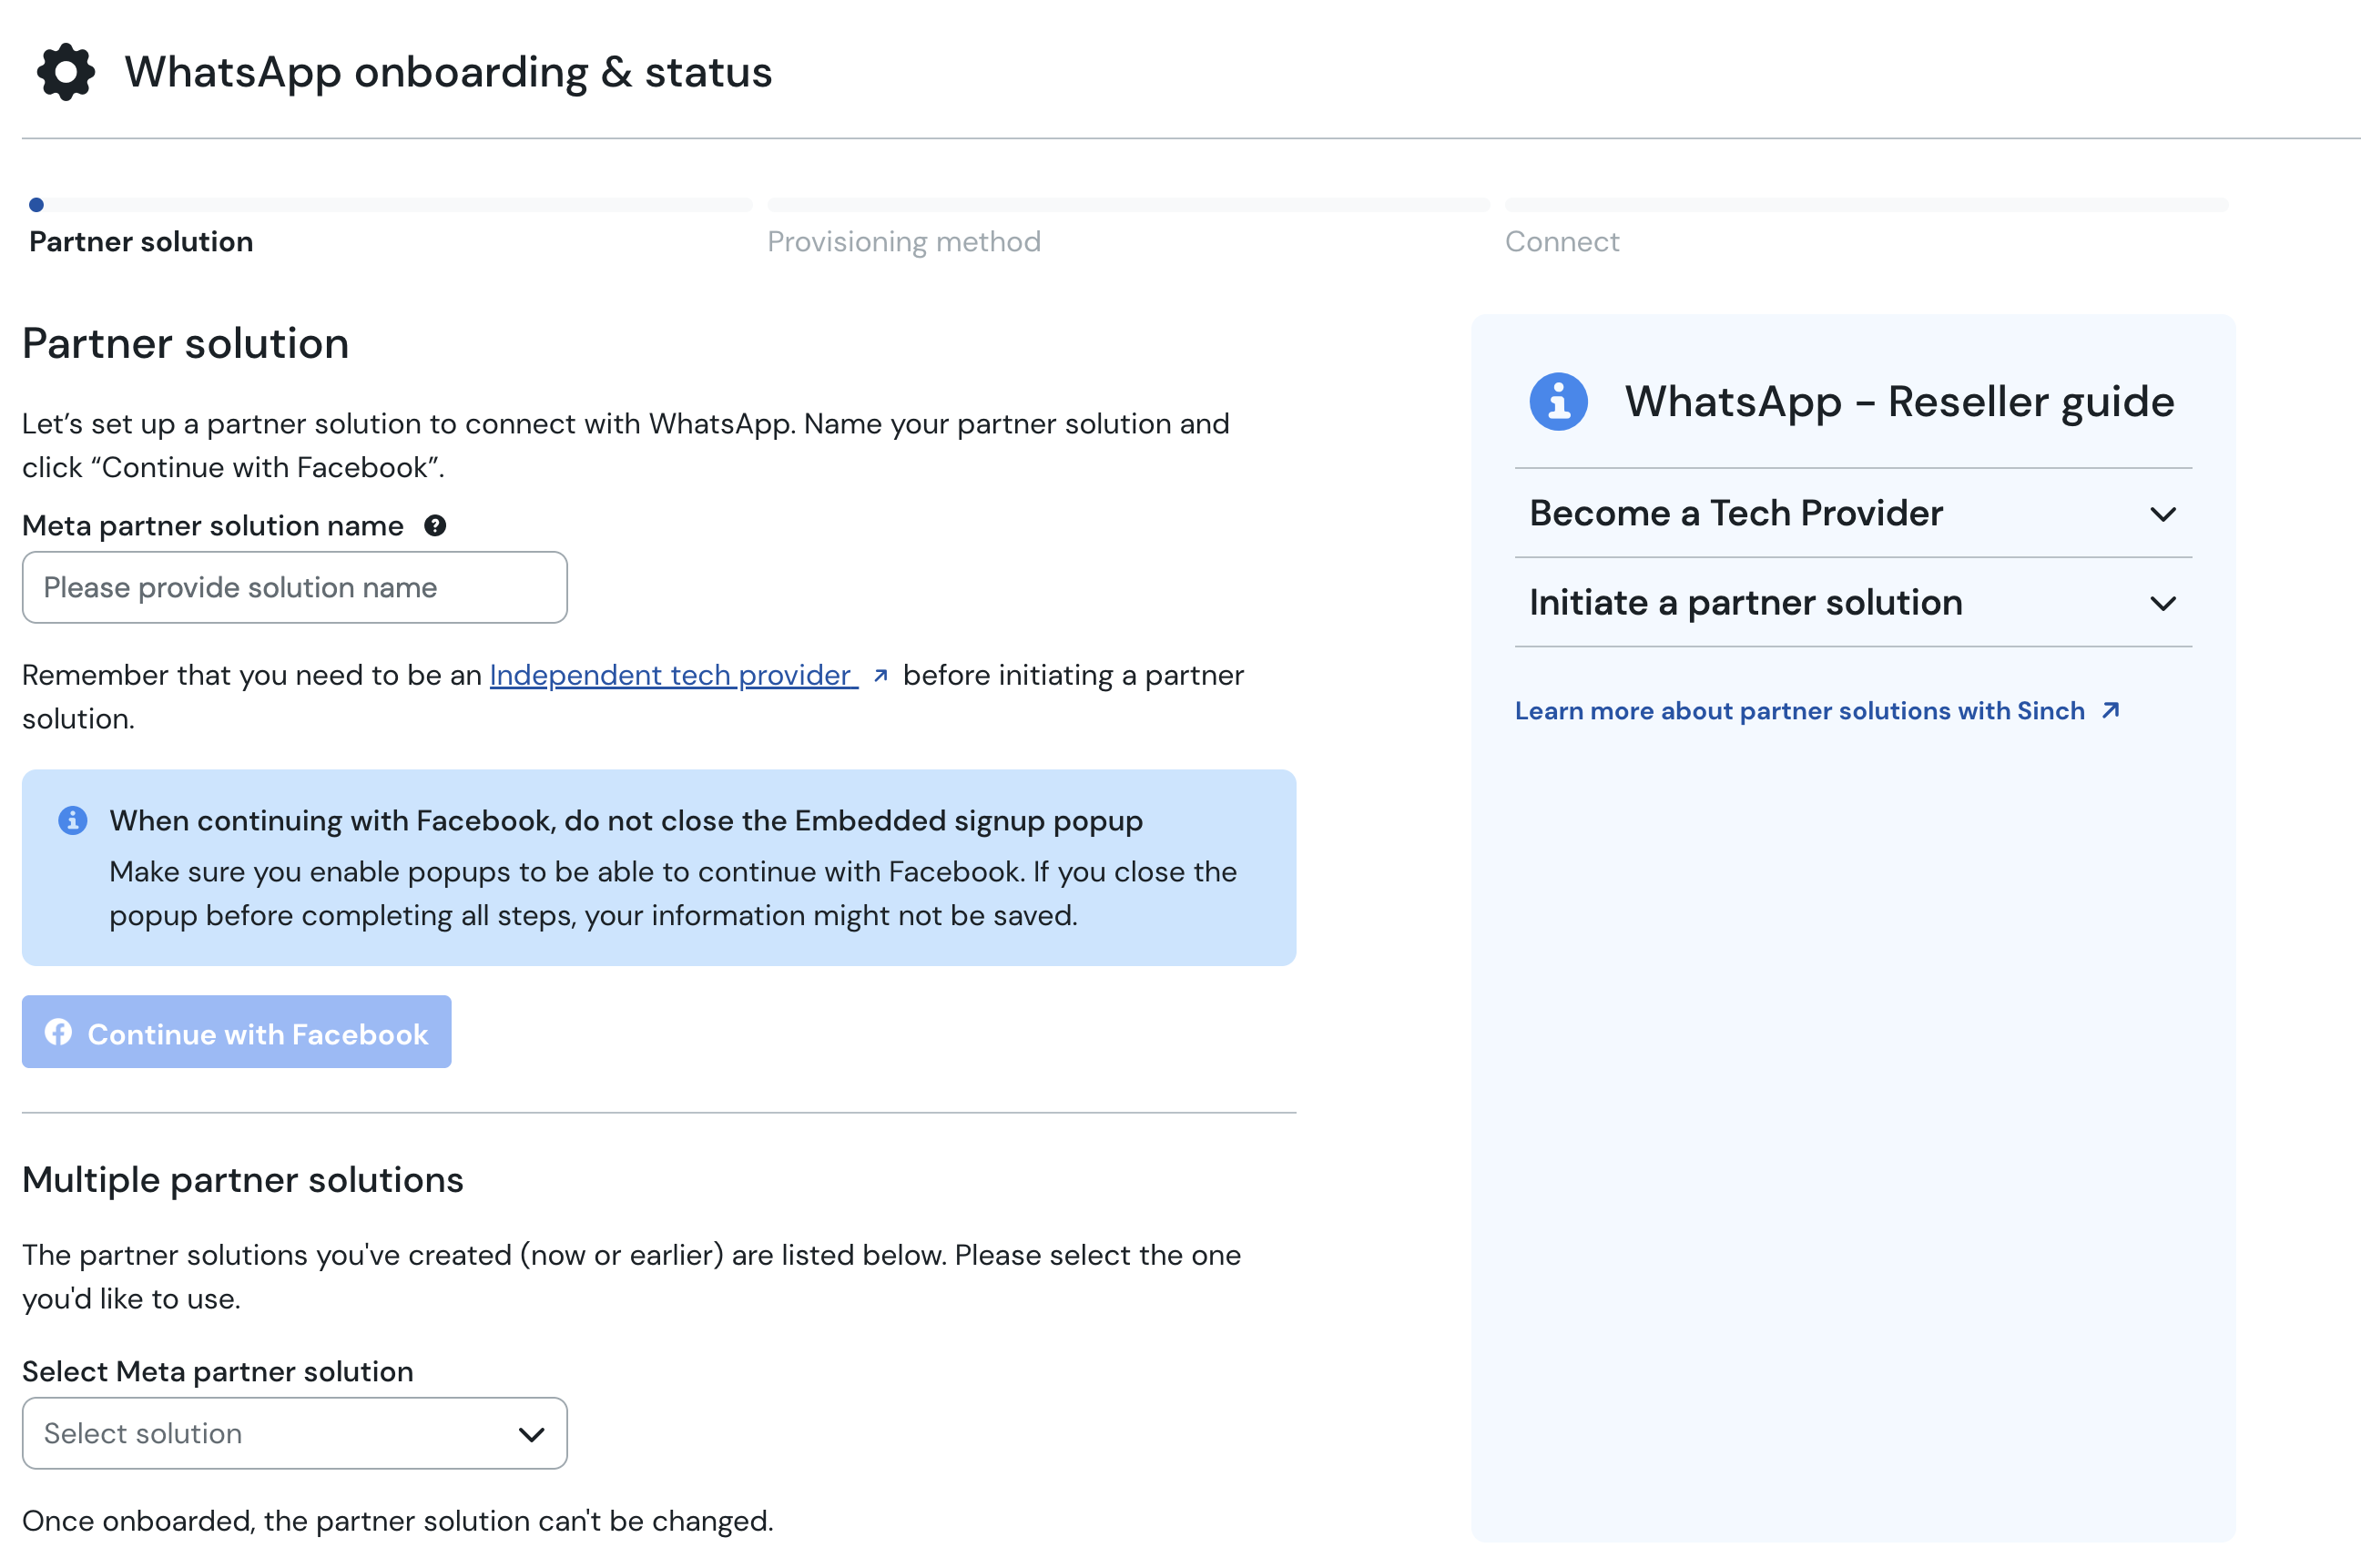
If you have not yet set up a partner solution, enter a meaningful name in the Meta solution partner name field. Then, click Continue with Facebook.
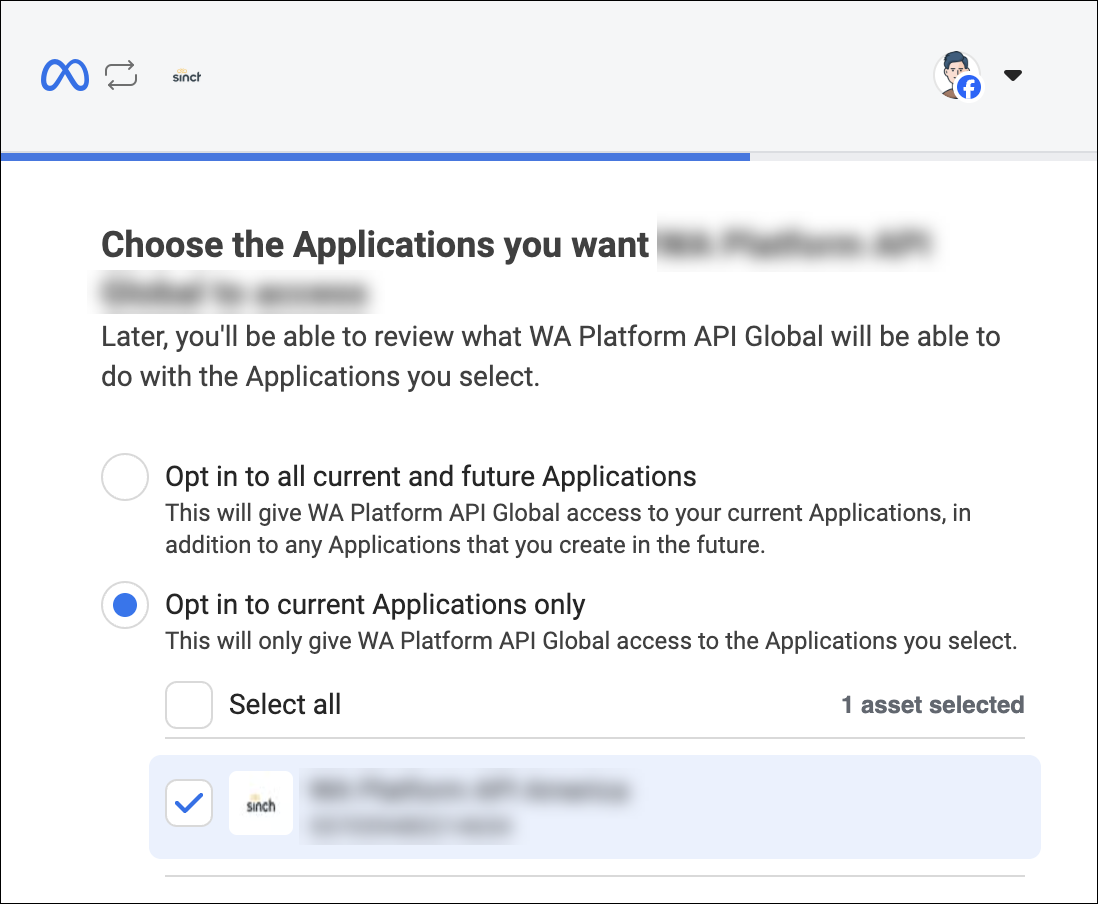
Complete the Meta Embedded Signup Solution creation flow and select the Meta app you and your customers will use to onboard end-clients to WhatsApp (this will be the Meta App you created while following our guide on becoming a Tech Provider).
 Note:
Note:It must be the same app you will use to launch the Embedded Signup flow for your end customers.
If you have already set up a partner solution to use, you may select the partner solution from the Select Meta partner solution drop-down list.
You must now choose one of the following options:
Continue onboarding via the Sinch Build Dashboard. You can do so using the Partner-initiated method, in which you will gather information from the customer and submit it to Meta on your customer's behalf.
Build your own onboarding experience using the
solution_idyou created in the last section. This option should be completed by users with solid technical skills and experience in adding features to websites/applications.
- This process is technical in nature and requires coding skills and a general knowledge of WhatsApps tools and systems. This option should be completed by users with solid technical skills and experience in adding features to websites/applications. For a fee, you may contract Sinch Professional Services for assistance.
- This section includes instructions and code snippets provided for and by a third-party. Third-party tools, software, and documentation are subject to change at any time. Refer to the linked documentation for the latest information from the third-party source.
This section applies only if you want to build your own onboarding experience. If you plan to invite your customer to complete the onboarding process using the Sinch Build Dashboard, you can skip this process.
This section includes images of third-party tools. Third-party tools, software, and documentation are subject to change at any time. Refer to the third-party's documentation for the latest information on these tools.
Prior to adding any custom code to your sites or apps, you must ensure your Meta app (that is, the Meta App you created while following our guide on becoming a Tech Provider) is configured to support Embedded Signup.
If you haven't done so already, complete the following steps:
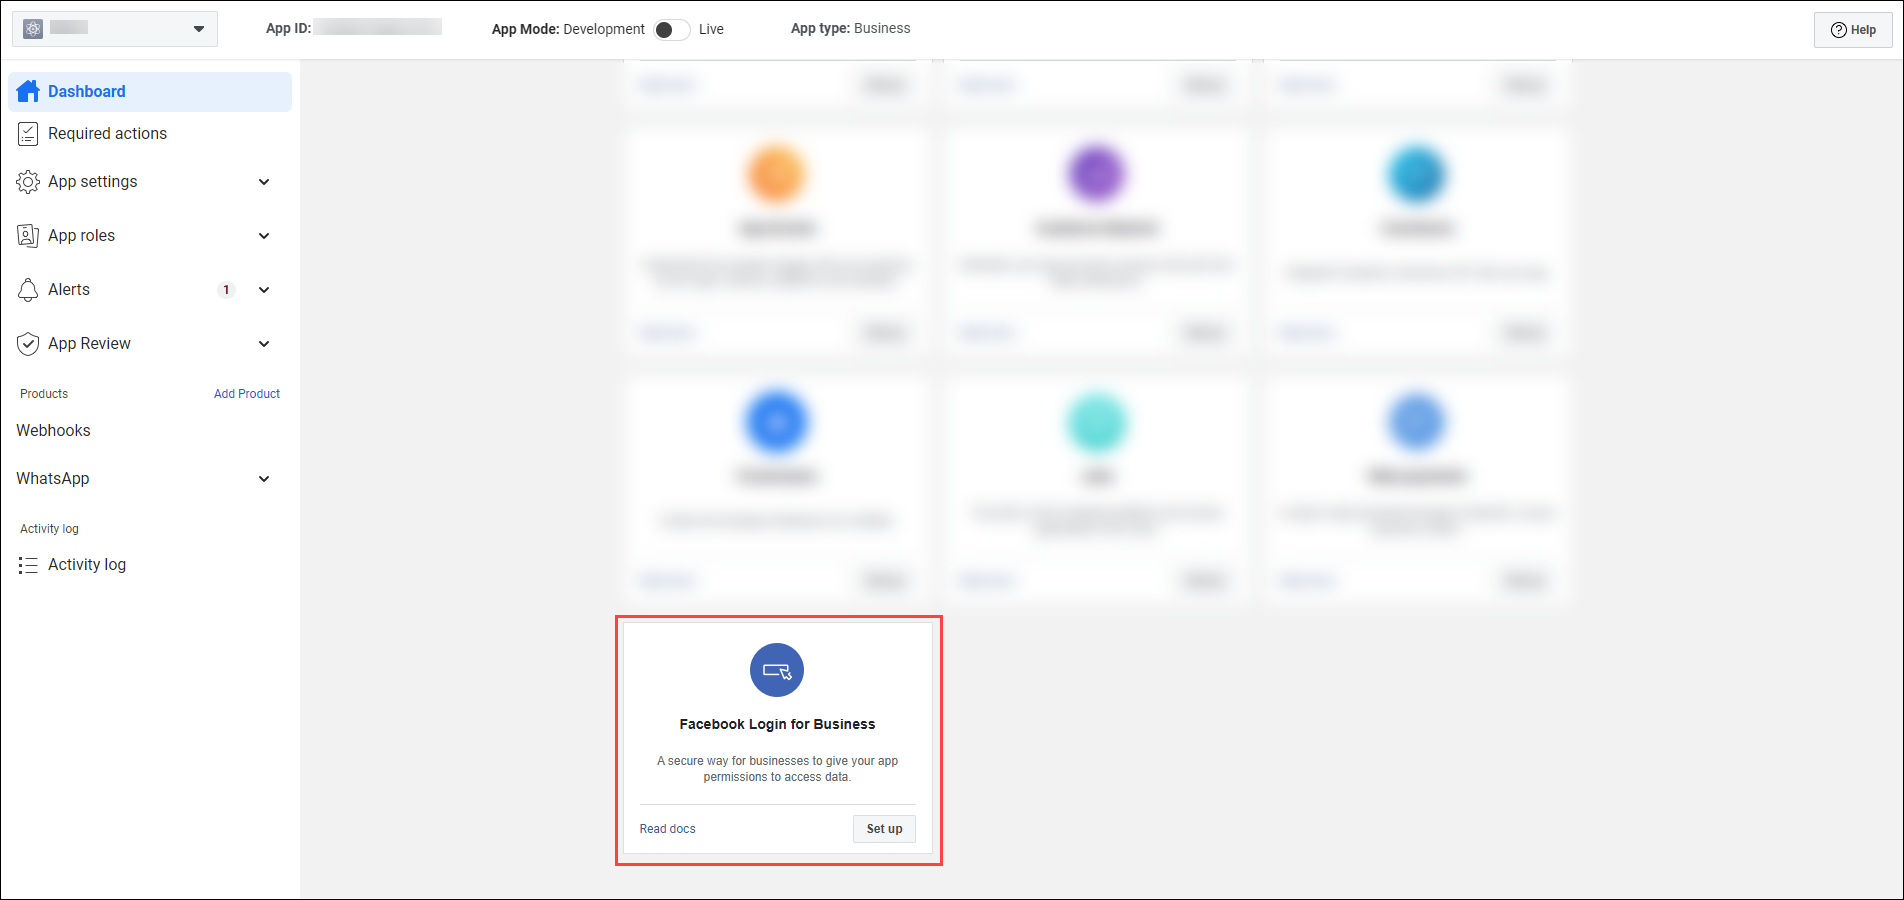
Visit the Meta App Dashboard and select your app.
Add Facebook Login for Business if it isn’t already enabled.
In the left menu, select Configurations and click Create from template.
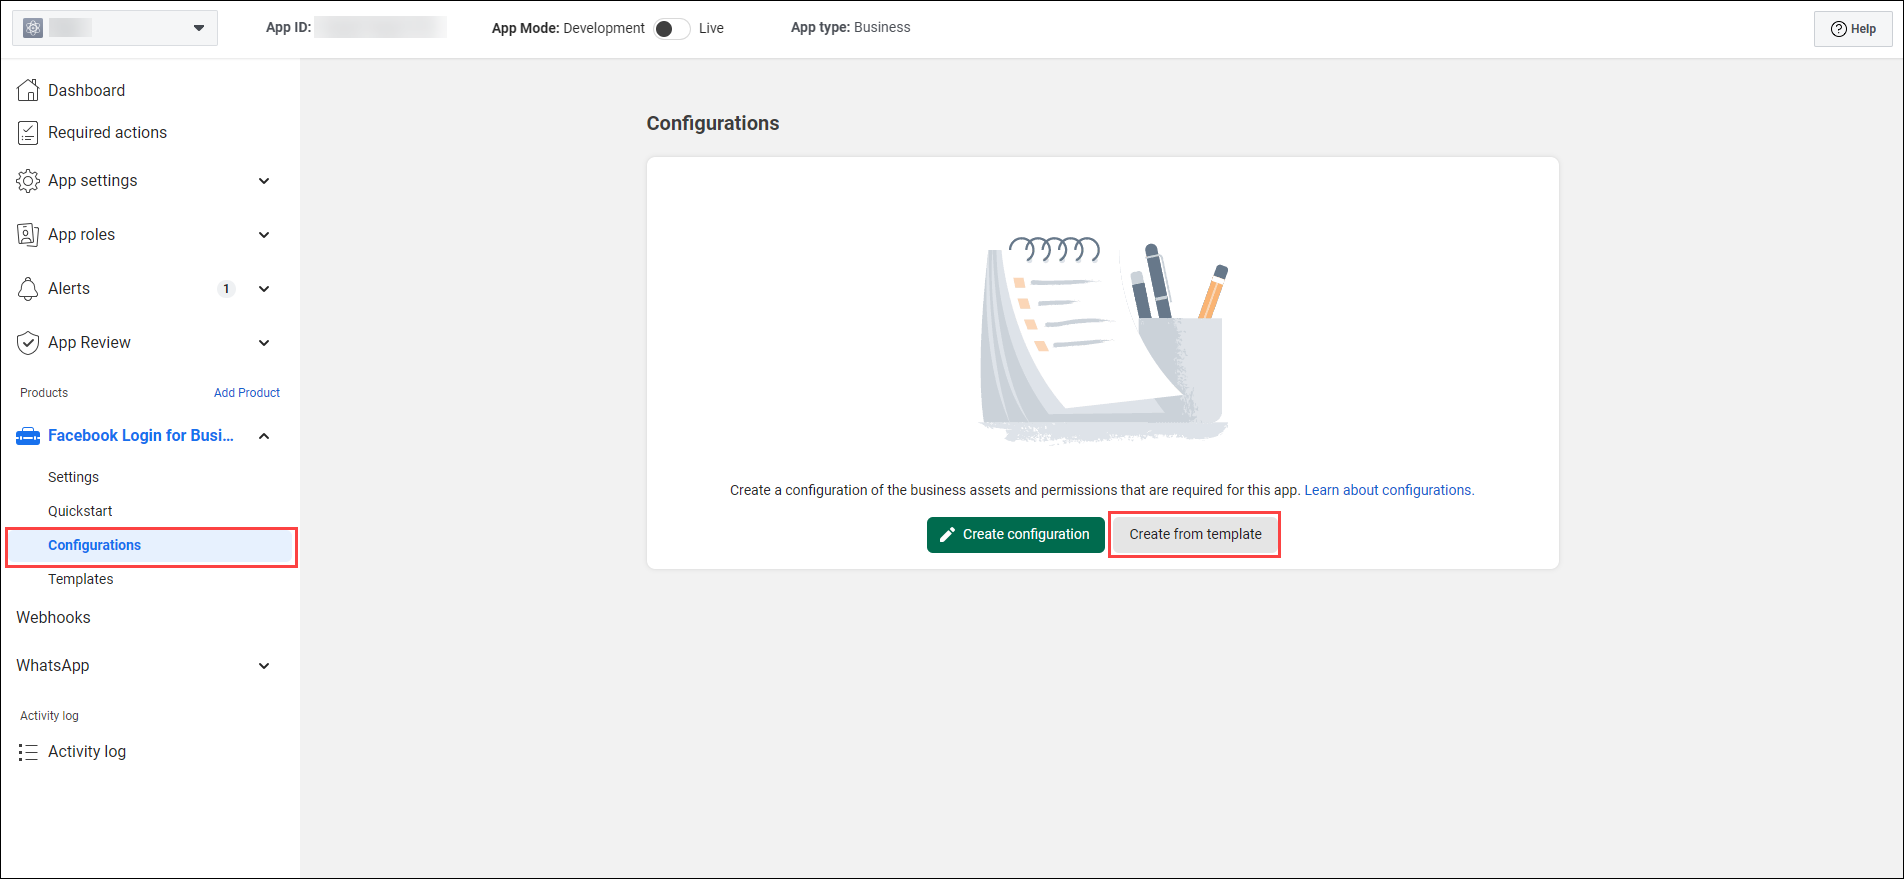
Choose WhatsApp Embedded Signup Configuration With 60 Expiration Token.
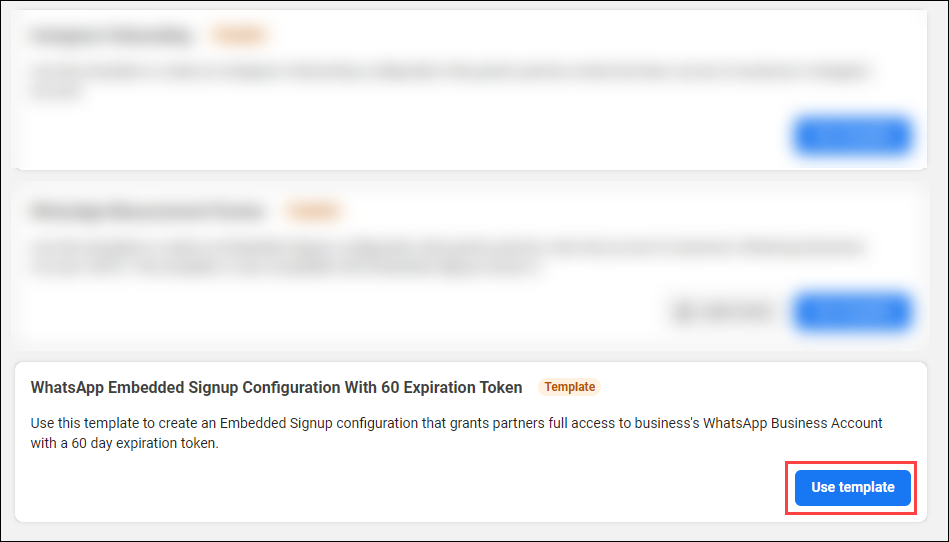
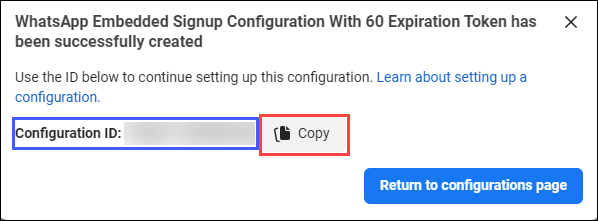
Note the generated Configuration ID. you’ll need it in your frontend code.
After creating the configuration, we recommend that you edit the configuration allow Marketing Messages Lite. Navigate to the Configurations tab and Edit the configuration:

Proceed through the wizard and select WhatsApp Cloud API and Marketing Messages Lite API when you reach the Products step.
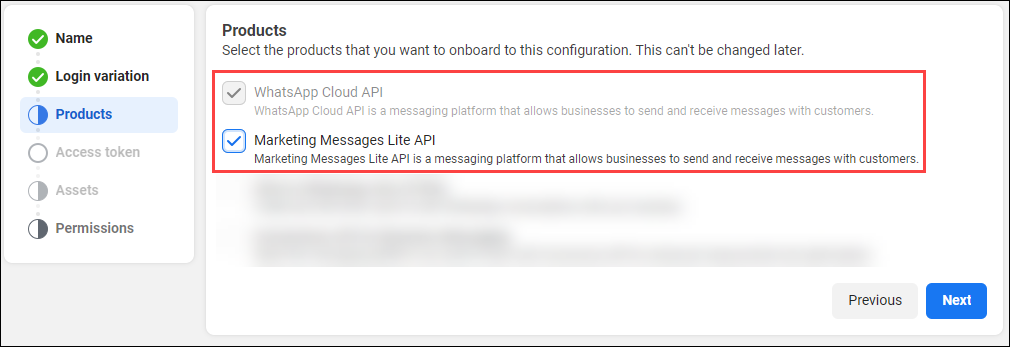
Complete the wizard and save your selections
Navigate to the Settings tab and set your Valid OAuth Redirect URIs to your HTTPS redirect endpoint. In Allowed Domains for the JavaScript SDK, add the domain of the page hosting your Embedded Signup flow.
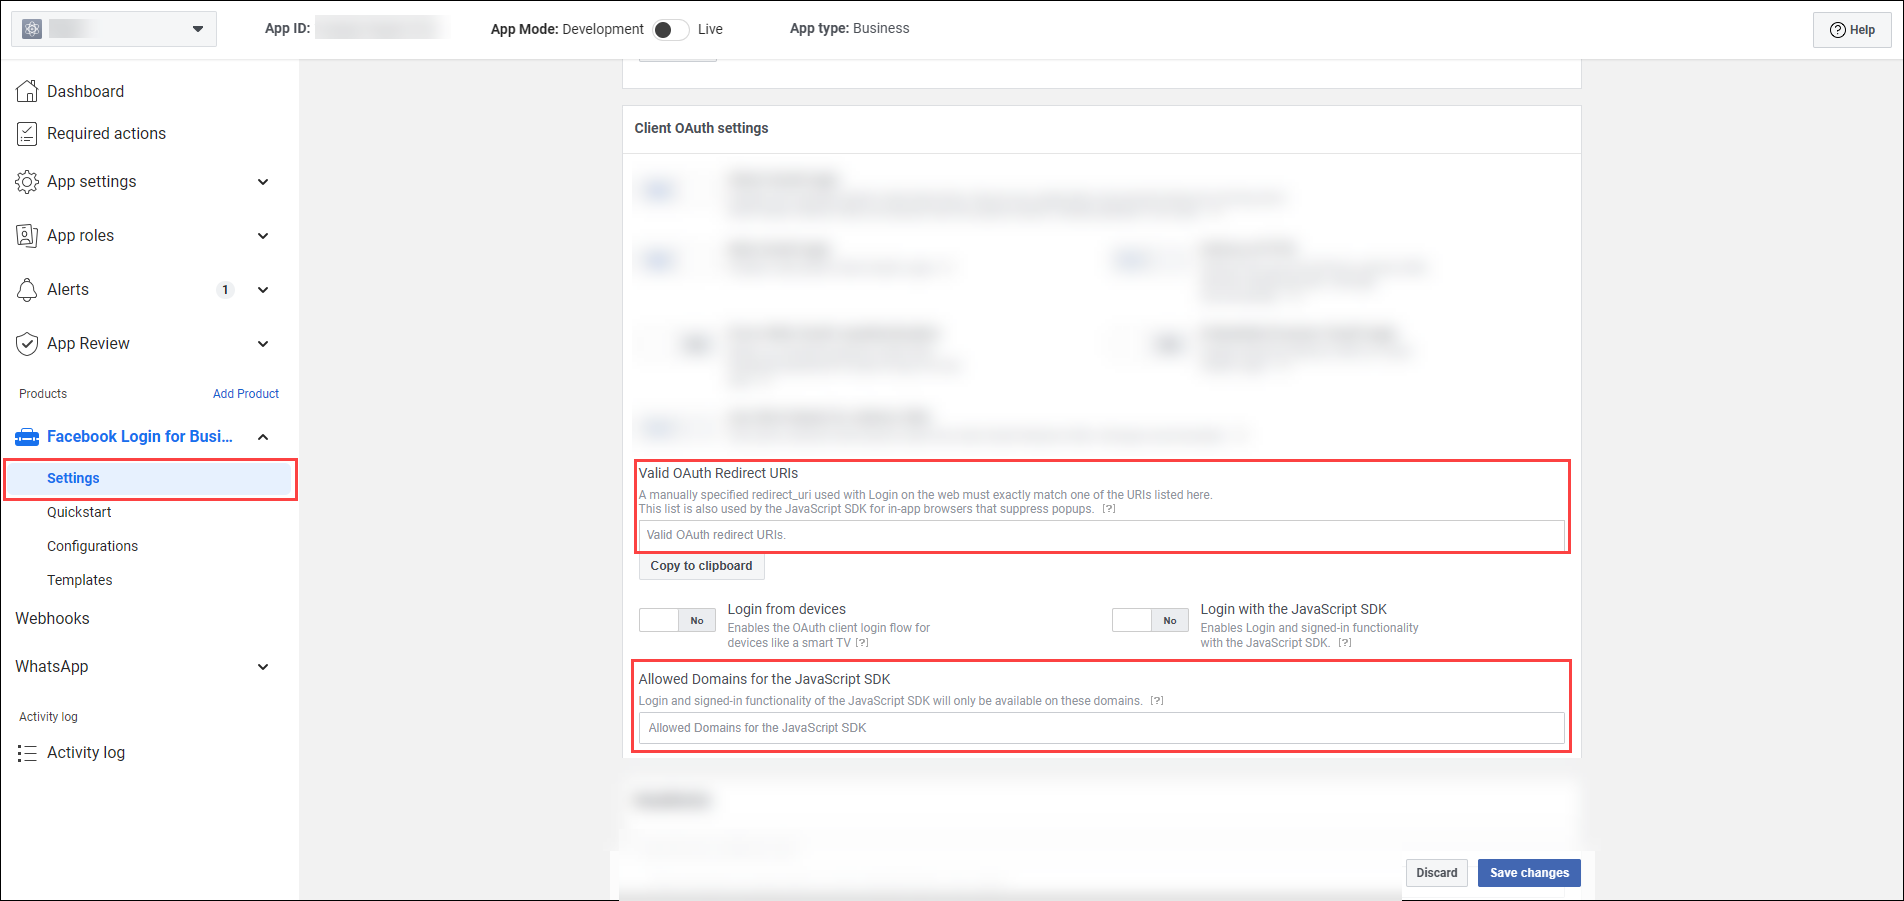
Click Save changes
This section includes third-party code snippets. Third-party tools, software, and documentation are subject to change at any time. Refer to the linked documentation for the latest information from the third-party source.
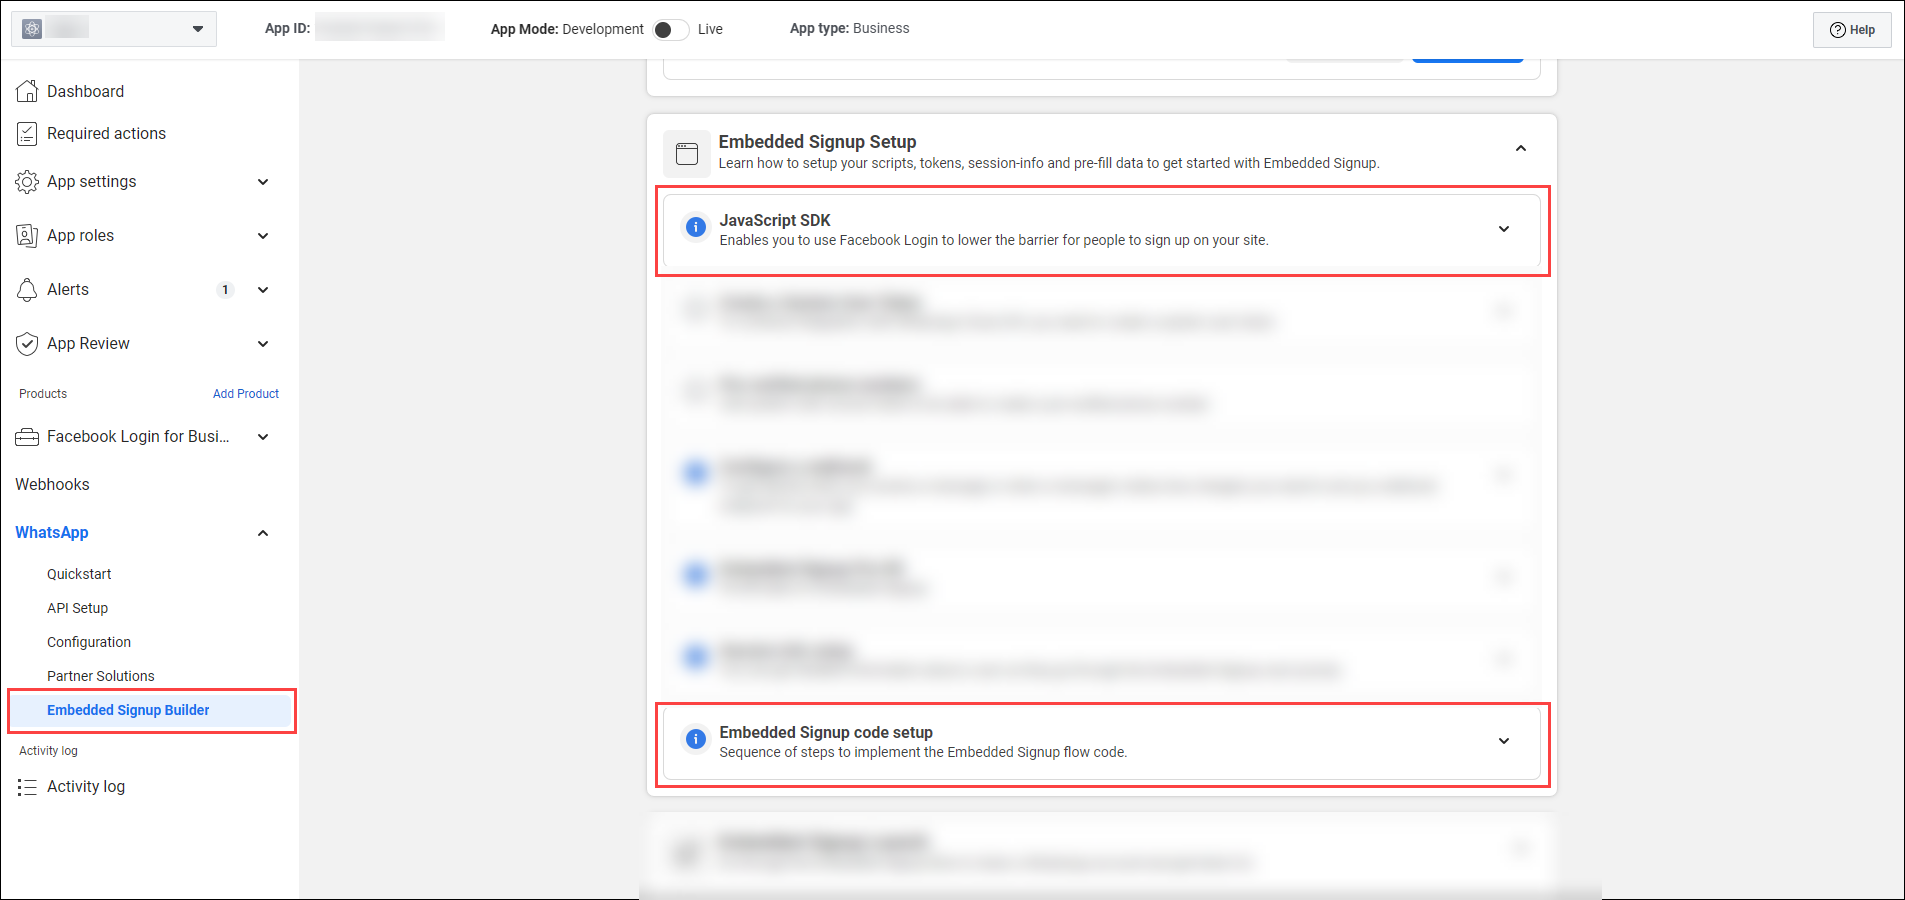
You can get the latest code snippet from the Embedded Signup Builder in the WhatsApp section of the Meta App Dashboard:
Navigate to the WhatsApp tab.
Click Embedded Signup Builder
Navigate to the Embedded Signup Setup. There, you can use the JavaScript SDK and Embedded Signup code setup sections to help you customize your code:
Alternatively, refer to Meta documentation and follow Meta’s steps up to the After Business Completes Signup Flow section.
We provide a brief summary of the relevant steps below:
Load the Facebook JavaScript SDK.
<!-- SDK loading -->
<script async defer crossorigin="anonymous" src="https://connect.facebook.net/en_US/sdk.js"></script>
<script>
  window.fbAsyncInit = function () {
    // JavaScript SDK configuration and setup
    FB.init({
      appId:    'facebook-app-id', // your Meta App ID
      cookie:   true, // enable cookies
      xfbml:    true, // parse social plugins on this page
      version:  'v23.0' //Graph API version
    });
  };
</script>
Define function starting FB.login flow. Make sure the following are included:
- The response callback function
- The
config_idparameter, which is the Configuration ID recorded in the last section - The
solution_idparameter, whch is available on the Sinch Build Dashboard. - The extras object with the setup parameter for any prefilled form data Meta documentation.
// Response callback
const fbLoginCallback = (response) => {
    if (response.authResponse) {
        console.log('login response with authResponse: ', response); // remove after testing
        // your code goes here
    } else {
        console.log('login response', response); // remove after testing
        // your code goes here
    }
}

// Launch method and callback registration
const launchWhatsAppSignup = () => {
    FB.login(fbLoginCallback, {
        config_id: 'YOUR_config_ID', // your configuration ID goes here
        response_type: 'code',
        override_default_response_type: true,
        extras: {
            setup: {solutionID:'YOUR_solution_ID'}, // this is visible on the Sinch Build Dashboard
            featureType: '',
            sessionInfoVersion: '3'
        }
    })
}
Create a Login Button
<button onclick="launchWhatsAppSignup()"
  style="background-color:#1877f2;border:0;border-radius:4px;color:#fff;cursor:pointer;
        font-family:Helvetica,Arial,sans-serif;font-size:16px;font-weight:bold;
        height:40px;padding:0 24px;">
  Login with Facebook
</button>
Listen for completion events
// Session logging message event listener
window.addEventListener('message', (event) => {
  if (event.origin !== "https://www.facebook.com" && event.origin !== "https://web.facebook.com") return;
  try {
    const data = JSON.parse(event.data);
    if (data.type === 'WA_EMBEDDED_SIGNUP' && data.event === 'FINISH') {
      const { waba_id, phone_number_id, business_id } = data.data || {};
      // Send these values to your backend
      console.log('Embedded Signup completed:', { waba_id, phone_number_id, business_id });
    }
  } catch (err) {
    console.log('message event:', event.data);
  }
});
When a business customer successfully completes or abandons the flow, a message event and object will be sent to the window that spawned the flow.
The returned data object structure for successful flow completion will have the following format:
{
    "data": {
        "phone_number_id": "<CUSTOMER_BUSINESS_PHONE_NUMBER_ID>",
        "waba_id": "<CUSTOMER_WABA_ID>",
        "business_id": "<END_CUSTOMER_BUSINESS_ID>"
    },
    "type": "WA_EMBEDDED_SIGNUP",
        "event": "FINISH",
        "version": 3
}
The event field will indicate whether the customer completed the embedded signup process (i.e., a customer that completed the process entirely will have an event value of FINISH); see Meta’s documentation for more information on other values event can be set to. You may desire to modify your system’s behavior to account for users that only partially complete the flow.
When customers complete the flow, the waba_id and phone_number_id properties must be passed to your backend server to be used in the Provisioning API call(s) that will create a WhatsApp Sender for your customer.
Your frontend can also be used to collect additional customer information you need or wish to have. For example, your frontend UI should ask your customers what region they are located in/what region they’d like to have their data stored in (US, EU, or BR). This information will then be used during Conversation API app creation on your system’s backend.
Your frontend collects customer data; your backend calls Sinch APIs to:
- Create a new subproject to represent your customer
- Create new WhatsApp Senders
- Create a Conversation API app
- Configure webhooks for the newly created Conversation API app
Never call Sinch APIs directly from your frontend, and never store Sinch credentials in the frontend. All API calls and credentials must reside in your backend.
Your customer must never have access to your Sinch credentials. It is your responsibility to maintain the security of this information in your solution and integration.
Each of your customers must have a subproject contained within your parent project. This can be accomplished through an API call to the subprojects API.
- Placeholder Serverhttps://subproject.api.sinch.com/v1alpha1/projects/{parentProjectId}/subprojects
- curl
- JavaScript
- Node.js
- Python
- Java
- C#
- PHP
- Go
- Ruby
- R
- Payload
curl -i -X POST \
  https://subproject.api.sinch.com/v1alpha1/projects/dxxxxxba48b144xxxxx184b81e4xxxxx/subprojects \
  -H 'Authorization: Bearer <YOUR_TOKEN_HERE>' \
  -H 'Content-Type: application/json' \
  -d '{
    "displayName": "YOUR_customer'\''s_business_name",
    "labels": {
      "YOUR_key1": "YOUR_value1",
      "YOUR_key2": "YOUR_value2",
      "YOUR_key3": "YOUR_value3"
    }
  }'
Replace the {parentProjectId} variable with your parent project ID, which can be found on the Dashboard.
The displayName field is required. This value is how the subproject will be labelled in Sinch's system; it does not have to be exposed to your customer.
After making this call, record the subprojectId that’s returned in the response. You will use this as the identifying project ID in API calls for this customer.
Display name information is not included in the Sender creation call in this section. Your customers will provide display name information while completing the Embedded Sidnup process. Sinch will fetch that information and associate it with the Sender automatically
The Embedded Signup flow returns values for waba_id and phone_number_id. Send these values to your backend, which will invoke the Sinch Provisioning API to create a WhatsApp Sender. Note that:
- The field name for the WABA ID is
wabaId. - The field name for the phone number is
phoneNumberId. - The
{projectId}path variable must be set to your customer's subproject ID. - You may set
regionto the region you obtained from your frontend UI.
- Production serverhttps://provisioning.api.sinch.com/v1/projects/{projectId}/whatsapp/senders
- curl
- JavaScript
- Node.js
- Python
- Java
- C#
- PHP
- Go
- Ruby
- R
- Payload
curl -i -X POST \
  -u <username>:<password> \
  'https://provisioning.api.sinch.com/v1/projects/{projectId}/whatsapp/senders' \
  -H 'Authorization: Bearer <YOUR_TOKEN_HERE>' \
  -H 'Content-Type: application/json' \
  -d '{
    "region": "EU",
    "metaLocalStorage": "DE",
    "wabaId": "11111111111111",
    "phoneNumberId": "222222222222222",
    "authenticationCode": "123asdf123"
}'If you want your customers to be able to add phone numbers to already onboarded WABAs, the API call above can also be used. Instead of retrieving information from the ES flow, simply set wabaId to the existing WABA ID and set phoneNumberId to the phone number to be added to the WABA.
After making htis call, record the id and bearerToken values included in the response. You'll need these when you create a Conversation API app in the next section.
Create a Conversation API app and include the Sender(s) you created in the previous step.
- Use the customer’s subproject ID (not your parent project) in the endpoint path parameter often referred to as
{project_id}. - Include the region (
us,eu, orbr) collected from the fronted of your system as a variable in the endpoint of the call:https://{region}.conversation.api.sinch.com/v1/projects/{project_id}/apps display_nameandchannel_credentialsare required.- Inside
channel_credentials: channel:WHATSAPPstatic_bearer.claimed_identity: the WhatsApp Sender ID obtained in the last section.static_bearer.token: the bearer token for that Sender (obtained in the last section)
- The {region} variable must be set to us, eu, or br, and it must match the region in which you created your Conversation API app.https://us.conversation.api.sinch.com/v1/projects/{project_id}/apps
- curl
- JavaScript
- Node.js
- Python
- Java
- C#
- PHP
- Go
- Ruby
- R
- Payload
curl -i -X POST \
  -u <username>:<password> \
  'https://us.conversation.api.sinch.com/v1/projects/{project_id}/apps' \
  -H 'Content-Type: application/json' \
  -d '{
    "channel_credentials": [
      {
        "channel": "WHATSAPP",
        "static_bearer": {
          "claimed_identity": "{WhatsApp_Sender_ID}",
          "token": "{WhatsApp_Bearer_Token}"
        }
      }
    ],
    "display_name": "Demo WhatsApp App"
  }'
The app's ID is included in the id this call returns. This value must be recorded and used in future API calls.
The Conversation API app (created in the last section) needs to be configured to receive messages. To do so, make a call to the webhooks endpoint:
- Use the customer’s subproject ID (not your parent project) in the endpoint path parameter
{project_id}. - The
targetis required. This is the URL you’ve configured to receive Conversation API events. - Set the
app_idto the app ID recorded in the last section. - Ensure the
MESSAGE_DELIVERYandMESSAGE_INBOUNDtriggers are included in the triggers array.
Method: Post
Endpoint: https://{region}.conversation.api.sinch.com /v1/projects/{project_id}/webhooks
Payload:
{
"app_id": "string",
"target": "string",
"target_type": "DISMISS",
"triggers": [
   "MESSAGE_DELIVERY",
   "MESSAGE_INBOUND"
]
}
Testing your onboarding flow is a great way to ensure that your frontend system is collecting the appropriate information, your code to connect to Meta’s embedded signup process is functioning properly, and your backend is making the correct calls to Sinch’s APIs.
To test this process, you must use a Facebook account/ID that is not already associated with your business portfolio. If you attempt to use a Facebook ID associated with the business portfolio that is now the Tech Provider in the Tech Provider/Solution Partner relationship with Sinch, you will be unable to complete Meta’s embedded signup process.
You can optionally allow customers to create and preview WhatsApp templates in your own UI, or use the Sinch Build Dashboard to create templates on their behalf.
See: Create a template in project
After successful onboarding, explore the Conversation API reference to learn how to send and receive messages, manage conversations, and more.

